So here we go…the final phase of enabling vCenter HA in our vSphere 6.5 environment. To quickly recap what we have done thus far. We have deployed our two external PSC appliances, configured the certificates as well as the load balancer to service them. In the previous step (Part 4) we deployed vCenter Server and now we will enable the vCenter HA feature which is a NEW feature in vSphere 6.5.
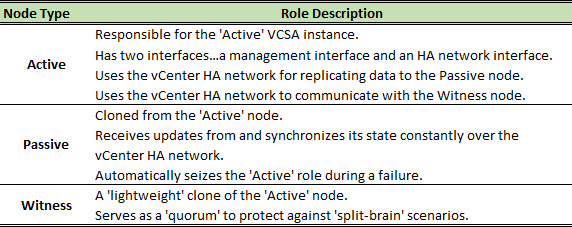
There will be a total of three (3) nodes in this configuration…Active, Passive and Witness. Each has a particular role.
Configure the vCenter HA Network
No matter which deployment workflow you intend on using (Basic or Advanced) to enable vCenter HA, a network must be created on your virtual switch. I am using a virtual distributed switch (vDS) in my environment; therefore I have created a distributed port group on my vDS (vCenter-HA-Network).
This vCenter HA network is a separate network segment from my main management network segement. The addresses that I am configuring must be static addresses. Here is a quick summary of the networks that I have…
- vSphere Management (vCenter, PSC, NLB and ESXi Management) – 192.168.80.0 /24
- IP Storage (iSCSI) – 192.168.81.0 /24
- vMotion – 192.168.82.0 /24
- vCenter HA – 192.168.83.0 /24
My vCenter HA Network segment is going to be on the 192.168.83.0 /24 network segment. Completely separate from my primary vSphere Management network. This network must have less than 10ms of latency.
First line of business for the Advanced Workflow is we have to manually add a second NIC to the vCenter Server appliance and connect it to the vCenter HA network. From vSphere Web Client I am going to edit the virtual hardware of the vCenter Server appliance. Simply add the new network adapter and connect it to the vCenter-HA-Network (vDS port group) as you can see below.

Once the adapter has been added to the configuration you must then configure a static IP address on the adapter. By default the adapter will appear as DOWN. Applying the static IP settings can be accomplished in one of two ways.
Option 1 – Through the vSphere Web Client navigate to Administration > System Configuration > Nodes and in the list of nodes select the FQDN of your vCenter Server appliance. Click the Manage tab and under Common select Networking. Under networking you should see two NICs (nic0 and nic1). Click the Edit button in the upper right-hand corner, expand the nic1 option and then select Use the following IPv4 settings and enter the static IPv4 address information.

Option 2 – Open a web browser and access the Management Web UI of the vCenter Server appliance (https://<vcenter-fqdn>:5480/). Log into the web interface using the ‘root’ credentials that you specified during the installation of the appliance. In the Navigator column on the left-hand side of the screen select Networking and then select Manage. Beneath the Networking Interfaces section you should see two NICs (nic0 and nic1). Click the Edit button to the right. Expand nic1 and then select Use the following IPv4 settings and enter the static IPv4 information.

The status of the new interface should indicate UP within the web browser. Open a command prompt from you local system and PING the address to verify that the system is responding.
vCenter HA Advanced Configuration
Okay now it is time to go through the vCenter HA Advanced Configuration Workflow. During this procedure we will configure the vCenter HA network for the Passive and Witness nodes, clone the vCenter appliance onto differenti ESXi hosts and then finalize the vCenter HA configuration. Do not clone the vCenter appliance and place the Passive and Witness nodes to the same host, that defeats the whole purpose of vCenter HA.
- Log into the vSphere Web Client. Select Hosts and Clusters and then select the name of your vCenter Server (FQDN) at the top of the hierarchy. Select the Configure tab and then select vCenter HA. Click the Configure button.

- The Configure vCenter HA wizard will appear. Select Advanced and then click Next.

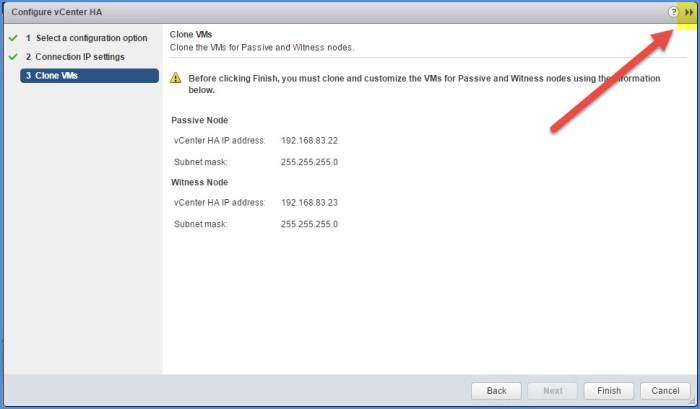
- On the Connection IP Settings page enter the static IP address and Subnet mask for the Passive Node and the Witness Node from the vCenter HA network subnet range. My range is the 192.168.83.0 /24 network. My vCenter Server (active) node is already configured with 192.168.83.21 /24. I want to remain in sequence so I am going to assign 192.168.83.22 /24 to my Passive Node and then assign 192.168.83.23 /24 to my Witness Node. Click Next. (Notice the warning on this page).

- Once everything is validated it will then proceed to the Clone VMs portion of the wizard. Click the >> in the upper right-hand corner of the wizard and pause here. DO NOT CLICK FINISH.
- Right-click the vCenter Server VM in the virtual machine inventory and clone the VM…Clone > Clone to Virtual Machine.

- In the clone wizard enter a VM name for the ‘passive node’. I’m using vcsa-01a_peer for my passive vCenter VM. Click Next.
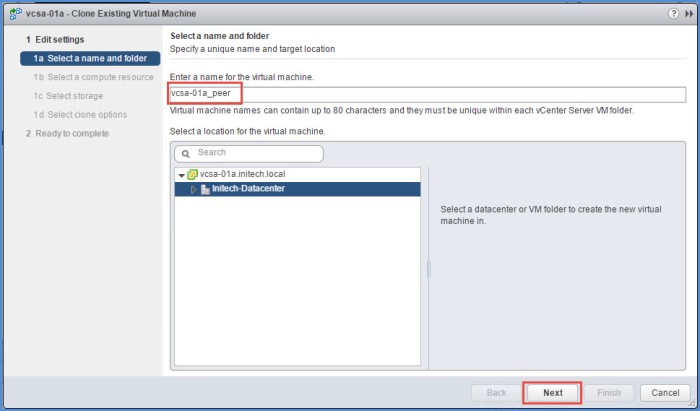
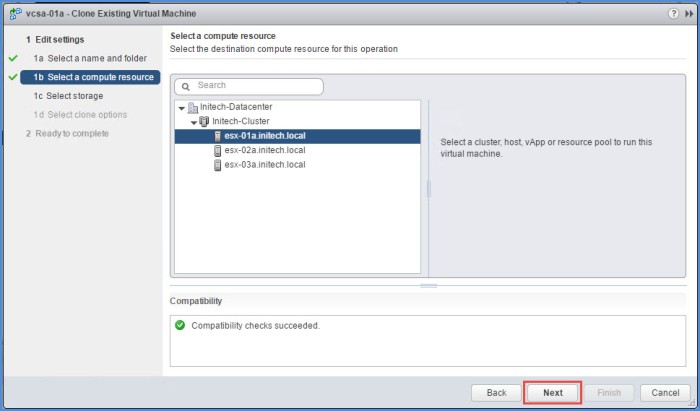
- In the ‘Select a compute resource’ window choose a different ESXi host from where your Active vCenter Server is running and click Next.

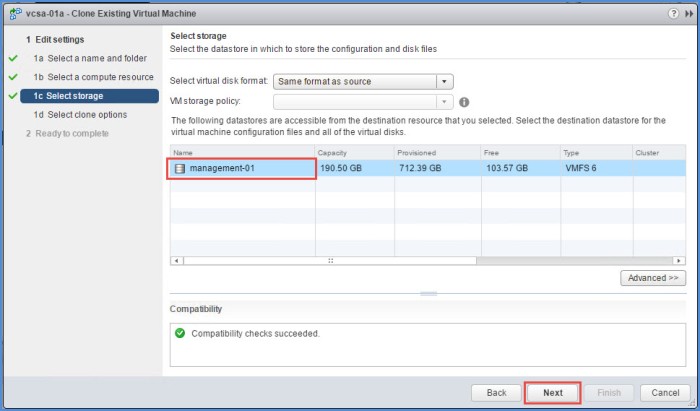
- On the ‘Select storage’ page select a datastore and click Next. I only have one datastore in my lab so my choice here is limited. In a real world deployment you most likely will place your Passive Node (and Witness Node) on a separate datastore.

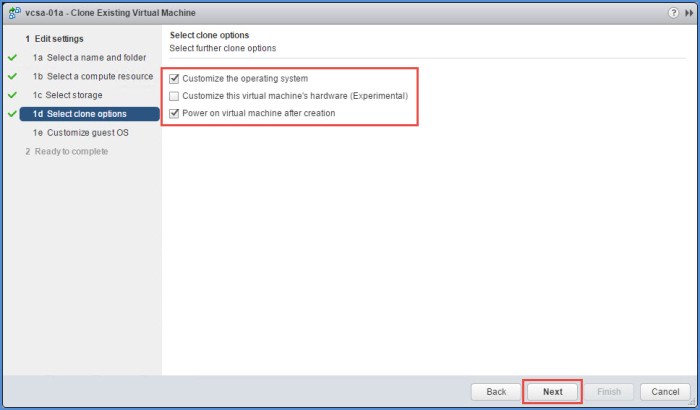
- On the ‘Select clone options’ page select the options for Customize the operating system and Power on virtual machine after creation and click Next.
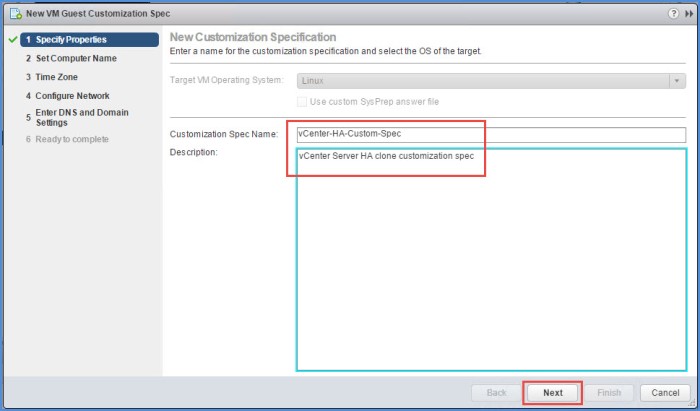
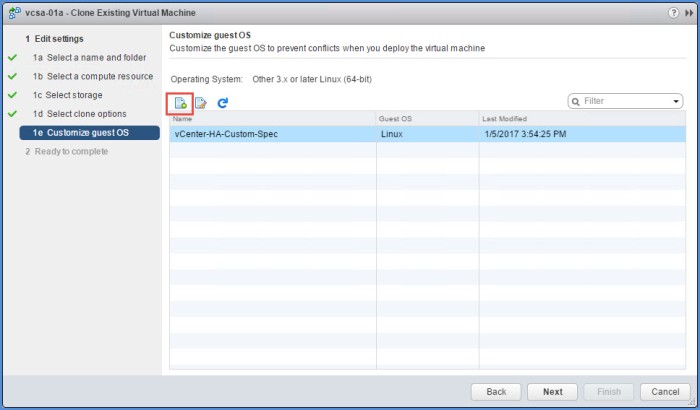
- Select the New Customization Spec button and a new wizard will appear.

- On the ‘Specify Properties’ page of the Guest Customization Spec wizard, provide a name for the specification and click Next.
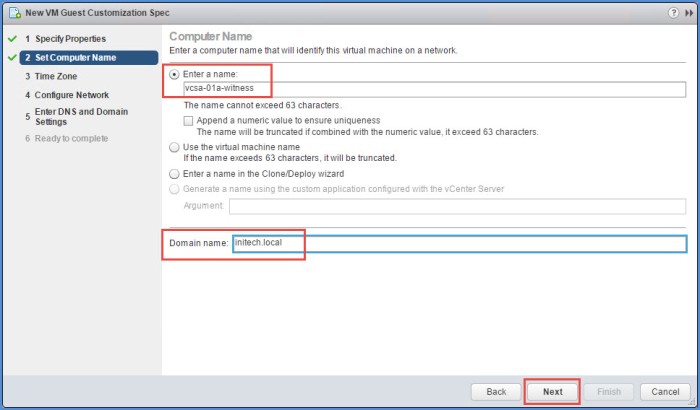
- On the ‘Set Computer Name’ page enter the same exact name as the ‘Active’ node to be used on the ‘Passive’ node. Enter the domain name below. Click Next.

- On the ‘Time Zone’ page select the Area, Location and Hardware Clock Setting and click Next. Use the identical time zone settings that you currently use on your vCenter Server Appliance. If you do not remember, log into the vCenter Server Management UI (the Port 5480 URL) and to verify.

- On the ‘Configure Network’ page, select NIC1 and then select the pencil to Edit.

- In the ‘Edit Network’ window select Use the following IP settings and enter the same exact IP address being used by the Primary vCenter Server. Do not forget to enter a default gateway. Click OK.
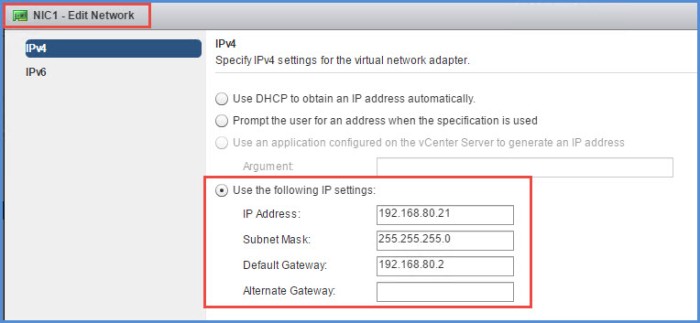
- Select NIC2 and click Edit. Here we will enter the static IP address settings for the vCenter HA network. Enter the IP address for the Passive Node (reference Step 3 above if you do not remember). Do NOT enter a default gateway on this interface.

- Return to the ‘Configure Network’ page and verify your IP settings. Click Next.

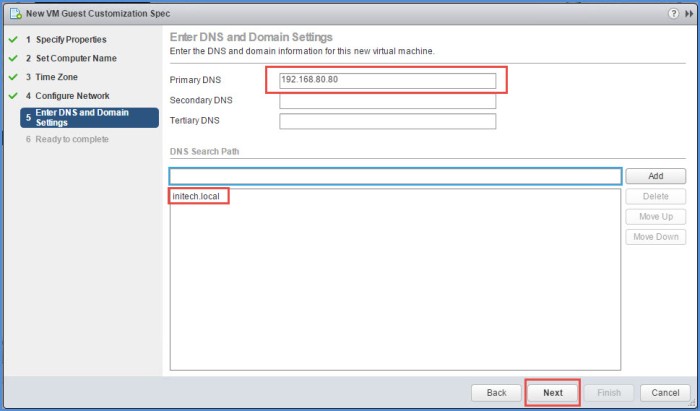
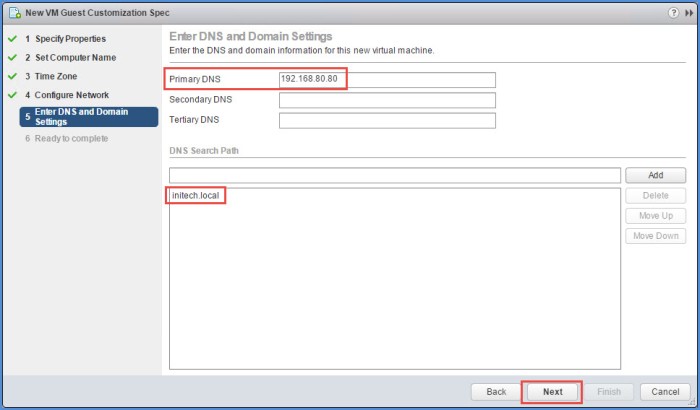
- On the ‘Enter DNS and Domain Settings’ page enter the IP settings for the Primary DNS (Secondary and Tertiary DNS if necessary), enter the DNS domain name and click Add. Click Next when you are ready to proceed. Click Finish on the next page and you will return to the original wizard where we were cloning the VM.
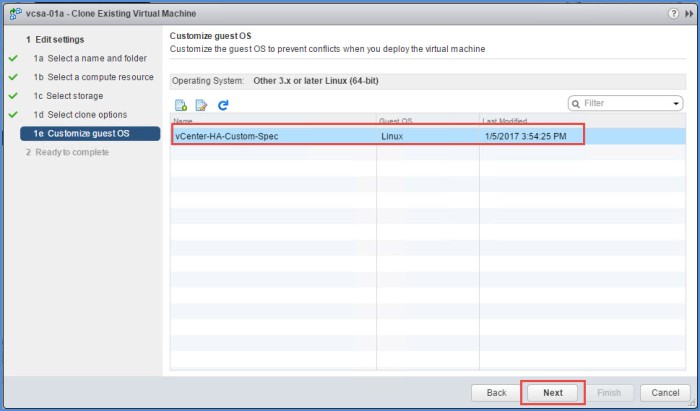
- You will return to the ‘Customize guest OS’ page. Select the customization that was just created and click Next.
- Review the information on the ‘Ready to complete’ page and click Finish.

- The clone process will begin. Allow it to finish and wait for the VM to power on. Once it is complete, right-click the ‘Active Node’ vCenter Server and begin the clone procedure again but this time for the ‘Witness Node’. Enter a name for the VM as it will appear in the VM inventory and click Next.

- On the ‘Select a compute resource’ page choose a different ESXi host and click Next.
- On the ‘Select storage’ page choose a datastore and click Next.
- On the ‘Select clone options’ page select Customize the operating system and Power on virtual machine after creation and then click Next.

- We are going to create another Guest Customization. Click the Create button to begin a new customization.
- Provide a name for the Witness appliances guest customization. Click Next.

- On the ‘Set Computer Name’ page enter a name for the ‘Witness Node’ appliance and then enter the domain name. Click Next.
- On the ‘Time Zone’ page enter the correct time zone parameters just as we did with the ‘Passive Node’ appliance and click Next.

- On the ‘Configure Network’ page select NIC2 and click Edit.

- In the ‘Edit Network’ window for NIC2 select Use the following IP settings and enter the IP address settings for the ‘Witness Node’ for the vCenter HA network. Do NOT enter a default gateway on this interface. Click OK.

- Repeat the steps to apply the IP address settings on NIC1. Enter the same IP address used on the ‘Active Node’ on NIC1. Return to the ‘Configure Network’ window and review the parameters. Click Next.

- On the ‘Enter DNS and Domain Settings’ page enter the Primary DNS (Secondary and Tertiary if necessary), enter the domain name and click Add. Click Next when you are ready to proceed.
- Review the information on the ‘Ready to complete’ page and click Finish. You will then return to the Clone wizard.

- Select the name of the new customization spec for the ‘Witness Node’ appliance and click Next.

- Review the information on the ‘Ready to complete’ page for cloning the VM and click Finish.

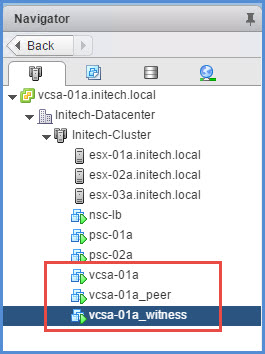
- The clone process will proceed, wait for it to complete and allow the VM to power on. Once this completes you will then see your three VMs listed in the VM inventory.
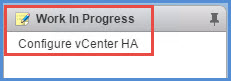
- Return to the Configure vCenter HA wizard where we left off in Step 4. You can find the wizard in the upper right-hand corner of your browser in the Work In Progress section.
NOTE: Prior to finalizing the configuration and returning to the vCenter HA wizard…’power off’ the Witness appliance and reconfigure the hardware to use 1 vCPU and 1 GB of RAM. The Basic Workflow performs this automatically for you so you must manually do this when using the Advanced Workflow. - The ‘Configure vCenter HA’ wizard will reappear where we left off on the ‘Clone VMs’ page. Review the information for the Passive and Witness nodes and click Finish.

- vCenter HA will proceed with being configured. You will see at the top of the screen a status that indicates vCenter HA is currently being configured. Monitor the Recent Tasks view for progress updates.

- Wait for the process to complete and once it completes it will indicate at the top that vCenter HA is Enabled and then replication between the Active and Passive nodes will take place. This warning message will eventually change.

- Once replication is complete you will then see the health status change and indicate All vCenter HA nodes are accessible and replication is enabled. Automatic failover protection is enabled. You will also notice all three nodes (Active, Passive and Witness) all have a status of UP and their vCenter HA address is listed. If you select each node you can review the ‘Active Settings’ for the node below.
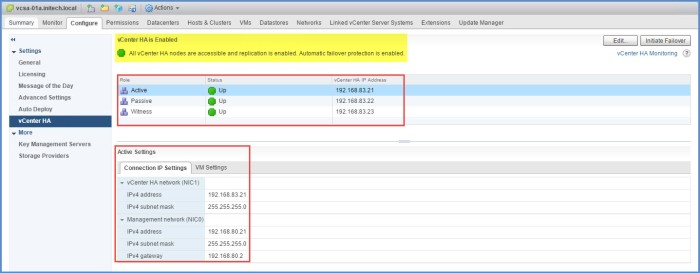
- In the upper right-hand corner beneath the ‘Edit’ and ‘Initiate Failover’ buttons is a link for vCenter HA Monitoring. Select the link and you will be redirected to the Monitor > vCenter HA tab for the vCenter Server. Click the ‘vCenter HA Settings’ link to return to Configure > vCenter HA.

- In the event that Maintenance needs to be performed; from the Configure > vCenter HA page click the Edit button in the upper right-hand corner.

- There are four (4) options available. The ‘Enabled HA’ is greyed out because vCenter HA is currently enabled. I did not highlight it here so you can visually see that it is greyed out. The ‘Maintenance Mode’ option allows replication to continue but disables automatic failover thus allowing the Active node to continue to run normally regardless of the state of the Passive or Witness nodes. The ‘Disable HA’ option completely disables replication and automatic failover but the configuration is preserved. The ‘Remove vCenter HA’ option completely removes the configuration with no disruption to the Active node. Click Cancel.

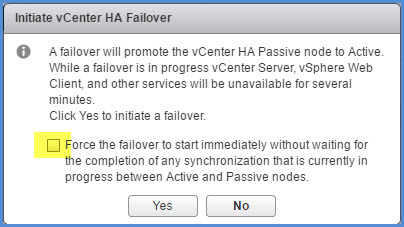
- If you click the Initiate Failover button a dialog box will then appear. Use this option to perform a “planned failover” from the Active Node to the Standby Node. If you need to FORCE an immediate failover, check off the box and click Yes. Click No for now.
IMPORTANT: The last thing you want to do is create a vSphere DRS anti-affinity rule to ensure these VMs, particularly the Active, Passive and Witness nodes, are already running on separate vSphere hosts. In a “perfect world” I would enable this feature on a cluster running with at least five (5) or six (6) ESXi hosts to ensure my two (2) PSCs and three (3) vCenter appliances are all running on a separate ESXi host. Six would be a sweet spot in my opinion for this particular configuration because that would allow me the flexibility of using a planned maintenance window on any ESXi host and not violate any anti-affinity rules. My anti-affinity rule would include all five (5) VMs and keep them separated at all times
If I have less than 5 or 6 ESXi hosts in the cluster I can still pull this off and probably do so by creating two separate anti-affinity rules. One rule to ensure the PSC appliances separated and another to ensure the Active, Passive and Witness nodes for vCenter are always separated. Just make sure you highlight the RISK involved; should a host go down in this smaller cluster it is “highly possible” the host outage will result in multiple components going offline; possibly a PSC appliance and a vCenter node.
Conclusion
This will conclude the step-by-step implementation and configuration of the new vSphere 6.5 feature vCenter HA (High Availability) using the Advanced Workflow option.
I want to point out a few things in the vSphere Availability Guide for ESXi 6.5 and vCenter 6.5 (Download) regarding the configuration of vCenter HA (starting on page 57 of the PDF). If you quickly reference Page 67 and the Clone Options sections of Step 2 an Step 3…the information is somewhat “vague” regarding the network configuration for the two clones.
The Passive Node has to function like a “twin” of the active node so it make sense as to why this clone must have the same identical host name and TCP/IP settings on NIC1. So moving forward, the NIC1 settings of the Passive and Witness nodes should have the same IP address settings as the Active node. So in the configuration above I used 192.168.80.21 (static IP of the active node) on the NIC1 settings for the Passive and Witness nodes. The only difference is the static IP’s on NIC2 which connect to the vCenter HA network (vDS port group) that I created.
Sizing the vCenter HA deployment should also be accounted for when sizing your environment to ensure performance. During the procedure above we deployed a SMALL vCenter Server appliance which is configured with 4 vCPU, 16 GB of memory and 290 GB of disk space. You multiply that by two for your Active and Passive nodes and the deployment will utilize 8 vCPU, 32GB of memory and 580GBof disk space. Lastly, add the 1 vCPU and 1GB of memory to the configuration to account for the witness. Make sure you account for these resources to properly size your environment.
Quick Links
vCenter 6.5 HA – Overview (Part 1)
vCenter 6.5 HA – External PSC Deployment (Part 2)
vCenter 6.5 HA – Load Balancer Config (Part 3)
vCenter 6.5 HA – Deploy vCenter (Part 4)
Additional Notes: Step 37 was modified from my original posting. I did not include modifying the hardware (vCPU and memory) for the witness appliance here. I give Adam Eckerle (@eck79) credit here for making me aware of this. So I updated my post and included this to my list of steps for manually configuring the virtual appliances prior to completing the vCenter HA wizard.
During a vCenter HA Basic Workflow the Witness Appliance hardware is automatically reconfigured to use 1 vCPU and 1 GB of memory. During the Advanced Workflow this is not the case. An administrator must manually modify the witness appliance hardware after the cloning procedure is complete. No sense in running a witness appliance with the same vCPU and memory resources as the Active and Passive nodes.

Great blog series. A few comments – step 44 there is a typo. Maintenance mode does *not* disable replication. It simply disables automatic failover.
Also, was there a particular reason why you chose to do the Advanced workflow? You could have used the basic but perhaps you just wanted to show the Advanced because it is more complicated.
Last, for the Witness node, you can go in and change it to 1 vCPU and 1 GB RAM after the clone completes. This is done automatically during the Basic workflow.
Nice work!
LikeLiked by 1 person
Thanks Adam. Yes it was simply put together to demonstrate the Advanced Workflow. Also, thanks for catching the typo. Didn’t know that about the Witness Node. Is that in the Availability Guide? I don’t recall seeing that anywhere but I could’ve overlooked it.
LikeLike
Hello,
There is a crucial step missing in Step 37. After powering off the witness and giving it 1 vCPU and 1 Gig RAM, you *must* power it back on again and let it boot through, before clicking next in the wizard.
If it stays powered off, the configure HA workflow crashes because it cannot SSH into the witness appliance.
Kind regards,
Steve
LikeLike
That part is assumed in Steps 36 and 37
LikeLike
Hello, I’m nico from France. I Wonder why Witness node must have the same IP adress than the Active node, if a strong DNS is required, will there not be some problems on the domain ?
LikeLike
Hello Nicolas. The Witness Node does not have the same IP address as the Active Node. The Active Node and Standby Node share an IP address because they are clones of one another. The witness node has a completely separate IP address.
LikeLike
Tahnk you for your reply. @TheWifiCable
Well in step 31. on this page you say : “31. Repeat the steps to apply the IP address settings on NIC1. Enter the same IP address used on the ‘Active Node’ on NIC1.” So that’s why I was disapointed…
But I’m stuck on step 21 because of an error of duplicated Ip address conflict on two differents VMs (Active and passive node) and the WebClient doesn’t respond anymore …
So Basic HA fails with SSH error and Advanced fails due to @IP conflict …
Regards
Nico
LikeLike
Sounds like something else is going on because when you enable vCenter HA (basic or advanced mode) all process handles all of that in the background. Double check your TCP/IP settings, VLANs and definitely your HA Heartbeat network.
LikeLike
Very helpful blog, helped me to setup the vCSA in HA mode, thanks a lot !!
LikeLike
That’s awesome and great to here And you are running vCenter HA in production?
LikeLike
not in production as of now, the lab, it worked well and hopefully we will have the same deployed in prod too, thanks again
LikeLike
I deployed this in a test lab using the basic configuration and initiated a test failover that took over 10 minutes before the web interface came backup. Did you experience a similar time? Im curious to know what people are getting. 10 minutes for a failover is pointless, might aswell stick with HA although its a bit longer. You have to ask is the setup headache and resources worth it for a few minutes?
LikeLike
Unfortunately I did not experience a 10 minute failover. Take a look at your underlying resources (CPU, memory, disk, network). My management cluster has substantial resources available including all-flash disk for storage.
LikeLike
In my experience, it took 3-4 mins which is per their documentation as well to start all inactive services online on passive node
LikeLike
Hello, great posts. One question, did you also connect an Active Directory to your HA PSCs? Thanks
LikeLike
Yes sir
LikeLike
Has to be accomplished from the command-line. Reference KB article 2116051 here: https://kb.vmware.com/selfservice/microsites/search.do?language=en_US&cmd=displayKC&externalId=2116051
LikeLike
Hi,
Its wonderful guide to deploy a vSphere 6.5 platform, i really appreciate your effort.
A quick question 🙂
Since you have created a custom certificate with DNS name for 2x PSCs and a vCenter, what happens if wanted to add an another PSC and a vCenter in to same SSO domain?
Thanks in advance
Jantharan
LikeLike
Here ya go!
https://blogs.vmware.com/vsphere/2015/03/vcenter-server-6-topology-ha.html
LikeLike
Thank you, I have recently been searching for information approximately this topic for a long
time and yours is the best I’ve came upon so far.
LikeLike