Certificates have always been an interesting topic to me. I have seen complex PKI infrastructures on several occasions but more often than not most environments have utilized certificates in a limited capacity. In regards to vSphere, a majority of the time the default certificates provided by vSphere were sufficient for most deployments.
Security is certainly a hot topic these days and I believe we will see more and more organizations begin implementing additional security measures to ensure integrity and confidentiality of data transmission. The VMware Certificate Authority (VMCA) was released with vSphere 6.0. By default the VMCA issues a certificate to each vCenter Server and ESXi host. vSphere Admins (and Security Admins) can replace the default certificates with newer VMCA signed certificates, replace ALL certificates with customized certificates or configure the VMCA as an Intermediate (Subordinate) Certificate Authority (CA). The VMCA simplifies certificate management compared to previous releases of vSphere. It is much less cumbersome thanks to vSphere 6.
In this “how to” blog article I am going to walk you through the process of configuring the VMCA on an external Platform Services Controller (PSC) as an Intermediate CA. The VMCA root certificate can be replaced by a certificate signed by a third-party CA or an enterprise CA. I am going to demonstrate this procedure with a Microsoft Enterprise CA.
If you are not 100% familiar with the PSC deployment process, there are two possible deployment scenarios. There is an embedded deployment whereby the PSC and vCenter Server are deployed on the same virtual appliance or an external PSC where the PSC and vCenter Server roles are deployed on separate virtual appliances.
When looking at the various procedures for replacing the default certificates with a custom certificate, I stand beside VMware’s recommendation of deploying the PSC first followed by replacing the VMCA root certificate. Once you have accomplished this you can proceed with deploying vCenter and adding the ESXi hosts to the environment and everything else will seamlessly fall into place. The VMCA will assign these certificates as the vSphere infrastructure is deployed.
The other alternative? If the PSC, vCenter and ESXi hosts are deployed and a vSphere HA/DRS cluster is present (operational) then you will have to generate and replace the certificates for each component separately. Sounds like a lot more work to me.
There are three (3) steps (high-level) to configure the VMCA as an Intermediate CA and they must be done in order.
- Replace the VMCA Root Certificate.
- Replace the Machine SSL Certificates.
- Replace the Solution User Certificates.
The Certificate Manager tool will manage all three steps for us. Once we have replaced the root certificate the tool will automatically replace the Machine SSL certificates and lastly replace the Solution User Certificates. As I stated previously, I am utilizing an Enterprise Microsoft PKI Infrastructure in this demonstration.
Environment Overview
Before we proceed with configuring the VMCA as an Intermediate CA let’s review a logical layout of the environment starting with the Microsoft PKI Infrastructure. I deployed only two (2) systems in my Initech.local lab environment.
- Offline Root CA (rootCA01)
- Active Directory Domain Controller (dc01.initech.local)
- DNS Server
- Subordinate CA
- Web Server (IIS)
I could have deployed each onto a separate server but I have limited resources in my lab. In a real-world environment I would expect these roles to be separated (and likely redundant). I used the following Microsoft Technet article by Yung Chou to configure my PKI. Click HERE to see his awesome article which is very detailed.
NOTE: The Microsoft Technet article by Yung Chou is sometimes unavailable. If the link does not work above please use this alternate link for configuring your MS PKI by Arthur Remy (3-part series starting w/ Part 1)
INSTALLING A TWO TIER PKI HIERARCHY IN WINDOWS SERVER 2016 – PART 1
Once the various roles were installed on my Windows Servers above I had to perform a few additional configuration steps to create the Certificate Templates needed for my Root VMCA Certificate and for my Machine/User Certificates. Reference VMware KB 2112009 for that procedure.
PSC Deployment & Default Certificates
I am deploying a fresh (pristine) vSphere 6.5 environment for my Initech.local lab and utilizing an External PSC and vCenter Server (separate appliance-based VMs). As I mentioned earlier, if the PSC and vCenter Server are both deployed and the ESXi vSphere HA/DRS cluster is configured then you will have some additional work to do.
I have deployed a few key components up so far. First, I have a standalone ESXi 6.5 host ready to go that I will be using to deploy my two VCSA appliances. I deployed an External PSC to this standalone ESXi host and now I am ready to proceed with replacing the default VMCA certificate. I have not deployed vCenter up to this point. Only the PSC. Before doing anything let’s take a look at the default certificates on the newly deployed PSC. My PSC FQDN is psc-01a.initech.local.
- Type the following URL into your web browser and log in using the SSO Administrator account that was configured during the PSC deployment.
https://<psc-fqdn>/psc

- Under Certificates select the Certificate Store option and then select the TRUSTED_ROOTS store from the drop-down menu. Click Show Details for the certificate and review the information. Make note of some of this information as it is going to change very soon. Browse a few other stores and certificates and document some of that information as well because we will change those certificates later after the root certificate is changed.
- Next select the Certificate Authority option. Here you can review the default certificates on the PSC. There will be four (4) tabs across the top. If you have a freshly installed PSC like I do then you should only find certificates on the Active Certificates tab and the Root Certificate tab.
- The certificates that we are most interested in are the Trusted Root Certificates, Machine Certificates and the Solution User Certificates as we are going to replace these in order. Select the Certificate Management option and then enter the SSO admin credentials and click Submit. You will then see three (3) tabs. Document the information for each certificate (or take a screenshot). Select a tab, choose a certificate and then select Show Details.
- Logout of the PSC homepage and proceed to the next step.
Certificate Manager
Next we are going to replace the root certificate on the VMCA. One thing I recommend before starting is perform a quick snapshot of the PSC. If things go awry you can quickly revert back and start over. When we are finished with everything we will remove the snapshot.
Another thing to make note of is the local CSR template file (certool.cfg) found in the ‘usr/lib/vmware-vmca/share/config/’ directory. Open this CFG file and take a look at the contents. The CSR we are going to custom generate will look similar to this.
So we are going to be accessing the PSC appliance via Putty (SSH) and using WinSCP to copy our CSR and Certificates to and from the appliance. We also need to configure the default Shell to BASH for the root account. Open a Putty (SSH) session to the PSC and execute the following command to access the BASH shell.
shell.set --enabled true
Once you have accessed the temp BASH shell run the next command to configure the BASH shell for root access.
chsh -s /bin/bash root
Log out of the BASH shell and then log back in for the changes to take affect. Leave your Putty (SSH) open and then launch WinSCP. Open a session with the PSC using WinSCP and keep it open.

We are now ready to go! We will start everything by using the Certificate Manager tool on the PSC.
- First thing we want to do is launch the Certificate Manager on the appliance. Execute the following command and then select Option 2.
/usr/lib/vmware-vmca/bin/certificate-manager

- Once you’ve selected Option 2 and pressed ENTER you will then be prompted to generate all certificates based on a configuration file. We want to press Y and then ENTER to continue.

- Next we are going to be prompted for some information but first we need to provide the ‘Administrator@vSphere.local’ credentials.

- The first configuration file is for the MACHINE_SSL_CERT.cfg. Enter the proper values for the certificate request. Some parameters are optional or you can simply use the default value.

- The second configuration file is for the machine.cfg. Follow the prompts as you did above for the previous CFG.

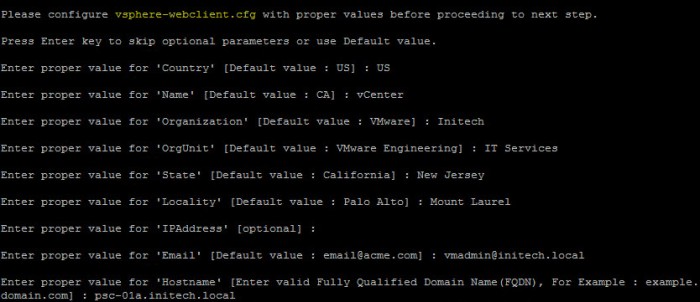
- The third configuration file is for the vsphere-webclient.cfg. Again, follow the prompts and continue.
- Once the process is complete you will then be presented with two (2) new options. One to Genearte Certificate Signing Request(s) and Key(s) and the second option is for Importing custom certificates. We are going to use Option 1 and then enter a directory location for the CSR(s) and Private Key(s). I created my own /certs directory on my PSC which I will use for this step.

- Next we will configure the certool.cfg file. Follow the prompts to configure this file that will be used for the CSR request. A new CSR file and KEY file will be generated and placed into my /certs directory. Minimize your Putty session with the PSC as we will come back to it later. I have a WinSCP session open with my PSC and browse to my /certs directory where I see my new CSR and key. I copy these two files over to a folder on my workstation.

- Now we submit the CSR request to my Microsoft Subordinate CA that is running on my domain controller (dc01.initech.local). I then type the following URL into my web browser to access my AD Certificate Services certificate request page and then select the Request a certifcate link.
http://dc01.initech.local/certsrv

- On the very next page select the advanced certificate request link.

- I then locate the vmca_issued_csr.csr file that I copied to my local workstation and open it with a text editor (Notepad, Notepad++, other). I then copy the contents of my CSR files and paste them into the Saved Request (Base-64-encoded certifcate request) box. From the Certificate Template drop-down menu I select my vSphere 6.5 VMCA template. Then click Submit.
- On the Certificate Issued page I then choose the Base 64 Encoded option and then select both links to Download certificate and Download certificate chain.

- I now have two new certificates on my workstation. The ‘certnew.cer’ is the newly signed custom certificate. The ‘certnew.p7b’ is the certificate chain from my Microsoft Subordinate CA. We have to open the Certificate Chain (p7b) and export those two certificates. Simply right-click the .p7b file. A ‘certmgr’ window will open. Expand the certificate and select the Certificates folder. Here I will see my certificates in my chain. The two certificates I am working with are highlighted. The other certificate is from my offline Root CA that I used to configure my Microsoft PKI earlier. We will need this certificate as well.

- Right-click each certificate and select Export. You will have to export each certificate one at a time. During the Export Wizard select the Based-64 Encoded X.509 (.CER) option and maintain the same certificate name as they appeared in my certmgr console in Step 13. Once I am finished I will see all three (3) certificates.

- I have to merge these three certificates into ONE certificate. If you reference Pages 112-113 in the Platform Services Controller Guide you will see my NEW certificate must include all three (3) certificates in the following order.
-----BEGIN CERTIFICATE-----
<Certificate of VMCA>
-----END CERTIFICATE-----
-----BEGIN CERTIFICATE-----
<Certificate of Subordinate CA>
-----END CERTIFICATE-----
-----BEGIN CERTIFICATE-----
<Certificate of Root CA>
-----END CERTIFICATE-----
I repeat….THEY MUST BE IN THAT ORDER! Starting with my new VMCA cert followed by the Subordinate CA certificate and lastly the Root CA certificate. I accomplish this from a Command Prompt on my Windows-based workstation and browse to the folder containing my new certs. I execute the following command to merge the three (3) into ONE master certificate that I will name NEW-VMCA-CERT.crt.
type vCenter.cer subordinate-DC01.cer ROOTCA01.cer > NEW-VMCA-CERT.crt

- Next we have to copy this new certificate to the PSC. Before doing so, I first open the certificate with notepad to verify that my certificates have been merged into one.I then COPY that new certificate from my workstation back to my /certs directory on my PSC.

- Next I return to my Putty (SSH) session with my PSC. I have two options available…Continue to import Custom Certificate(s) and to Exit the Certificate Manager. Select Option 1 to continue with the import.

- First I am prompted to supply my NEW certificate. This is my NEW-VMCA-CERT.crt certificate that I just merged and copied onto my PSC. I will then be prompted for the custom key for root which was generated back in Step #8. I enter my two paths to my certificate and my key and then press Y when I am ready.

- Here is the great thing about the Certificate Manager tool. It is going to do EVERYTHING for me. It is going to replace the ROOT CERTIFICATE on my PSC and generate the new Machine SSL Certificates and Solution User Certificates for me. This final step will take some time to complete.

NOTE: If any issues occur during this procedure and it fails it will automatically ROLL BACK to the original certificates. You should also reference the ‘certificate-manager.log’ file located in the ‘/var/log/vmware/vmcad/’ directory on the PSC. - I am now going to stop and start all services on the PSC as instructed in the output from the previous process. (Or you can just simply reboot the appliance.)
service-control --stop --all
service-control --start --all
Certificate Verification
Next we are going to log back in the PSC SSO webpage and verify our new certificates. Type the following URL into your web browser using the following format.
https://<psc-fqdn>/psc
Type in the SSO administrator credentials and then click Login.
Once you are logged into the web page select Certificate Management and then provide the SSO administrator credentials. Review the NEW certificates one by one. Below I have provide screenshots of my new ROOT CERTIFICATE.
Conclusion
So that is the simple procedure of configuring the VMware Certificate Authority (VMCA) as an Intermediate CA running on an external PSC 6.5 appliance. The procedure can be a bit frustrating at times but follow the steps very carefully and you can easily configure the VMCA to act as an Intermediate CA for your vSphere 6.5 infrastructure.
Going forward from this point you can simply proceed with deploying the vCenter Server 6.5 (appliance) and integrate it with the PSC and lastly build and configure the vSphere HA/DRS cluster(s) as you would normally.

Keep in mind there are risks involved with this model. Having a Subordinate CA, a ‘rogue admin’ with full access/rights to the PSC could potentially ‘mint’ new and fully trusted certificates. And this trust goes up the ladder to the organization’s Root CA. My recommendation is for you to consult your Security Team before making the final decision to configure the VMCA as a Subordinate CA.
UPDATE: May 2nd, 2018
If you are looking to accomplish this but you are using an Embedded PSC and not an external PSC please take a look at my other blog article specific to that deployment. Click the link below to go there now!
VMCA 6.5 with Embedded PSC as an Intermediate CA
Useful Links
Platform Services Controller Administration (ESXi 6.5 and vCenter Server 6.5)
vCenter Server Appliance Configuration (vCenter Server 6.5)
Enterprise Microsoft PKI with Server 2012 R2 AD Certificates Services
Install & Configure Certificate Authority in Windows Server 2016
Remember….BE SOCIABLE, SHARE! 🙂

I’m migrating to vSphere 6.5 and this is the only write up that I could find on 6.5. The best part is you go through the certificate-manager utility step by step which VMware official documentation covers at a higher level.
I’ll add a couple items of note that I have run into.
1. Chrome/Firefox support for SHA1 has been deprecated for 2017. If you get a certificate warning, verify it is due to this and not an issue with the certificate change.
2. You can set a registry key to allow Chrome to trust intranet certificates with SH1 – goo.gl/vl9WPe
LikeLike
Thank you Warren and an additional thank you for the info on Chrome. My goal with this article was to provide a more in-depth procedure that you don’t get in the documentation.
LikeLike
Hi and thanks for the your efforts!
In my case I’m using VCSA 6.5 with the embedded PSC.
Can I still follow your guide?
Also I’d like to create VCSA HA afterwards, I guess I don’t need to go through all that again, do I?
Thanks again!
LikeLike
Hi Thomas! I cannot seem to find anything online that says you couldn’t try this process with an embedded PSC. I would certainly test it first before doing it to your production VCSA appliance and thoroughly document the procedure. Don’t forget to backup the appliance before modifying!
LikeLike
A little late to the party but how do we combine these steps with also having PSC HA behind a load balancer? Do I setup PSC HA first and then replace the root certificate?
LikeLike
Reference my 5-step blog article for enabling vCenter HA. This covers configuration of the PSC HA using the load balancer; including custom certificate configuration and replacement.
LikeLike
I read that posting but my question is more about order of operation. Should I create the first PSC using the steps outlined here and make it a intermediate CA and then follow the steps in the PSC HA post or complete the steps in the PSC HA post using the self signed certificates and then follow the steps to replace the root CA and convert it to an Intermediate CA?
LikeLike
I would do the steps here first then configured PSC HA second. That way you’re not changing certificates too much. My recommendation would be to get the first PSC ready to go and utilize the PSC HA FQDN for everything. Once that part is done you should copy those carts to the 2nd PSC to complete you PSC HA config. I’ve never done both in the same procedure but logically that makes sense to me.
LikeLike
I’ve done 10th of VMCA Root replacemants in the Windows vCenter/PSC’s and it has worked flawless. NowI am trying to follow a similar process for the VCSA, but whatever csr I create from the certificate tool, my ADCS server will return a Root CA Cert based on the default values, to it has all the VMware details in it.
During the certificate-manager phase all the fields are correctly presented as defaults, but still it will return the “default” Root CA cert, except that it is now except that it is now a certificate issued by ADCS.
I’m totally puzzled on how to get this to work on a VCSA.
LikeLike
following up on this, we have the same problem. Did anyone find a solution yet?
LikeLike
Hi,
First of all thanks for the good article – unfortunatly I do have a problem and you might have an idea whats wrong?
I did a fresh install of the VCSA 6.5U1 after running
“Run /usr/lib/vmware-vmca/bin/certificate-manager and Select Option 2.”
I see the message
“Do you wish to generate all certificates using configuration file : Option[Y/N] ?”
which I can confirm with “Y” as next step I login with the correct credentials, and then I see the following message:
“certool.cfg file exists, Do you wish to reconfigure : Option[Y/N] ?”
When I confirm the this with “Y” I can see this:
“Press Enter key to skip optional parameters or use Previous value.
Enter proper value for ‘Country’ [Previous value : CH] :
etc”
I never come to a point where I can configure “MACHINE_SSL_CERT.cfg”, “machine.cfg”, etc. do you may have any idea whats wrong?
Thanks.
LikeLike
I recently tested this out on a new 6.5 U1 deployment and I ran into a similar situation but didn’t prohibit me from replacing my certificates. Just ignore the fact it didn’t prompt for those certificates and proceed forward with the procedure.
LikeLike
Here’s a thing – when I ran the cert management tool, and selected option 2, I only got prompted to customize the certool.cfg file; none of the others. So when I got my certificate, it had only default entries for Country, locality, etc..
LikeLike
Having a hard time replicating the issue you are experiencing. Double and triple check your steps, read through procedures first before executing.
LikeLike
It appears that the most recent build of the VCSA 6.5 (6.5.0.10100) only uses the answers from certool.cfg, and uses those to populate all the other cfg files, only changing the Name field as appropriate. At least, that’s what it looks like in the cert manager log file.
LikeLike
I had exactly the same issue as Chuck, the solution for me was to download an older version of the appliance, in version 6.5u1 option 2 let me just edit the certool.cfg – in version 6.5x it worked like documented here, after everything was done I updated so u1
LikeLike
Standby guys. There’s certainly something different going on in 6.5 U1. So give me some time here and I will lab this up and see what issues I run into and see if I can find a workaround.
LikeLike
I just completed a run through of this procedure in a vSphere 6.5 U1 environment on my PSC and had zero issues configuring it as an Intermediate CA. Some of the prompts in Certificate Manager were a little different; specifically Steps 4-6 above did not happen. I had to enter the criteria for CSR only once and I arrived at Step 8 with zero issues. I proceeded through the procedure as it is outlined above and was able to successfully configure everything. Be very careful and check everything. Lastly, review the documentation for the PSC before executing.
Click to access vsphere-esxi-vcenter-server-651-platform-services-controller-administration-guide.pdf
LikeLike
Thanks for the wright up, but no matter what I do certificate manager fails and rolls back. I’m not clear on step 13 you state to download both links, what do we do with the standard cert?
LikeLike
Keep that certificate as you will need it as outlined in Step 15. You take the newly signed VMCA certificate that was signed by your Microsoft CA (or external public CA) and then the subordinate CA and my offline root CA. I then combine all 3 to form a single new certificate. I then use that new certificate and the private key from Step 8 during the replacement procedure moving forward and concluding with Step 20.
LikeLike
Do I have to replace certs on PSCs to provide load balancing services?
LikeLike
Yes. If you are looking to provide load balancing between your PSC appliances you will have to replace the certificates on each.
LikeLike
last thing, PSC cert creation, you need to do the same for each PSC right?
LikeLike
You run the procedure to generate new certs on one, get them digitally signed and then replace on each PSC. You should follow the PSC HA procedure provided by VMware. Reference KB 2147018
LikeLike
Hi John,
I know this post is super late but i’m stuck in the water. I have followed the process up to the point where create a new VMCA PSC (SAN since i’m doing HA) CSR. I did that, submitted it to my CA which is Godaddy.
I receive back the new signed cert and one bundle cert which contains Godaddy’s root chain.
You keep mentioning that i need to combine the three certs into one but I only have 2, the new cert that i’ve created, and the combined bundle CA cert which I’m guessing is the “root?”
Where do i find this “subordinate CA” you keep referring to?
LikeLiked by 1 person
That subordinate CA is referring to my internal MS PKI. The architecture of the environment in this article is likely much different than your infrastructure. So be careful and your best bet is to read through the VMware documentation before proceeding because your certificate is being signed by an external public CA. Conceptually this is the same but logically different.
LikeLiked by 1 person
I have followed these steps, and my external PSC is successfully an Intermediate CA. However my pre-existing vCenter still gives “invalid cert” errors on the web client. How do I fix it?
LikeLike
Google magic!!!
https://kb.vmware.com/s/article/2112283
LikeLike
While working with the intergrated PSC, I’m also experiencing the same issues as a lot of other folks above. The problem is that the .CSR creation with use of the wizard/certool.cfg isn’t working as expected. Like stated above, all the information you enter there (like country, department, etc) isn’t passed into the certificate request.
This issue is described here: https://kb.vmware.com/s/article/2145544
The KB article is for vCenter Server 6.0 Update 2 and above, which includes 6.5.
So in my case I could walk through this whole blog post except for the part where the .CSR is created. This needs to be done following the VMware KB article and then you are ready to go.
LikeLike
Correct. Attempting to perform this with an embedded PSC requires some additional work. Perhaps I’ll create a step-by-step blog for doing this with an embedded PSC so folks can see the difference because the procedure above is for an external PSC and prior to deploying vCenter.
LikeLike
John, in your article you state that the certificate used by the VMCA is signed by a Microsoft Enterprise CA. In my understanding an Enterprise CA means the machine is AD joined and online. Is this the case or can I sign the VMCA certificate with a MS offline root certificate?
LikeLike
Yes. The PKI that contains the offline root will also have a subordinate CA online. Review the blog article from Yung Chou which has a hyperlink above.
LikeLike
Thank you. Understood. This is how we plan to deploy our PKI. I’m trying to understand the dependencies from a VMware operational perspective. Does the VMCA require an *online* CDP where it can access the CRL? In other words: does my AD joined issuing/subordinate CA need to be contentiously online in order for my VMCA (and thus my external PSC) to function properly? What kind of impact do I expect when my PKI goes down?
LikeLike
The best way you can determine that impact is by working closely with your MS Admin team and security teams and perform very thorough testing in a sandbox environment before you roll this into your production infrastructure. Document your findings, fill gaps where necessary and create various operational runbooks for both planned and unplanned outages.
LikeLike