A couple months ago I posted a 5-part series for configuring and enabling vCenter HA using an external PSC and load balancer. Very effective solution for anyone looking to enhance vCenter availability in their environment. What about those customers who are taking advantage of VMware NSX and want to utilize the NSX load balancer for vCenter HA?
The documentation available from VMware and my 5-part series blog post covers the “in’s and out’s” of this procedure assuming the environment is brand new. How rare is that nowadays? I’ll be 100% honest with you…I don’t come across many customers looking to deploy VMware for the first time these days. VMware is everywhere!
So what about the environments that are already running VMware vSphere and NSX? How do you introduce vCenter HA into that environment? Perfect high-level scenario example…
- Long-time vSphere customer installed NSX into their vSphere 6.0 environment about a year ago. The PSC and vCenter Server are running on separate virtual appliances using the External PSC (non-HA) model; together the PSC, vCenter Server and NSX Manager appliances all operate in a separate vSphere HA/DRS cluster.
- Customer recently upgraded from vSphere 6.0 to vSphere 6.5. Prior to the upgrade NSX was also upgraded to version 6.3.
- The vSphere environment was upgraded from vSphere 6.0 to vSphere 6.5 so the customer can take advantage of the new features. One of those features happens to be vCenter HA. Customer wants to leverage the NSX load balancer to configure vCenter HA.
So in a nutshell the environment is running vSphere 6.5 and NSX 6.3. The PSC and vCenter server appliances are running on separate virtual appliances on a 1-to-1 basis. NSX is installed and configured for the environment. Summarize all of this information and this becomes “Point A” of the equation.
Now we want to introduce vCenter Server HA and utilize the NSX load balancer to accomplish this. This is “Point B” of the equation…the end result. Picture all of this in your head….Point A to Point B. Let’s think for a moment here…
- Which components can and will be impacted by implementing vCenter HA?
- What are the short-term impacts?
- What are the long-term impacts (if any)?
- How will you mitigate risk during the procedure?
- What needs to be done to accomplish this successfully?
- How much downtime is needed for the existing PSC, vCenter or NSX Manager appliances?
- Is there enough capacity to accommodate the new virtual appliances?
- CPU
- Memory
- Disk
First and foremost make sure everything in your management control plane is BACKED UP and protected then verify that a restore can be performed. Create a temporary, isolated VMware test environment with at least one host and make sure you can restore the vCenter Server, PSC, NSX Manager and other components successfully. If you cannot perform a successful restoration of these VMs I certainly would not proceed. I don’t care if your backup is blazing fast and completes in less than a 5 minutes…your backup is only good if you can perform a successful restore. I can rant more about this another time in another blog post but I think I paint a clear enough picture here.
One area that will be affected by this procedure is CERTIFICATES! The vCenter Server connects to the External PSC and certificates play a key role here between the two. In order to implement PSC high availability we must change some certificates on the PSC. If we are changing certificates on the PSC what can and will be impacted?
- NSX Manager SSO Lookup
- vCenter Server Authentication
How can this risk be mitigated? Very simple and it is not overly complicated. First let’s understand SSO a little bit. SSO makes NSX and vSphere more secure through a “secure token exchange mechanism” versus requiring each component to authenticate separately through a user account (service account). The only thing that will be impacted by removing the SSO Lookup Service URL from the NSX Management Service will be the ability to log into the vSphere Web Client with an account that resides in the local Microsoft AD domain (assuming vSphere is integrated with AD of course). If you were to log into the vSphere Web Client with an AD account, the Networking & Security component will appear in the inventory but if you were to click on it, the NSX manager would not appear in inventory. It would literally tell you…

So why would I remove the SSO Lookup Service URL during this procedure? It is because I will need to reconfigure it with the new PSC HA FQDN (i.e. psc-ha.initech.local). This new PSC HA FQDN will resolve in DNS to the load balanced IP address that I will eventually configure on my NSX load balancer edge appliance.

You could probably do this prior to deploying the second PSC and updating the certificates or later down the road after both PSCs are deployed/updated and the NSX LB is also deployed. I chose the route above simply because I felt it would logically be less disruptive. If things went awry then I simply re-enter my original PSC FQDN and I am quickly back to square one.
High-Level Review
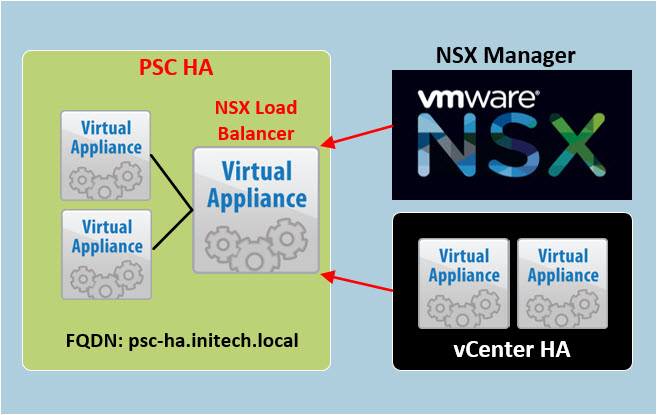
So let’s have a quick high-level review of what we are trying to accomplish here before we begin. We have a vSphere 6.5 environment that is also running NSX 6.3. The task at hand is configuring vCenter HA on the existing environment. Our starting line “Point A” is pretty much a standard environment that you would find just about anywhere: vCenter Server, External PSC and the NSX Manager.

We want to get to “Point B” which will consist of two external Platform Service Controller’s (PSCs) that will be load balanced by an NSX load balancer. The NSX Manager and vCenter Server appliances will then point to the NEW load balanced PSC FQDN. We will re-point the existing vCenter Server to the newly load balanced PSC using the PSC HA FQDN. Then we can finally proceed with enabling vCenter HA.
Before we begin we verify backups are in place. I am going to double-up my backup efforts by taking a full backup using Veeam in my lab. In addition to that I am also going to take advantage of the new backup feature available on my two appliances…my PSC and vCenter Server appliances. I always want multiple backups in multiple places…just in case!
Read more about this new feature here in this VMware Blog by Emad Younis.
Step 1 – Deploy NSX Load Balancer
I am going to start with deploying the NSX Load Balancer that I want to use for my future vCenter HA configuration. This load balancer will be used to specifically load balance the two Platform Service Controllers (PSCs). I have one PSC now and I will need to deploy a 2nd PSC next but I am going to go ahead and get this load balancer ready.
You can find this procedure here in KB Article 2147046; however, the KB article does not cover the step-by-step procedure for creating the Service Monitor as I do below.
I used the following steps to deploy and configure the NSX load balancer in my environment.
- First thing we are going to do is deploy a new NSX Edge appliance. Open Networking & Security > NSX Edges from the Web Client. Click the (+) icon and select the option Install Type: Edge Services Gateway. Deploy the Edge and then enable High Availability. During the deployment I am going to specify ‘Internal’ for the LB interface and not uplink. If you choose ‘Uplink’ the HA feature will not be enabled after deployment. It will fail. The IP address configured should be the same IP that you have reserved for the PSC HA Virtual IP (VIP). Review your load balancer settings once the appliances are deployed.
- Next we will Enable the Load Balancer on the new Edge appliance. Double-click the load balancer in the inventory, select the Manage tab and then select Load Balancer. Click the Edit button. Select the box to Enabled Load Balancer and click OK. (Optional – enable logging and choose a logging level.)
- Next create the Application Profile on the LB. Select Application Profiles and click the (+) icon. Enter a name for the profile, change the type to TCP and then select Source IP for Persistence. Click OK. Verify that the new Application Profile has been created.
- Next we are going to create a Service Monitor ID. Select Service Monitoring and then click the (+) icon. Enter a name for the monitor and then select TCP for the type and click OK. Verify that the monitor has been created.
- Next we need to create a POOL. Select Pools and then the (+) icon. In the New Pool window enter a name, select ROUND ROBIN for the algorithm and the monitor that you created in the previous step. Hit the (+) icon to add the two members. You will create a member entry for your 1st PSC and a second member entry for your 2nd PSC.
- Lastly we need to create a Virtual Server. Select Virtual Servers and then click the (+) icon. In the New Virtual Server window select the application profile from the drop-down menu, enter a name for the virtual server, enter the IP address, port range (443,389,636,2012,2014,2020) and the pool that you created. When you enter the port range do not put a space after each comma. If you leave a space and hit OK you will receive an error message. When you are finished verify that the virtual server has been created.
That concludes the deployment and configuration of the load balancer that will be used to serve the PSC appliances. Next we will deploy the secondary PSC followed by the configuration of the certificates on the two PSCs.
Step 2 – Deploy the Secondary PSC
Next thing we are going to do is deploy the secondary PSC and join it to the existing SSO domain (vsphere.local). I am going to use the same procedure as I outlined in my vCenter HA blog post (Part 2). Quickly skip to Step 2 in that blog article and complete that procedure. Here are the screenshots of my 2nd PSC appliance deployment for this particular procedure. Remember there are two stages when deploying the VCSA appliances. Stage 1 deploys the appliance and Stage 2 finalizes the configuration.
Step 3 – Reconfigure PSC Certificates
Okay now comes the really fun part. After the secondary PSC is deployed we must then proceed with changing the certificates. I am going to use the same procedure as it is outlined in Step 3 of my blog post (same link in Step 2 above). Here are a few screenshots taken from this procedure.
Remember one thing here…you are changing the certificates on the PSCs. vCenter is still configured with the primary PSC and not the secondary. vCenter will automatically reconnect with the PSC but you may have to update the certificate in your web browser which likely contains the OLD certificate that you just replaced.
Step 3 – Verify the PSC HA Configuration
So we have deployed our NSX load balancer that is configured with the VIP address that we intend on using for our PSC HA configuration. In my environment the TCP/IP addresses for my PSC configuration looks like this.
psc-01a.initech.local -- 192.168.110.11
psc-02a.initech.local -- 192.168.110.14
psc-ha.initech.local --  192.168.110.10
I also want to make sure the POOL that I created on my NSX load balancer is functional. From the vSphere Web Client open Networking & Security > Edges and double-click the load balancer. Select the Manage tab and then select Load Balancer > Pools. Click the Show Pool Statistics link and you should see something similar as seen below.

This is a good sign. The next thing we are going to do is from both PSCs. We need to make sure that the ‘psc-ha.initech.local’ load balancer is functioning properly. Open a SSH (Putty) session with each of the PSCs and enter the following command:
openssl s_client -connect psc-ha.initech.local:443
The output of this command should look like this. As you can see the ‘psc-ha.initech.local’ FQDN appears in the certificate in these two places. If it does not you need to go back and fix it before proceeding.

Step 4 – Reconfigure vCenter and NSX Manager
Now we need to re-point our vCenter Server and the NSX Manager to the new PSC HA FQDN address. The vCenter is still pointing to only the one PSC and we need it to point to the ‘psc-ha.initech.local’ address.
Open an SSH (Putty) session with the vCenter Server appliance and enter the ‘shell’ of the VCSA appliance. Enter the following command to point the vCenter Server appliance to the new PSC HA FQDN:
cmsso-util repoint --repoint-psc psc-ha.initech.local
The output should look something similar to this. The process will take a few minutes so be patient. All of the services must stop and restart again on the vCenter Appliance.

The VMware KB article for this procedure can be found here.
Next we need to reconfigure the NSX Manager Appliance; specifically the SSO Lookup that we removed earlier. Connect to the NSX Manager web UI and then select Manage vCenter Registration. Enter in the PSC HA FQDN address and credentials and proceed. Accept the new certificate. Once everything is complete the Lookup Service URL on the NSX Manager should look like this.

That’s all there is to it. You can now proceed with configuring vCenter HA as I showed you in my previous blog article.
vCenter 6.5 High Availability – Enable vCenter HA (Part 5)
Conclusion
Configuring vCenter HA by leveraging the NSX Load Balancer is very useful and valuable to organizations who may not have a load balancer or do not wish to purchase a physical load balancer to do so. In my opinion this process was much easier than the one I completed earlier using a 3rd party load balancer (NetScaler).
UPDATE – 04/09/2017
There is one other very important step that must take place prior to re-pointing your vCenter Server. This procedure can be found in VMware KB Article 2147384. Execute these scripts once the load balancer is ready for the PSC’s. Repoint the vCenter Server and then reconfigure SSO Lookup URL on the NSX Manager and you should be good to go!
BE SOCIALABLE…PLEASE SHARE! 🙂

Hi I do I this Steps but when i want to repoint the VCenter this error appear:
Validating Provided Configuration …
Falied to open connection https://psc.hosco.net:443/websso/ Error:
Please check the configuration and retry
Thanks
LikeLike
I would double check your DNS entries, both forward and reverse lookup, before proceeding. Make sure you do this from the VCSA and PSC command-line and not your desktop/PC.
LikeLike
Validating Provided Configuration …
Falied to open connection https://psc.hosco.net:443/websso/ Error:
Please check the configuration and retry
LikeLike
Hi, I’m just doing a discovery of our SDDC environment, we have two PSC’s (Supposedly HA) using NSX edge Load Balancer.
PSC01.company.corp
PSC02.company.corp
PSCVIP.company.corp
However when I check vCenter’s registered PSC either by lookin Under the vCenter Server’s Advanced Setting, there is a property called “config.vpxd.sso.admin.uri” OR running “/usr/lib/vmware-vmafd/bin/vmafd-cli get-ls-location –server-name localhost” on the VMCA
It specifies PSC01.company.corp.
In addition the NSX manager specifies PSC01.company.corp under Lookup Service URL:
Does this mean that the PSC HA configuration isn’t quite complete?
LikeLike
It certainly sounds that way. Anytime you have PSC HA configures the vCenter Server should be pointing to your PSC HA FQDN. In your case that should be ‘pscvip.company.corp’. If PSC01 were to fail or go offline for any reason with your current config, you would not be able to log into vCenter.
LikeLike
Are we creating a circular dependency by utilizing NSX load balancer to handle PSC Functionality? If the environment goes belly up or a restart of the entire environment takes place; the NSX ESG appliance must become operational before the vCenter servers can permit authentications to the system. Would it be valid to warn that your LB ESGs should always be set to start automatically?
LikeLiked by 1 person
You bring up some great points and I agree a lot with what you are saying. If there is anything I would change about this post it would be elaborating more about this.
First off, the entire environment goes “belly up” scenario always cracks me up because if that happens you have much bigger problems and vCenter HA isn’t going to save you. Multi-site protection in your DR strategy would be of the utmost importance.
In vSphere 6.5 you can create a VM/Host Rule for “Virtual Machines to Virtual Machines”. Assuming your NSX LB control VM and vCenter Server is in the same HA cluster you can then take advantage this custom HA rule. This will allow you to configure VMs to start FIRST and then RESTART other VMs after that top priority group. There would be two (2) VM groups…one for your NSX LB and the second for your vCenter Appliances (single appliance or the PSC and vCenter if they’re deployed separately). You would then create a HA rule the makes sure the NSX LB boots first before the vCenter appliance(s).
That’s one way to solve the “circularly dependency” issue.
LikeLiked by 1 person
Reblogged this on Nguoidentubinhduong.
LikeLike