One of my most popular blog articles is the configuration of VMCA 6.5 as an Intermediate CA but the article is specific to environment’s with an External Platform Services Controller (PSC) and configuring it prior to deploying the VCSA for vCenter Server. I have received a lot of great feedback from this article and numerous requests to demonstrate how to do this on a vCenter Server (VCSA) with an Embedded PSC. So I’ve decided to do exactly that…so here it is!
Just a quick recap before we get started, I will be using the same Microsoft PKI infrastructure running on Windows Server 2016. Here are two articles to help you get started with that portion of the infrastructure. The first one below discussed Server 2012 R2 but you can still accomplish these tasks on Server 2016.
Enterprise PKI with Window Server 2012 R2
VMware KB 2112009 – Creating MS CA Templates
There is a very important VMware KB article (2145544) that you should review prior to starting this procedure. The difference between my first VMCA 6.5 article and this one is we are now using a VCSA with Embedded PSC. Therefore, vCenter Server is already deployed and we are going to change some certificates. If you followed my other blog article and attempted to accomplish it using an Embedded PSC you most likely encountered some errors. The way we fix this is we are going to create our certificate request (CSR) using OpenSSL instead of creating it using the native VCSA Certificate Manager. The VMware KB article covers the steps to perform this for both Windows vCenter Server and the vCenter Server Appliance.
We are going to start immediately with creating the CSR using the procedure outlined for the VCSA (vCenter Server Appliance). The only difference I am doing differently from the KB article is I created a ‘certs’ folder inside the /tmp directory on my VCSA appliance. I created the folder because it helps me stay a little more organized.
I am also using vCenter Server 6.5 Update 1 (Build 8024368) so things may be a little different compared to my other VMCA 6.5 post.
Let’s create the certificate request!
- Open a Putty session with the VCSA appliance and create the following ‘vmca_root.cfg’ file. This file will contain the information we will need for our certificate request.

- Using nano or vi, add the following information to the certificate request configuration file. This information is also provided in the KB article above if you need to reference it. Save the file.

- Next we are going to use OpenSSL to generate the certificate request. There will be two files; .csr file and a .key file. I create the certificate request for 2 years (730 days) versus the default one year (365 days). I also specify a longer RSA key length instead of the default 2048. (both just because I want to 🙂 )
root@vcsa [ ~ ]# openssl req -days 730 -new -newkey rsa:4096 -keyout /tmp/certs/vmca.key -out /tmp/certs/vmca.csr -config /tmp/vmca_root.cfg

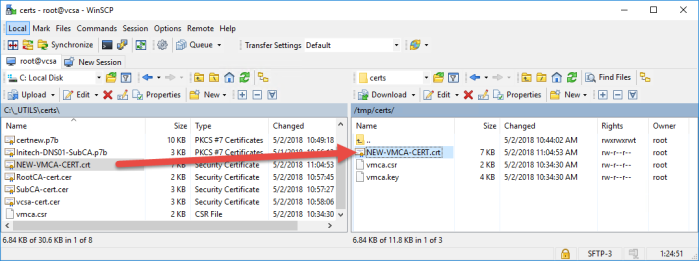
- The command executes successfully and the new .csr and .key files are now in my /tmp/certs/ directory on my VCSA.

- Next open up WinSCP and copy the .CSR file over to your workstation.

- Open the .csr file in notepad and copy the contents (thumbprint).

- I open my web browser for my Microsoft Enterprise Subordinate CA that I have and Request a certificate.

- I choose ‘advanced certificate request’ and the window will automatically proceed to the next step.

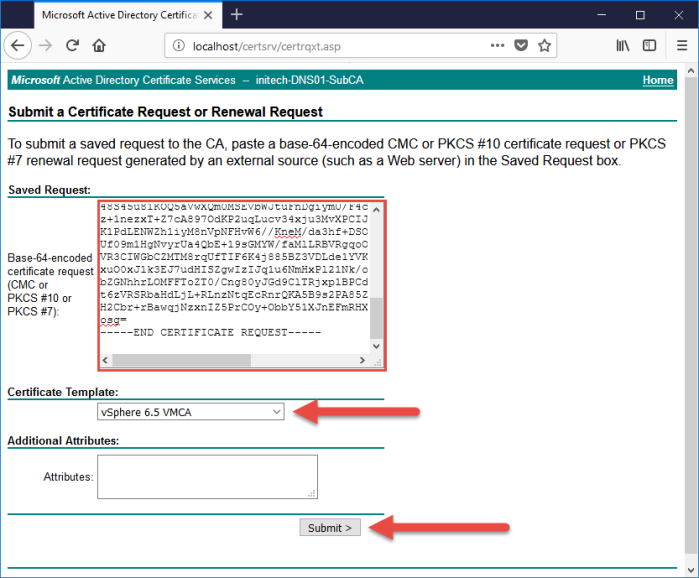
- Paste the certificate request thumbprint that you copied into the ‘Saved Request’ section. Choose the ‘vSphere 6.5 VMCA’ template and then click Submit.
- Next select the ‘Base 64 encoded’ option and download both the certificate and certificate chain. I have a local ‘_UTILS\Certs\’ directory on my workstation where I save everything that I am working with.

- Right click the certnew.p7b (certificate chain) and select Open. Certificate Manager will open the certificate and you can see all three (3) certificates. Right click each certificate and select All Tasks > Export and follow the wizard to export each certificate to a local directory and use the Base-64 encoded X.509 (.CER) option. When I am finished I have the following three (3) certificates saved locally on my workstation.
- Next I need to merge these three (3) certificates into one (1) certificate. I do that from my Windows workstation using the following command from an elevated command prompt. When you merge the certificates they MUST BE in the following order:
-----BEGIN CERTIFICATE-----
<Certificate of VMCA>
-----END CERTIFICATE-----
-----BEGIN CERTIFICATE-----
<Certificate of Subordinate CA>
-----END CERTIFICATE-----
-----BEGIN CERTIFICATE-----
<Certificate of Root CA>
-----END CERTIFICATE-----

- Verify that the certificate is created and saved to the directory. You can also verify that all three (3) have been merged properly by opening the certificate in notepad and you should see all three (3) thumbprints.

- Next return to the WinSCP session and copy the new certificate back to the VCSA appliance.
- Return to the VCSA putty session and launch the Certificate Manager using the following command:
root@vcsa [ ~ ]# /usr/lib/vmware-vmca/bin/certificate-manager

- Select Option 2 to ‘Replace VMCA Root Certificate…’ and proceed through the prompts. What you enter during the prompts is not important as you will ignore that and use your custom certs in a brief moment. You will then come to a part in the wizard where you will have two (2) options. One to Generate the CSR Request and Keys and a second to Import custom certificates and keys and to replace existing VMCA root signing certificate. We are going to use Option 2 here because we already have everything from OpenSSL and our Microsoft PKI.

- Specify the path to the new custom certificate and key and simply allow some time for the Certificate Manager to complete the process.

- The certificate update process completes!

- Next let’s verify the certificates by opening a web browser and enter the following URL for the PSC, select Certificate Management and then provide the SSO admin credentials one more time and click Submit.
https://<hostname-or-IP-Address>/psc

- Select the three (3) various tabs for Machine Certificates, Solution User Certificates and Trusted Root Certificates and click the ‘Show Details’ option to view the certificate.
Conclusion
So that is pretty much all there is to it when configuring the VMCA on a VCSA appliance with an Embedded PSC as an Intermediate CA in your existing Microsoft PKI. The procedure was nearly identical as when you configure the VMCA on an external PSC except you need to use OpenSSL to generate the certificate request and keys versus using the local Certificate Manager.

CAUTION! Be aware there are risks involved with this model. Having a Subordinate CA, a ‘rogue admin’ with full access/rights to the PSC could potentially ‘mint’ new and fully trusted certificates. This trust will funnel all the way to the organization’s Root CA. My recommendation is for you to consult your Security Team before making the final decision to configure the VMCA as a Subordinate CA.
I hope this helps all of you out there attempting to perform this procedure. If you have any questions or comments please let me know.
I plan on providing procedures for VCSA 6.7 so stay tuned and subscribe to my blog!
Useful Links
VMCA 6.5 as an Intermediate CA (my previous blog for External PSC for 6.5)

Firstly, thanks for all of the posts.
I have come a bit unstuck and just seem to constantly get the Status: Failed, Error Code: 70009, Error message: Key I/O failure. I think that part of it may be down to the PEM Passphrase message when I execute point 3. Your instructions make no mention of being prompted to enter a PEM passphrase, so I just made one up and then am asked to continue entering the information that I already used in the vmca_root.cfg file. Do you know where I am going wrong? Any assistance will be appreciated. Thanks. T
LikeLike
I had the same issue. It turned out the command he has in the copy and paste box is incomplete. Take a look at the screenshot and you’ll see it should end in “-config /tmp/vmca_root.cfg”
LikeLike
I updated the copy and paste box to include ‘-config /tmp/vmca_root.cfg’. Thanks for catching that guys!
LikeLike
Hi, how can you resolve this error? Thanks!
LikeLike
So I followed this to a T, and it gets to 85% complete, then pauses for a long time (15 minutes or more) and fails, attempts to rollback, then fails to do that. Came across this: https://plus.google.com/u/0/105723318465037180316/posts/GCANhdTd5Z4
Any ideas?
LikeLike
At the bottom you mention that we need to use openssl command line to create the csr, but you do not mention why. I guess you have to if you want to have a validity period longer than the default, but are there other things?
LikeLike
This is all fine, but how does it work with a linked mode VCSA with embedded controllers??
LikeLike
First you should reconfigure your VCSA 6.5 environment onto a supported topology. Linked mode with embedded controllers in 6.5 is a deprecated topology. Reference this KB article…
https://kb.vmware.com/s/article/2147672
LikeLike
update 6.5 Update 2, same features of 6.7 supports topology this and vmware will no longer support external PSC’s going forward. See the last note of that KB you refereed too. Embedded Linked Mode up to 15 is supported.
Note: With vCenter Server 6.5 Update 2, you can deploy by using the GUI or CLI installer up to 15 vCenter Server Appliance instances in Embedded Linked Mode, and manage these instances with the vSphere Web Client or vSphere Client from any of the instances. “
LikeLike
That’s a different topic of discussion. This article focuses on VCSA 6.5. If you’re requesting vCenter 6.7 as an intermediate CA then I can add that to my list of future blog topics. As of right now, this article and what you’re asking is apples and oranges in comparison. Subscribe to my blog so you are notified when that future blog is released.
LikeLike
No, I was referring to 6.5 as per your article. As it stands 6.5 U2 supports ELM of embedded PSC’s. This is not a deprecated in any way. This is the preferred deployment of vmware going forward. Were evening using this mode along with HA.
Was I was wondering is if I replaced the VMCA certificate with my Own CA on one of my PSC’s, Id hoped that that CA would be used for all my other Linked Nodes.
Vmware doesn’t go into any details on this and all I can tell is that I have to have the same or a different VMCA setup on each node.
I was only referring to 6.7 as the topology that were running in 6.5U2 was released the same time 6.7 supported it.
As per this image, thats supported is what we are running.. https://www.starwindsoftware.com/blog/wp-content/uploads/2018/11/word-image-24-1024×371.png
Thanks
Gary
LikeLike
Again, a different topic of discussion because the blog article is based on 6.5 U1 and not U2. Yes 6.5 U2 supports embedded linked mode and I have not deployed or attempted this on that version.
Off the top of my head, the logic behind accomplishing this in 6.5 U2 would be to deploy the 1st VCSA appliance with embedded PSC and configure it as a Subordinate CA as I outlined in this blog. Once that is complete I would then deploy a second VCSA appliance with embedded PSC and during the deployment tell it to join an existing SSO domain thus forcing that 2nd VCSA appliance to reference the primary VCSA that is already configured as a Subordinate CA.
Quick high-level summary off the top of my head would be:
1. Deploy new VCSA w/ Embedded PSC.
2. Configure the VCSA as a Subordinate CA.
3. Deploy 2nd VCSA w/ Embedded PSC; during deployment join existing SSO domain and point to existing VCSA server previously deployed.
4. Repeat as necessary.
That would be my approach thinking about this at the moment. Not 100% sure if this is the way to go until I test it out in my lab sometime. Hope this suggestion helps provide you some guidance. Good luck!
LikeLike
Thanks… That was my same approach last night..
I gave it ago and it seems the CA didn’t replicate round/there is no defined server issuing certs signed by the CA. So far I had to import the CA on each node and re-run certificate manger to generate machine and user certs.
I’ve logged a call with vmware to see what their preferred method is as there is lacking documentation around this
LikeLike
Hi,
I have configured my 6.7 U2 vCenter Server VMCA as a subordinate to my Windows Server/AD Root CA.
I have fixed the VAMI certificate issue (https://kb.vmware.com/s/article/2136693)
I have fixed the incorrectly commented out line in each of my 6.7 U2 ESXi Hosts /etc/vmware/rhttpproxy/config.xml file, so that they have the full chain to the root CA cert. (https://www.reddit.com/r/vmware/comments/8z4zal/certificate_chain_on_esxi_nodes/)
I have amended the vCenter Server advanced ‘certmgmt’ settings, so that my ESXi hosts Org, Org Unit, State, Locality settings are per my site requirements. I also had to change the vCenter Adv Setting ‘vpxd.certmgmt.certs.minutesBefore’ to 10, so I could actually replace the ESXi Host certificates in good time (below)
I have run the vCenter Server ‘Certificates | Refresh CA Certificates’ and then ‘Certificates | Renew Certificate’ for each of my ESXi hosts. They all now have VMCA signed certificates. 🙂
All looks great on the surface – no browser errors connecting to vCenter Server or any ESXi host.
BUT each ESXi host’s IOFILTER Provider (vCenter | Configure | Storage Provider) is offline and errors on re-synchronisation. The certificate the provider is using is the old self-signed ESXi host certificate and not the new VMCA signed certificate. It has not been updated!
The only way I can get the IOFILTER Provider back online is to place each host into Maintenance Mode, disconnect it from the vCenter and remove it from the vCenter Inventory. When it is added back in, the provider is back online and the provider certificate is now the VMCA signed one.
Do you know of any method of refreshing the provider certificate without Disconnecting/Removing? The storage provider certificate refresh button is always greyed out (irrespective if the provider is online or offline).
It’s a real PITA! Have I missed something? Any suggestions?
Cheers
Pin
LikeLike