In this “How-To” post I will cover the steps required to migrate a virtual Windows-based vCenter Server 5.5 instance to a new VCSA (vCenter Server Appliance) 6.0 U2 instance. During the migration of your vCenter Server the configuration, vSS/vDS, user permissions, inventory and so on will all be migrated to the new appliance. No additional configuration will be required. There is an option that you will see in the steps below that will also allow you to migrate historical info and performance data. The only impact to choosing that option will be the amount of time that it will take to migrate everything to the new VCSA. The amount of time it will take to migrate comes down to how much information is stored in the vCenter DB. Simple as that.
NOTE: If you want to plan ahead and have an estimate for the amount of time it will take to migrate everything, reference VMware KB Article 2146420.
First and foremost, you should know and understand everything about your existing infrastructure. Particularly your current vCenter 5.5 architecture/layout…is the SSO (Single Sign-On) domain local or external? Hopefully the installation of your vCenter 5.5 system was well documented somewhere for you to reference.
First thing I want to cover is the deployment method that was use to deploy the vCenter 5.5 instance. If the “Simple Install” was used then the target VCSA 6.0 U2 appliance will include an embedded Platform Services Controller (PSC).
If the “Custom Install” method was used then it all boils down to where the SSO component was installed. If the custom install was used and all four (4) components were installed locally (I’ve seen this done many times) then you will still end up with a VCSA 6.0 U2 appliance with an embedded PSC. If the SSO role was deployed to a separate system from your vCenter 5.5 server then the end result will be a VCSA 6.0 U2 with an external PSC.


If you do not know which method was used to deploy your vCenter 5.5 instance don’t be alarmed. The Migration Assistant will tell you specifically what your destination configuration will look like. Simply proceed with the migration and then adjust your vCenter Server topology later. You can deploy a new external PSC appliance and repoint the vCenter Server to use it instead of the embedded PSC. The procedure to repoint your vCenter Server 6.0 to an external PSC can be found here.
All four (4) vCenter 5.5 roles are installed locally in the example I used below. Therefore my destination VCSA configuration will include an embedded PSC. The original hostname (FQDN) and IP address will be retained on the new VCSA appliance once it boots. A temporary IP address will be used during the data migration to avoid an IP conflict. The source vCenter is eventually powered off during the procedure prior to the new VCSA booting. The temporary IP address is discarded.
One of the most important things that you should do before proceeding with the upgrade is READ THE RELEASE NOTES!! Then when you are finished reading those a few times read the vSphere Migration documentation. RTFM all day!
Here are a couple links for you to get your started:
vCenter Server 6.0 Update 2 Migration Release Notes (HTML)
vSphere Migration (PDF)
Another thing I want to point out here is “if problems arise” during the migration do not worry. There are no changes being made to the existing Windows vCenter Server therefore performing a rollback is a rather simple process. There are some important things to make note of prior to starting a ROLLBACK procedure.
- The Windows vCenter 5.5 Server – if it was a member of an Active Directory domain it’s computer account in AD was updated with the new VCSA password. So make sure you have a local account on the old Windows vCenter Server ready in case you need it.
- Shutdown the new VCSA 6.0 U2 appliance – this needs to be done to avoid an IP address conflict. During the migration the network adapter of the vCenter 5.5 VM is disconnected. Once the VCSA 6.0 U2 appliance is powered down. Reconnect the network adapter using your VI Client.
- Log into the Windows vCenter 5.5 Server and rejoin the server to Active Directory. Reboot the system and logging into vCenter using the domain credentials should be restored.
Hopefully your migration is successful and you never have to look for a rollback procedure.
The Migration Procedure
The following steps below were used to migrate my existing vCenter Server 5.5 (Windows based) to a new vCenter Server Appliance (VCSA) 6.0 Update 2 with an embedded PSC. The existing vCenter 5.5 system has all four (4) roles installed locally. I used this because this is one of the most common vCenter architectures that I have found at my customers.
My vSphere lab environment INITECH consists of a few basic things. A single Windows Server 2012 Domain Controller (DNS Server), a few ESXi hosts and a few VMs. It morphs routinely but this is what I was working with at the time.
Yes, my lab is named after the infamous company from the movie Office Space. What can I say…I’m a big fan! My primary vSphere Admin is none other than the infamous Peter Gibbons so you will be seeing a lot of him in my future blog articles! 🙂
Very basic setup here to demonstrate the migration. My vCenter 5.5 system manages two ESXi hosts, a couple VMs running on a NFS share and a vDS with a few distributed port groups. All of this will be migrated to the new VCSA appliance in the end.
The Migration Procedure (Step-by-Step)
NOTE: You should always verify that you have a healthy backup of your vCenter system prior to making any major modifications to your vCenter Server. Test this procedure in a test environment before doing this in production.
- Mount the VCSA Migration ISO image on the vCenter Server 5.5 system. My vCenter 5.5 server is a VM so I simply mount the ISO to the VM Console.
- Open the media and browse to the ‘Migration-Assistant’ folder.

- Double-click on the ‘VMware-Migration-Assistant’ application located in the Migration-Assistant folder.

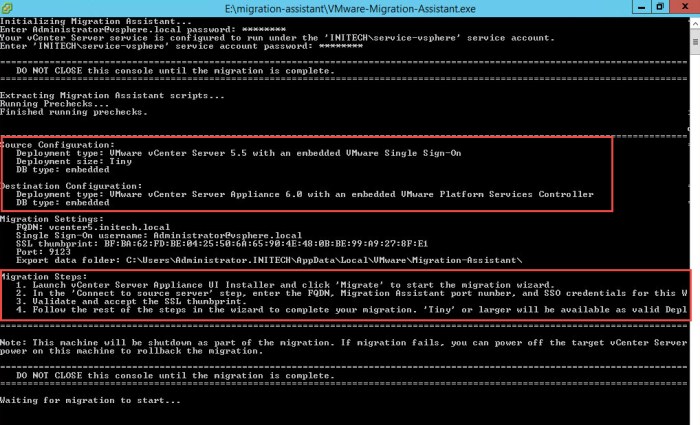
- A command-prompt will open prompting you for the ‘Administrator@vsphere.local’ password. The Migration Assistant will then begin extracting the scripts for the migration. Do not close the console until the migration is complete.

NOTE: If you are using an AD based service account for your vCenter Server you will be prompted for these credentials in addition to the SSO credentials. The service account must have the “Replace a process level token” permission on the local server. This is a User Rights Assignment found in the Local Security Policy. - When the migration is ready to start you will see a screen similar to this. Take note of a few things here; first the Source and Destination Configuration summaries. Review the information provided closely before proceeding. Next, review the Migration Steps in order. There are only 4 steps.
- Migrate to the root of installation media in Windows Explorer and open the ‘vcsa-setup’ (HTML File) to begin the migration procedure. When the link opens you will see the following screen appear. Select Migrate.

NOTE: You may be prompted to update the Client Integration plugin to 6.0.0 prior to seeing the screen above. - A vCenter Server Migration pop-up will appear. Click OK to proceed with the migration.

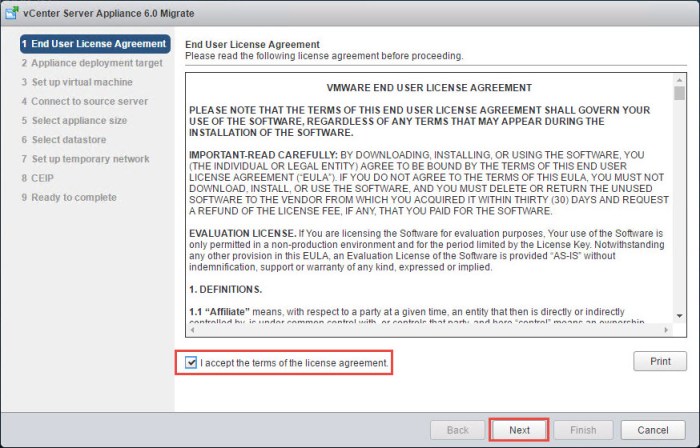
- Accept the license agreement and click Next.
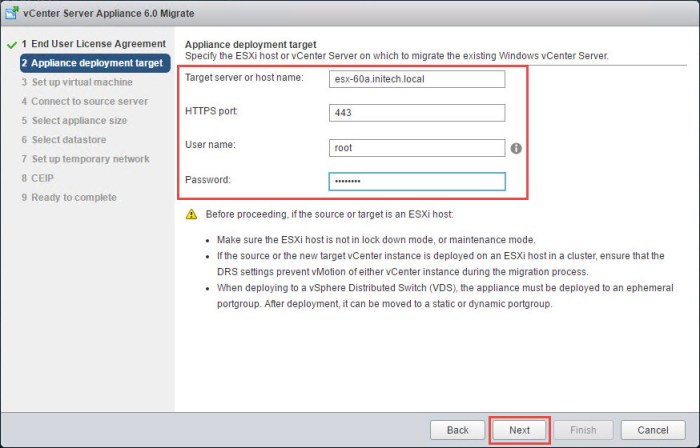
- Enter the target ESXi host information (IP Address or FQDN) and supply the credentials. Click Next. A Certificate Warning will appear; click Yes to proceed.
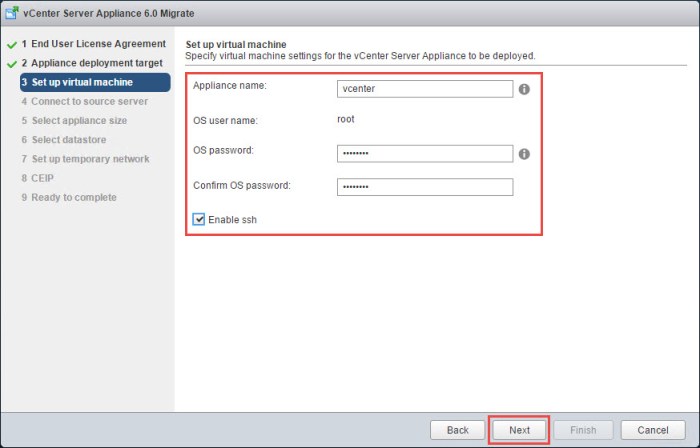
NOTE: In this example I’ve decided to deploy my newly migrated VCSA appliance to a fresh ESXi 6.0 U2 host. It’s not a requirement but if you can do it then it’s one less migration step to perform down the road. - Enter the information regarding the new VCSA 6.0 appliance. The appliance name is how the VCSA virtual machine name will appear in the inventory. I want to keep the same name. Click Next.
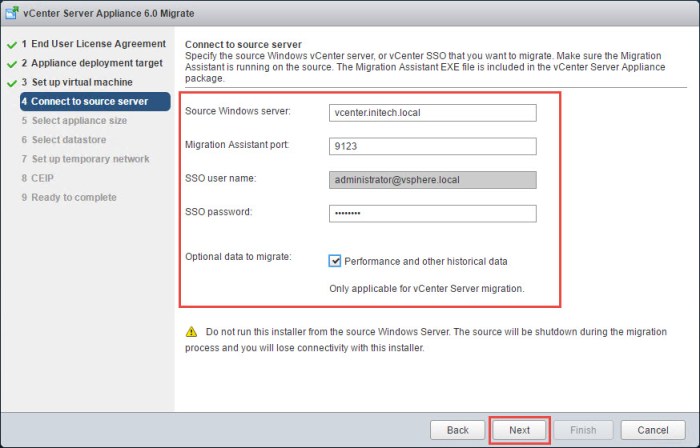
- Provide the information about the source Windows vCenter Server 5.5 system including the FQDN and the SSO password. Here is where you will find the option to migrate the ‘Performance and other historical data’ during the migration. You can also enable SSH on the appliance. Click Next to proceed when you are ready. (A Certificate Warning will appear. Click YES.)
- Enter the credentials to join the VCSA appliance to the AD domain. Here I have entered my ‘Peter Gibbons’ domain admin account and password. Click Next.

- Next choose the Appliance Size for your environment and click Next.

- Next select a Datastore for the VM. I selected the ‘Enable Thin Disk Mode’ option simply because I’m in a LAB environment and my target host here only has local storage. The disk requirements for your vCenter Server will likely be different and utilize shared storage. So choose wisely. Click Next.

- Configure the Network Settings for the appliance. First choose the port group in the Temporary Network drop-down menu. Next apply the Static TCP/IP settings that have been set aside for your new appliance and Click Next when ready.

(NOTE: Be sure to READ the two bullet points at the bottom of the screen regarding the ‘temporary’ TCP/IP settings that will be used during the migration.) - On the next page choose whether or not you want to join the CEIP (Customer Experience Improvement Program) and click Next.
- On the ‘Ready to complete’ screen, review the settings to ensure their accuracy and click FINISH.

- The migration will initialize and proceed. Monitor the process closely. Follow the progress in the Migration window (as seen below). I’m also monitoring the progress from my ESXi 6.0 u2 host via the new HTML5 client via VM console.
 ESXi 6.0 U2 HTML5 Client

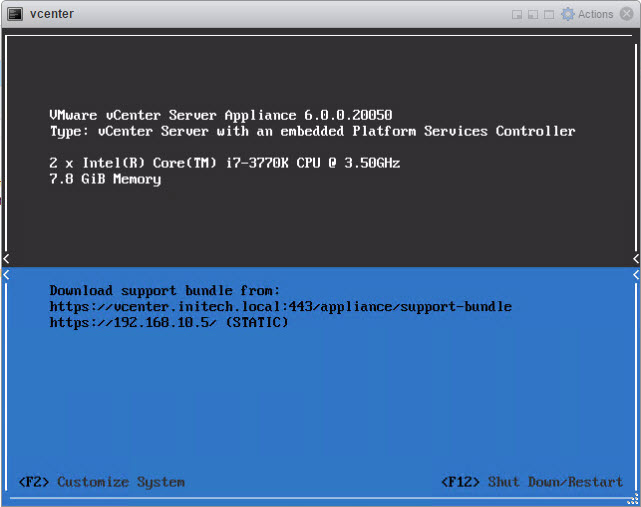
- At some point during the process the source machine (vCenter 5.5 system) will be shut down. The screenshot below is taken from the console screen of the VCSA appliance that is being deployed. During this step I confirmed that my former vCenter 5.5 system was in fact powered down. A period of 120 seconds (or longer) must elapse before proceeding to the next step as seen below.

- You will begin to see a bunch of “…firstboot.py” scripts execute. This is a good sign!

- When all is said and done the new appliance will boot!
- Open a web browser and connect to your new VCSA 6.0 U2 appliance via the vSphere Web Client. Log in and begin to verify your environment. You will get a warning about your licenses so get those ready and update them ASAP!
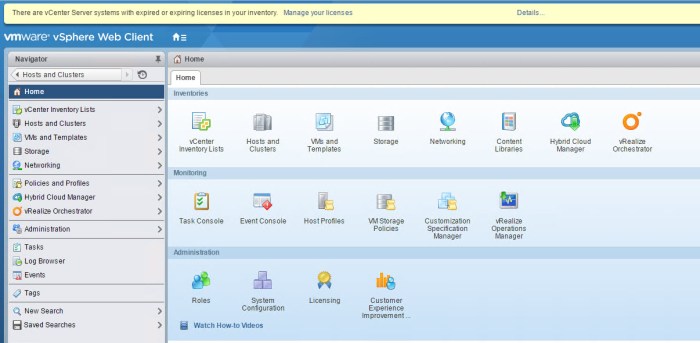
- Lastly, here you will see my host & VM inventories are maintained, my VM folder structure, my datastores and my vDS configuration is all there.Hosts & Clusters
 VMs & Templates

Storage

Networking

Conclusion
The vCenter Server 6.o Migration Tool is a great tool that makes transitioning from a Windows-based vCenter Server 5.5 to the vCenter Server Appliance (VCSA) 6.0 U2 a breeze. Very easy to do.
Always use caution and be well prepared before doing anything in your vSphere environment. Especially in live Production. I’m a huge fan of the saying…
“just because you can doesn’t mean you should…”
Yes your VMs will not be harmed during this process and continue to run. Yes you can probably do this migration during production hours. Would I honestly do that though? No. HELL NO! Do yourself a favor and schedule this change during off-hours. Get your ducks in a row…verify your backups, test the procedure in a small test environment and document everything. Then move forward.
Once you have the VCSA up and running you can now concentrate on your next steps which would likely include (in no particular order here) leveraging VUM to upgrade your vSphere hosts, upgrading the vDS from 5.5 to 6.0, upgrading your VM tools & hardware and so on.
Good luck!
If you have any questions let me know!
