The recently released NSX 6.4.0 introduced quite a few new features and enhancements. The one I really like is the Distributed Firewall (DFW) now has the ability to create Layer-7 (application-based) context for microsegmentation planning and flow control. Admins can also use the Application Rule Manager (ARM) which was introduced in NSX 6.3 to create an effective microsegmentation tactic. I will do more with ARM at a later date. In this blog I’m going to focus primarily on the DFW Layer 7 application awareness and how effective it can be for enhancing security in your existing NSX infrastructure.
NOTE: You should have hands-on experience with vSphere and NSX before continuing; NSX 6.4 is required in order to accomplish these tasks.
Prior to 6.4
Let’s first review how DFW rules were created prior to NSX 6.4’s release and then we can proceed with demonstrating the effectiveness of the new Layer-7 DFW capabilities. My environment has both Windows and Linux virtual machines. I’ll specifically be using Windows Server 2016 and CentOS 7 in my demonstration.
The scenario I am going to work with here is using a simple DFW rule where I do not want to permit SSH traffic from my ‘Windows DEV Servers’ (Security Group) to my ‘TPS SQL Servers’ (Security Group). The DFW rule that I have in place is pictured below.
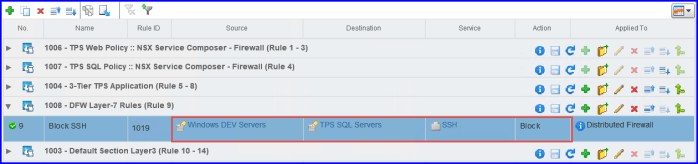
As you can see I have a ‘Block SSH’ rule in place from my source ‘Windows DEV Servers’ to my ‘destination ‘TPS SQL Servers’ for the ‘SSH’ service with a ‘Block’ action. I test this rule from my Windows DEV server (windev-001) and try to access tpssql-001 using Putty. The block rule is working as you can see below.

Now let’s say someone changes the SSH port on the TPS SQL Server and configures it to listen on port 2222 instead of the default port 22. This enables someone to circumnavigate the firewall rule and access the system using SSH. This is because the rule explicitly blocks port 22.
As you can see I was able to connect to the TPS SQL Server via SSH (port 2222) and executed a basic ‘ifconfig’ command. My explicit SSH block rule was ineffective because I was able to find a way around it by changing the SSH listening port on in my CentOS 7 VM running MySQL.
So how does NSX 6.4 fix this ‘loop hole’ and block this type of traffic? Layer-7 context-based firewall rules!
NSX Layer-7 Application Context Rule
To fix the security issue above I simply modify my existing rule. I select the ‘Service’ inside my rule and change it from ‘SSH’ to the ‘APP_SSH’ rule instead. All application context aware Layer-7 DFW rules in NSX 6.4 will have the APP_ prefix on the service. You can also create a custom Layer-7 service which I will get to that in a moment. I’m going to first walk you through resolving the issue above.
My goal is now simple. I want to block ALL traffic for SSH regardless of which port it is using. I want my rule to focus on the Layer 7 context instead. I modify the service in my rule to now include the new ‘APP_SSH’ service and remove the SSH service.


I then publish my DFW rule change and it becomes effective immediately. The end user attempting to use Putty to SSH into the TPS SQL Server on port 2222 is now blocked. The only difference is instead of my error message stating ‘Network Error: Connection Timed Out’ as it did previously now states ‘Network Error: Software caused connection abort’ instead. Ahhh…the beauty of enforcing security in software!!!

You can monitor this in NSX by using Flow Monitoring. While I was attempting to access the ‘tpssql-001’ VM from my ‘windev-001’ system I was able to capture DFW in action and examine the BLOCKED SSH connection attempt on port 2222. Here is the output from my session.
The source IP of my Windows DEV system is 10.20.20.6 and the destination IP of my TPS SQL Server is 10.10.12.11. The two things I want to point out here is the Destination Port and the Application Context columns; port 2222 and APP_SSH respectively.

Custom Services
You can also customize your Layer 7 App Service. When you create the custom service you need to supply some required criteria:
- Service Name
- Layer 7
- App ID
Now the App ID only appears when you select Layer 7 when creating your custom service. There are quite a few App ID’s available in NSX 6.4. So before you create your custom Layer 7 service make sure you understand the type of application it is beforehand in order for your DFW rule to be effective.
Below is an example of my custom service. The dialog boxes with the red asterisk (*) are required in order to create it. Everything else is optional.

Conclusion
So that’s all there is to it when it comes to application, context-aware Layer-7 DFW rules in NSX 6.4. Using these types of services in the DFW will position it to focus on transmission content traversing the network versus filtering only Layers 3 and 4 of the Ethernet frame. Filtering traffic at Layer 7 makes the DFW more powerful and flexible than ever and will greatly enhance network security for your vSphere environment. So take advantage of it and tighten up your security!
Useful Links
VMware NSX for vSphere Documentation Center
NSX 6.4 Administration Guide (PDF) – Firewall scenario’s start in Chapter 11 on page 176.
NSX 6.4 Upgrade Guide (PDF) – Need to have NSX 6.4 before you can take advantage of this feature! 🙂
