Here in Part 3 of the vCenter HA 6.5 multi-series we will configure the load balancer that will provide a layer of redundancy between the two external Platform Services Controller (PSC) appliances that were deployed in configured in Part 2. There are three load balancer’s summarized in KB Article 2147018 from VMware.
- NSX Edge Load Balancer (KB2147046)
- F5 BIG-IP Load Balancer (KB2147038)
- NetScaler Load Balancer (KB2147014)
I’m going to walk through the full deployment & configuration of the NetScaler VPX Load Balancer. When everything is complete we will have a Virtual IP (VIP) of 192.168.80.10 that will resolve to the ‘psc-ha.initech.local’ FQDN name. This VIP will be used to load balance between the two PSCs that we deployed in Part 2.

Quick recap of the PSC deployment…
The two (2) PSC appliances were deployed in Part 2. Each appliance is configured with a FQDN and static IP address on my management network segment (192.168.80.0 /24). I created the Host and PTR records manually on my internal Windows Server based DNS server that also doubles as a domain controller.
I also created static records in DNS for the ‘psc-ha.initech.local’ FQDN…both a host record and PTR record. I obviously cannot PING or communicate with it….yet….but I will once the load balancer is successfully deployed. This load balanced FQDN is what I will use later when I deploy my vCenter Server appliance. We will cover that portion later in Part 4 of this multi-series.
NetScaler VPX Deployment
I have downloaded my NetScaler VPX appliance (and license) and now I will proceed with deploying the appliance onto one of my stand-alone ESXi 6.5 hosts. This particular virtual appliance does not download as an OVA file. The ZIP for this download contains three (3) files within.
- A manifest file (.mf)
- A descriptor file (.ovf)
- a virtual disk file (.vmdk)
The two files we are going to work with are the OVF and VMDK files. The MF file is an optional file that is used for integrity/authenticity checks. It basically contains the SHA1 digest for all of the files in the package.
Let’s start deploying the OVF package for the NetScaler Load Balancer.
- Authenticate with the ESXi 6.5 client (URL) and log into the host. The new HTML5 based client :).
https://<esx-fqdn-hostname>/ui
- Once authenticated, select Virtual Machines and then select Create/ Register VM.

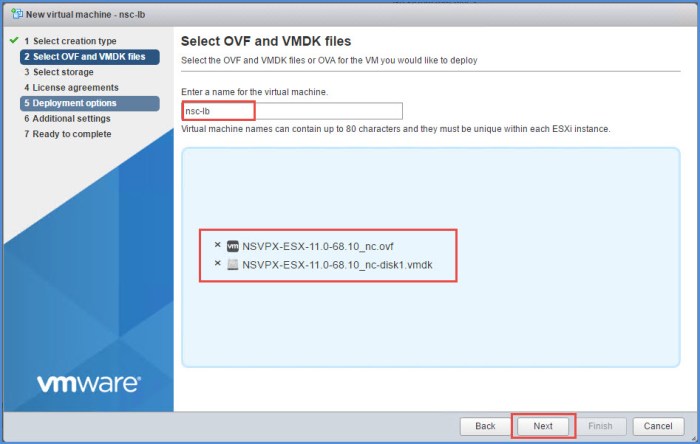
- The New Virtual Machine wizard will appear. Select Deploy a virtual machine from an OVF or OVA file and click Next.

- Enter a name for the VM and then select the Click to select files or drag/drop option. Browse to the OVF and VMDK files of the virtual appliance (you need both files) and then click Next.
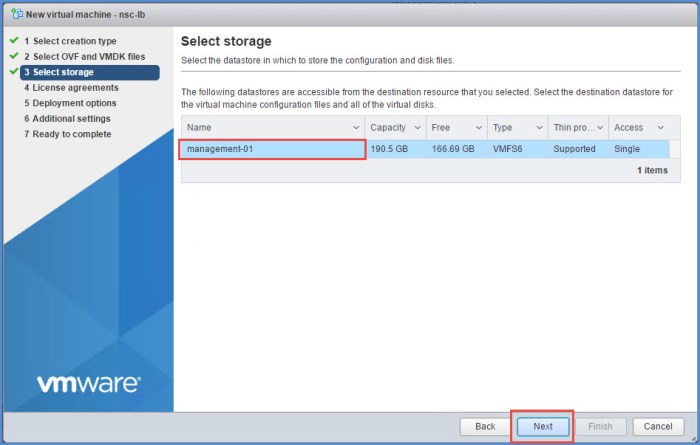
- Select the storage location for the VM and click Next. In the case of my lab environment I only have one VMFS datastore at the moment in my management cluster.
- Next you will select the virtual network that you wish to deploy/connect the load balancer appliance to and then select the virtual disk format (thin or thick). I am using thin provisioning in my lab. Click Next.

- Review the information in the Ready to complete section of the deployment wizard and click Finish when you are ready. The virtual appliance will begin to deploy. An ‘Import VApp’ task will appear below. Monitor the progress and once deployed the VM will automatically power on.

- Once the VM powers on click the Console and then choose Open browser console from the list of options. Monitor the VM as it boots. The appliance will then prompt you to enter the IPv4 address, Netmask and IPv4 gateway. Enter this information when you are prompted. Review the information and then select Option 4 and press ENTER to ‘Save and quit’ to continue. The appliance will continue to deploy.


- The NetScaler will then indicate that it has started successfully and then proceed through an initialization process. The NetScaler is ready when you see the following screen.

- Next log into the NetScaler VPX web UI. The default login is ‘nsroot’ for both the username and password.

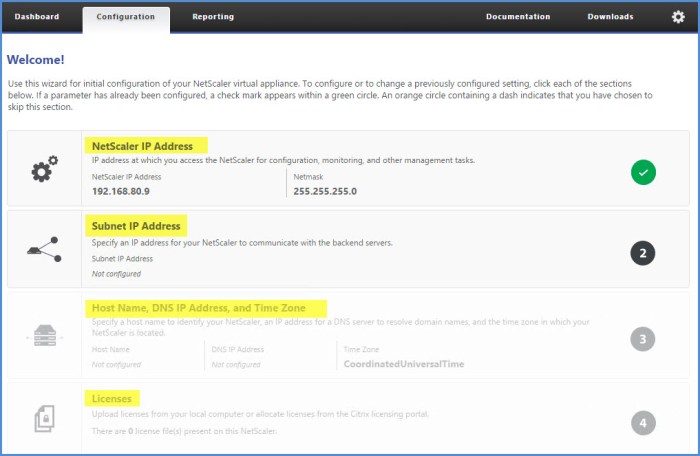
NetScaler Web UI - When you first log into the NetScaler VPX you will be on a Configuration tab where you need to configure a few things. The NetScaler IP Address, Subnet IP Address, Hostname/DNS/Time Zone and then the license. Upon completion of these settings you will be prompted to REBOOT the appliance. Monitor the reboot in the console window if you still have it open.
- This completes the deployment portion for the NetScaler VPX appliance.
NetScaler Configuration
Next we will proceed with the configuration of the NetScaler VPX appliance. There is a total of five (5) steps in this section that we will configure in the following order.
- Add PSC (Platform Service Controller) Nodes.
- Add Servers. There are six (6) services total.
- Create the Virtual Servers for each of the six services.
- Create a Persistency Group.
- Verify everything…servers, services and virtual servers.
Add the PSC Nodes
- On the Configuration tab, expand Traffic Management and then Load Balancing. Select Servers and then click the Add button. Enter the name of the PSC and its corresponding IP address. Repeat this for both PSC’s.


- The two PSC appliances should be listed on the right side of the screen. Both should indicate Enabled in the State column. Verify that the IP addresses are also correct.
Add Services
There are six (6) services total that we must load balance amongst our PSCs. Each service is bound to a port number.
- On the Configuration tab, expand Traffic Management and then Load Balancing and then select Services. Click the Add button on the right.

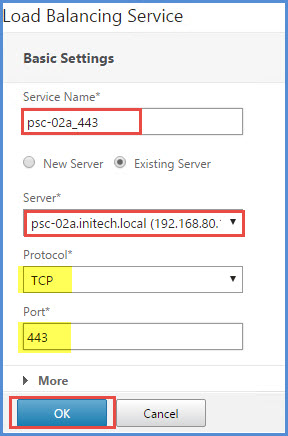
- Under the Basic Settings of the Load Balancing Service. Enter a name for the service for the first PSC, select Existing Server and then choose the first PSC from the drop-down menu. Select TCP from the protocol menu and then enter 443 in the port dialog box. Click OK.

- Review the information on the Load Balancing Service window. Server State should indicate UP. If it does not immediately indicate UP then give it a little extra time. Click Back.

- Click the Add button again.

- Under the Basic Settings of the Load Balancing Service. Enter a name for the service for the second PSC, select Existing Server and then choose the second PSC from the drop-down menu. Select TCP from the protocol menu and then enter 443 in the port dialog box. Click OK.
- Review the information displayed in the Load Balancing Service and click Back.
- Review the list of Services for Port 443. Each PSC should have an entry.
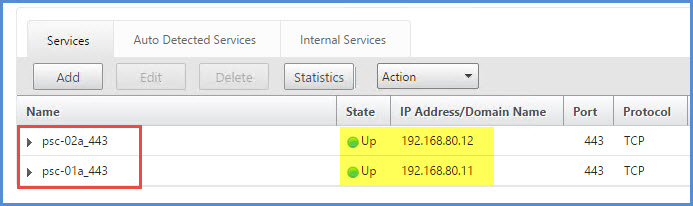
- Repeat this procedure for the following additional services: 389, 636, 2012, 2014 and 2020. All services will use the TCP protocol. When everything is complete you should have six (6) service entries for your primary PSC and six (6) service entries for your secondary PSC. All of them should have a state status of UP.
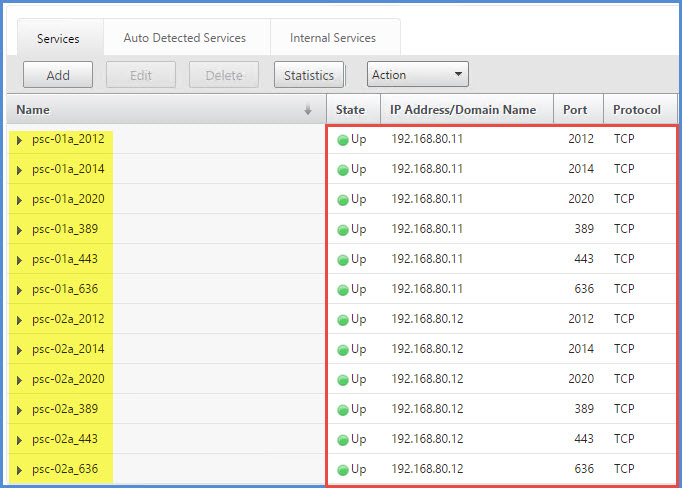
List of Services Provided by the PSC’s
Create Virtual Servers
Next we are going to create the virtual servers for each service. There will be ONE virtual server for each service. This is where we create the Virtual IP (VIP) address for the PSCs. In summary…my two PSCs psc-01a.initech.local (192.168.80.11) and psc-02a.initech.local (192.168.80.12) will be load balanced by psc-ha.initech.local (192.168.80.10).
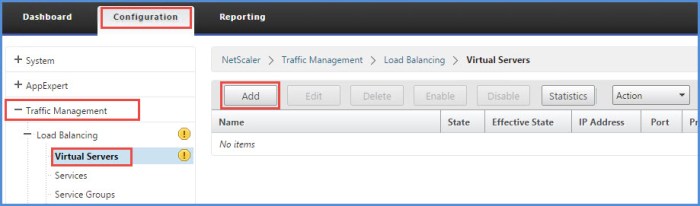
- On the Configuration tab, expand Traffic Management and Load Balancing and then select Virtual Servers. Click the Add button.
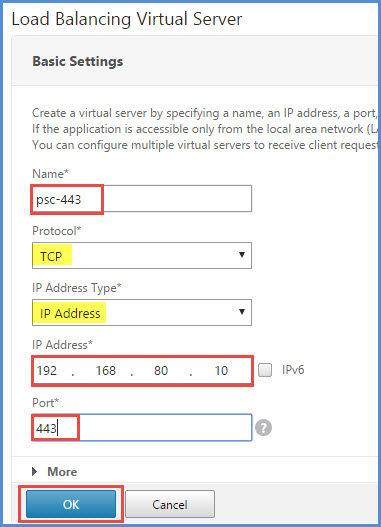
- On the Load Balancing Virtual Server page, enter a name for the virtual server, select TCP for the protocol, select IP Address from the drop-down menu, enter the VIP address and 443 in the port dialog box. Click OK. (If prompted to enable the LB feature, click Yes.) Click Continue.
- Under the Services and Service Groups section select No Load Balancing Virtual Server Service Binding option.

- In the Service Binding window click > and select the two services associated with Port 443 and then click Select.
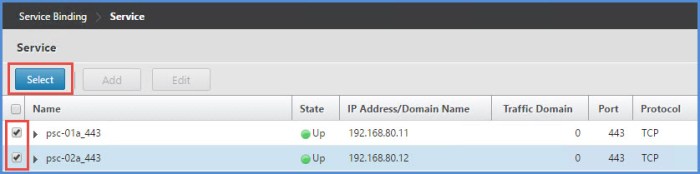
- On the Service Binding window click Bind and the click Done.

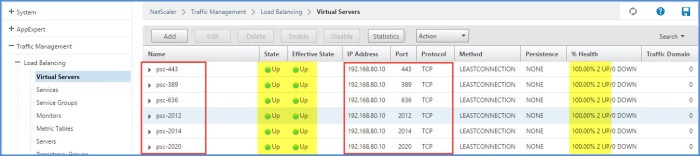
- Review the status of the newly created virtual server; the State and Effective State column should both indicate UP and the Virtual IP address (VIP) should be listed in the IP address column.

- Repeat these steps for the remaining services. There will be a total of six (6) VIPs each with a unique port #. When you are finished the list of Virtual Servers should look like this. You are finished creating your virtual servers.
Create Persistency Group
In this section we will create a Persistency Group which will include all six (6) VIPs that we just created in the previous step.
- On the Configuration tab, expand Traffic Management and then Load Balancing. Select Persistency Groups and then click the Add button.

- On the Create Persistency Group page enter a group name, select SOURCEIP from the Persistence drop-down menu, enter 1440 in the time-out dialog box and then click the +Add button.

- Select the ‘Select All’ option and then click on the > button to move all six (6) virtual server names from the left to the right. Click Create.

- The newly created Persistency Group should now be listed.

Load Balancer Verification
In this step we will verify that the Virtual Servers, Servers and Services are all configured and functioning.
- On the Configuration tab, select Traffic Management > Load Balancing and then Servers. Verify that both PSCs are present and Enabled.

- On the Configuration tab, select Traffic Management > Load Balancing and then Services. Ensure all services are UP and there are two services for each port (443, 389, 636, 2012, 2014, 2020).

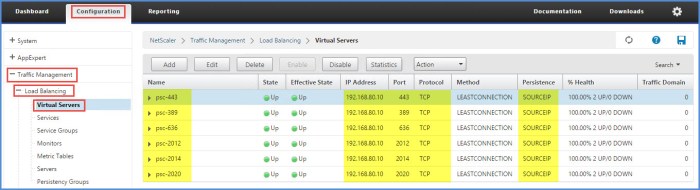
- On the Configuration tab, select Traffic Management > Load Balancing and then Virtual Servers. Verify all six (6) virtual servers are UP and that they are mapped to the correct Load Balanced HA VIP address.
- Last but not least….do NOT forget to save the load balancer’s running configuration! Click the little blue FLOPPY DISK icon in the upper right hand corner to save the running configuration of the NetScaler. I made the bonehead mistake and rebooted without saving the running configuration and had to redo everything. HAHA! Yes, yes….even VCDX’s make funny mistakes like this once and awhile. 🙂
Certificate Verification
The next thing we want to do prior to running a few configuration scripts on our PSCs followed by deploying the vCenter Server is verify that the Load Balancer is presenting the certificates we created back in Part 2 of this multi-series.
Simply open a Putty (SSH) session with each PSC and execute the following command:
openssl s_client -connect psc-ha.initech.local:443
The command from each PSC should reflect the same information, particularly the subject line and certificate thumbprint.

Next Steps
In Part 4 of this multi-series we will run a few start things off by running a few configuration scripts on the PSCs followed by deploying the vCenter Server virtual appliance. During the deployment phase we will use the ‘psc-ha-initech.local’ FQDN name when prompted for PSC.
Quick Links
vCenter 6.5 HA – Overview (Part 1)
vCenter 6.5 HA – External PSC Deployment (Part 2)

You end p3 of this article by saying
“In Part 4 of this multi-series we will run a few start things off by running a few configuration scripts on the PSCs…”
But that seems to be missing from p4
LikeLike
Thank you for pointing that out. I updated Part 4 of the blog post.
LikeLike
Great article thanks. I’m running into an issue that looks like it was fixed in 6.0U1. Let me know if you have any thoughts on this, https://kb.vmware.com/kb/2120514. I’m using the latest 6.5 (as of June 2017) and getting the same issue. I’ve got a ticket into VMWare to try and solve the issue, not finding any KBs that show this as an issue in 6.5
LikeLike
Looks like some type of SSL / certificate handshake error but I have not seen the specific issue you are faced with first hand. I’m curious about the end result from VMware support. Please repost an abbreviated answer/resolution once your issue is resolved. Good luck!
LikeLike
Hey,
Found out the issue with VMWare’s technical support, I should have caught it as I would going through the KB 2147627.
In the section titled “Replacing the Certificates on the Platform Services Controller”.
They show the first certificate to use as the chain certificate created earlier in the KB.
Please provide valid custom certificate for Machine SSL.
File : /certs/psc-ha-vip-chain.crt
This is the wrong cert to use. Use the cert psc-ha-vip.crt, not the chain cert. The 3rd cert you apply is the root cert, and thus creates the chain. VMWare technical support is going to be updating this KB with the correct information.
Hope this helps everyone else. Thanks again for a fantastic article on this subject.
-Reza
LikeLike
That’s strange. I was able to get through this procedure without any issues. I’ll have to look through again to see where you may have encountered your error again.
LikeLike