A little over a year ago in June 2016, VMware announced that they were acquiring the company Arkin Net and from this acquisition we have the powerful solution vRealize Network Insight (vRNI). This solution introduces another level of intelligence to the SDDC which enables you to create a highly-available, optimized and more importantly a secure network infrastructure that can span multiple clouds.
Micro-segmentation is one of the many reasons people are interested in NSX. vRNI helps you speed up the deployment and effectively plan micro-segmentation thus enhancing security for your vSphere environment. After that is complete you can bolt VMware AppDefense onto your solution and enjoy the benefits of having a “next generation” security platform that combats these “next generation” attacks that we are seeing nowadays.
You can learn more about VMware AppDefense from my VMworld 2017 blog article Here.
Another useful feature vRNI provides is the complete visibility between the software defined NSX “overlay” and your underlying physical network infrastructure. This greatly enhances operations and manageability like never before. I’ll be 100% honest with you. A lot of customers that I spoke to in the past hesitated with NSX initially because it was difficult to visualize between physical and virtual network connectivity and ultimately made troubleshooting a bit cumbersome. I am seeing a lot less hesitation now with customers as they are now “chomping at the bit” to get their hands on NSX. Not just because of the feature set you get with vRNI but NSX has reached an entire new level in the data center now. Bottom line is when it comes to visibility and planning, VMware answered the bell with vRNI because you have those abilities now. You have complete 360 degree visibility between NSX and your physical network and easily plan for NSX.
If you want to test vRNI and see what it can do for your environment first hand, check out the VMware Hands-on Lab (HOL) for free HERE. This HOL has 3 sections that will take you through the following topics:
- Micro-segmentation & Security
- 360 Degree Visibility between Virtual & Physical Networking
- Advanced NSX Management & Operations
So that lab environment is completely set up and ready for you to use. I have been through the HOL several time to familiarize myself with vRNI. I really liked it and I think you will too.
My blog article will focus on deploying vRNI for your vSphere environment.
Installation Prerequisites
Like any other installation, we have some prerequisites that we need to be aware of and adhere to before deployment. There are “minimum” hardware requirements that must be met for the OVA deployment and installation.
First off, there are two (2) OVAs that will be deployed; the Platform OVA and the Proxy OVA. The virtual hardware specifications for these appliances are summarized in the following table.

Software requirements are simple…Google Chrome or Mozilla Firefox web browsers. There are some “privileges” required for the data sources. Those can be found on Page 8 of the “Installing vRealize Network Insight” guide (PDF) from VMware.
The following products from VMware are required at a minimum in order to deploy vRNI.
VMware vSphere
- vSphere 5.5 up to Update 3
- vSphere 6.0 up to Update 2
- vSphere 6.5
In order for IPFIX to work properly…
- vSphere 5.5 Update 2 – Build 2068190 or higher is required
- vSphere 6.0 Update 1b – Build 3380124 or higher is required
- The vSphere Distributed Switch (vDS) must be version 5.5 or above.
VMware NSX
- NSX 6.0
- NSX 6.1 (up to 6.1.7)
- NSX 6.2 (up to 6.2.6)
- NSX 6.3 (up to 6.3.1)
There are also other products and version number requirements that must be adhered to including Cisco UCS, Cisco Nexus/Catalyst switching as well as switching from Arista, Brocade, Juniper, HPE and Palo Alto. Details of these can be found on Pages 9-10 of the same PDF link I provided above for Installing vRNI.
4-Step Deployment
The deployment is completed in 4 easy steps. Here is a high-level overview of those steps in order.
- Deploy/Install the vRNI Platform OVA by importing the OVA from vCenter Server. You import it just like any other OVA you have deployed in the past.
- Activate the vRNI license from the Platform HTTPS interface. By default vRNI operates in “NSX Assessment Mode” which is essentially an Evaluation Period. This assessment period and evaluation license is also used if you are working with a VMware Partner and conducting a VMware Network Assessment (VNA). If you don’t know about this assessment please talk to me.
- Generate Shared Secret and complete the setup of the vRNI Proxy OVA.
- Confirm deployment of the Proxy OVA and finalize data sources that will be analyzed/monitored by vRNI.
vRNI Platform OVA Deployment
I am deploying my Platform OVA from the vSphere Web Client and more specifically to the Management Cluster in my vSphere environment. I have a total of three (3) clusters in my environment: Compute, Edge and Management. The Compute Cluster is running all of my business workloads (VMs), the Edge Cluster is responsible for all of my NSX Edge Control VMs for my NSX routers (ESG, DLR and UDLR) and the Management Cluster run everything responsible for operations including the PSC, vCenter Server, NSX Manager, NSX Controllers, vROPS, DNS Servers, AD Domain Controllers and so on.
Here are the screenshots of my Platform OVA deployment from the vSphere Web Client (By the way I am running vSphere 6.5 in my environment).
I simply right-click the target cluster where I wish to deploy my vRNI platform OVA and select Deploy OVF Template and follow the wizard.. In this case I am targeting my Management Cluster. Here are some simple tasks that you should have ready to go before deployment.
- Hostname (FQDN) for both appliances (Platform and Proxy).
- Reserved Static IP Addresses; create the Forward and Reverse records in your DNS server prior to deployment.
- NTP server.
- Optional – if your environment is behind a proxy server make sure you have the necessary information available about proxy connectivity for web access. This information will be entered in the ‘Advanced Configuration’ section of the Customize Template portion of the deployment wizard.
Activate License & Generate Key
Next we are going to activate the license from the web browser. There are two types of licenses that can be used. You can purchase a Full Production license of vRNI or use the Evaluation Mode. By default the appliance operates in Evaluation Mode but still requires an evaluation license key.
To license your new vRNI deployment, simply open Chrome or Firefox and enter the following URL:
https://<platform-IP-address>
or
https://<platform-FQDN>
Enter the License Key and select VALIDATE.
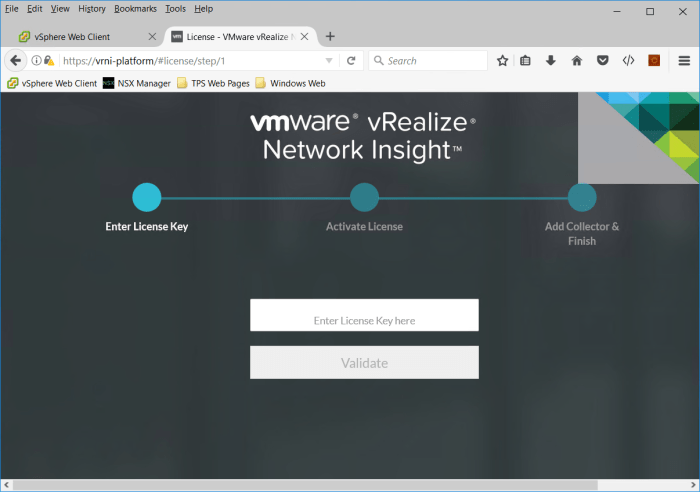
On the Activate License page you will see your LICENSE KEY and the Number of Sockets vRNI is entitled to; next you will be prompted to set the Admin password (Between 8 and 100 characters and must be alphanumeric). Select Activate when finished.

On the Add Collector & Finish page select GENERATE to create a shared key that will be used during the deployment of the Proxy (aka data collector). During the deployment of the Proxy OVA (Collector) you will be prompted to enter this key. Notice below collector status indicates NOT YET DETECTED. Leave this webpage open and move onto the Proxy OVA deployment.

Deploy Proxy OVA
Next we are going to deploy the Proxy OVA appliance. The same procedure we used earlier to deploy the Platform OVA in the vSphere Web Client is going to be used here. During the ‘Customize Template’ portion of the wizard you will be prompted to enter the Shared Secret (Key) that you generated earlier. Paste the key into this portion of the wizard.
When the vRNI Proxy OVA powers on and finishes booting the Platform OVA webpage that you left open earlier will eventually indicate Proxy Detected! Click Finish.

The webpage will refresh and you may see a notification in a GOLD box in the upper right hand corner that states the APPLICATION IS LOADING. Wait a few minutes before logging into the vRealize Network Insight Webpage.
The default login username for the web UI is admin@local and the password you specified earlier when you activated your license. Upon login for the first time you will be prompted to ‘Join the VMware Customer Experience Improvement Program’. Check or uncheck this box and click Submit.
The next step is to configure the vRNI with your vCenter Server. You will see the VMware vCenter icon on the webpage. Click it.
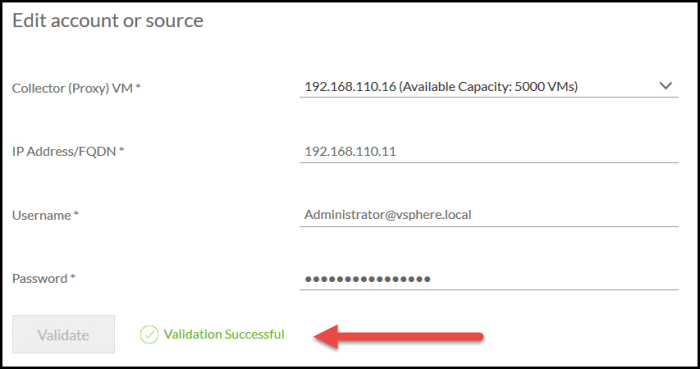
Enter the Account/Source information for vCenter Server (IP address or FQDN) and click VALIDATE. Validation should be Successful!
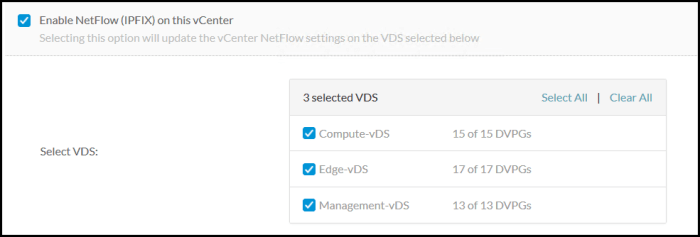
Next you have the option to Enable NetFlow (IPFIX) on this vCenter. When you select this option the option to select the VDS in the environment will appear. Select ALL or select specific VDS that you want to enable NetFlow (IPFIX).
Next enter a NICKNAME for the vCenter Server (Note are optional) and then click SUBMIT at the bottom of the page.
On the Accounts and Data Sources page click Add source again in the upper right-hand portion of the web page. Next you want to enter the NSX Manager as a data source. Follow the prompts to add the NSX Manager(s) to vRNI. Select the additional options:
- Enabled NSX Controller (prompted for NSX Controller password)
- Enable Automatic NSX Edge Population (Use NSX central CLI instead of SSH)
- Enable IPFIX
- Provide a nickname for the NSX Manager and click SUBMIT.
Proceed with adding additional Data Sources in vRNI. Here is a summary of the sources that can be added to vRNI. For the physical routers and switches you will need SNMP related information (SNMP version, community string, passwords, authentication type, etc.).
VMware Manager
- vCenter Server
- VMware NSX Manager
Firewall
- Palo Alto Networks Panorama
- Check Point vSEC Management Server
Converged Infrastructure
- Cisco UCS Manager
- HPE Virtual Connect Manager
- HPE OneView Manager
Routers & Switches
- Cisco Catalyst 3000, 4500 and 6500
- Cisco Nexus 5K, 7K, 9K and VSM (Nexus 1K)
- Arista Switch (SSH)
- Brocade VDX 6740/6940 and MLX
- Juniper Switch (SSH)
- Dell Powerconnect 8024 (SSH), Force10MXL10 and S4048 / Z9100 / S6000
The more data sources you enter into the vRNI configuration the more it will know and understand about your virtual and physical infrastructure. So you goal here is straightforward…ENTER AS MUCH INFO AS POSSIBLE!
Useful Links:
VMware vRealize Network Insight (Homepage)
VMware vRealize Network Insight Documentation
VMware Product Interoperability Matrices
YouTube videos:
VMware vRealize Network Insight: Microsegmentation
VMware vRealize Network Insight: Visibility
VMware NSX and vRNI Enabling Customer Operations
BE SOCIALABLE…SHARE! 🙂
