If you could not tell yet, I have been doing a lot lately with the NSX Advanced Load Balancer (AVI) and really enjoying it. My knowledge and understanding of the product has increased over the last few weeks. I’ve become a big fan because of the tremendous value it can provide customers. These days we constantly hear phrases such as “any app, any cloud, any, any any…” and truth is this solution fits that bill. Reduce friction in modern day application delivery multi-cloud application services platform.
- On average customers see 90% faster application delivery. If that isn’t acceleration then I don’t know what is.
- Automation! Take advantage of programmable app services along with ecosystem integration with 100% RESTful API’s. On-demand Autoscaling on-prem or in the cloud.
- Persistent network performance monitoring, security monitoring and app analytics enabling you to troubleshoot in seconds.
- Point-and-Click Layer 4 through Layer 7 security features and capabilities using the the intelligent web app firewall (WAF).
- Software-defined scale-out architecture that decouples the central control plane (CCP) from the distributed data plane (DDP). Single management point with elastic scale that respond to the growth of the business.
- Scalable Containerized Apps with multi-cluster, multi-site support; integrated DNS and IPAM as well as local and global load balancing.
- 50% Lower TCO using a 100% software-defined approach. No proprietary hardware = no pain from the impact to global supply chain waiting on bare metal equipment. Download and go!
So if you have not started using the NSX Advanced Load Balancer (aka AVI), you need to stop playing with these other LB solutions that simply won’t cut it. This is true software-defined solution with an elastic architecture for the modern data center.
Benefits:
- Multiple form factors: x86, container, public cloud, VM’s
- Role-based Access: Developers and Admins can use same centralized console
- Separation of the Control Plane and Data Plane
- Software-defined that mirrors dynamic data centers and clouds
- Multi-cloud Solution: on-premises, private or public cloud, container-based
- Elastic Scale: predictive autoscale and no over-provisioning
- Application Centric: ability to deliver services closer to the apps; N/S or E/W utilizes per-app load balancing
- Application Insight: app analytics, record and replay traffic related events
NSX-T Integration
Before we get into it, you should have a good understanding of NSX, its architecture and features. This is not meant to be a technical deep-dive for either product but I will get into the two solutions coming together. If you need to brush up on your NSX knowledge, reference the VMware NSX-T Data Center Documentation site.
A great place to start before I begin the step-by-step process would be to review the NSX-T Design Guide for Avi Vantage. Available online and downloadable to PDF. You should also review the AVI Ecosystem support matrix to ensure the solutions you are working with are compatible with one another. In addition to the AVI support matrix you should review the VMware Product Interoperability Matrix. Click HERE to see VMware NSX-T Data Center (all versions) and NSX Advanced Load Balancer (all versions). I will be using NSX-T 3.2 and NSX Advanced Load Balancer 21.1.3.
Few tasks that are completed prior to starting this integration that I will not take you through.
- NSX Advanced LB (AVI) OVA is deployed and online.
- Content Library for AVI is created in vSphere. The Content Library I am using is AVI-CL in my lab environment.
- NTP is synchronized across the environment. Do not overlook this!
- NSX-T is online and configured. I will be doing a few minor tasks in NSX but will not be taking you through a complete NSX deployment or configuration.
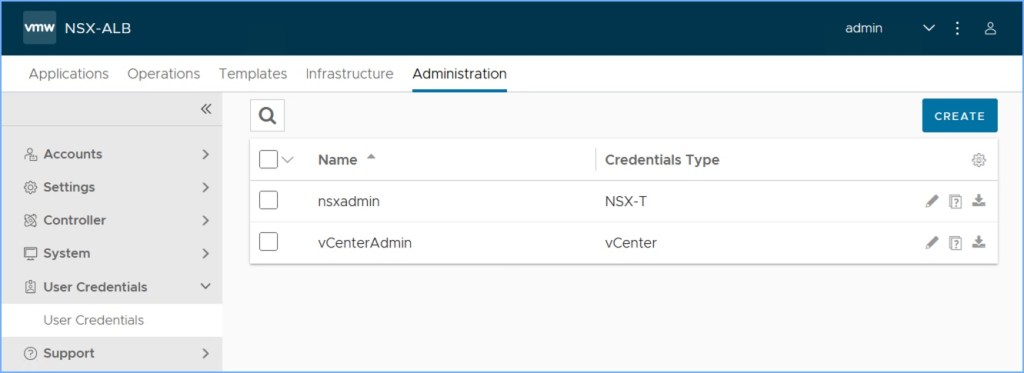
Credentials
First set the User Credentials for NSX-T and vSphere, specifically the vCenter Server. They will be required during the process of adding the NSX-T Cloud in the AVI Management UI. Create the credentials from the ‘Administration > User Credentials’ section.
NSX-T T1 Gateway and Segments
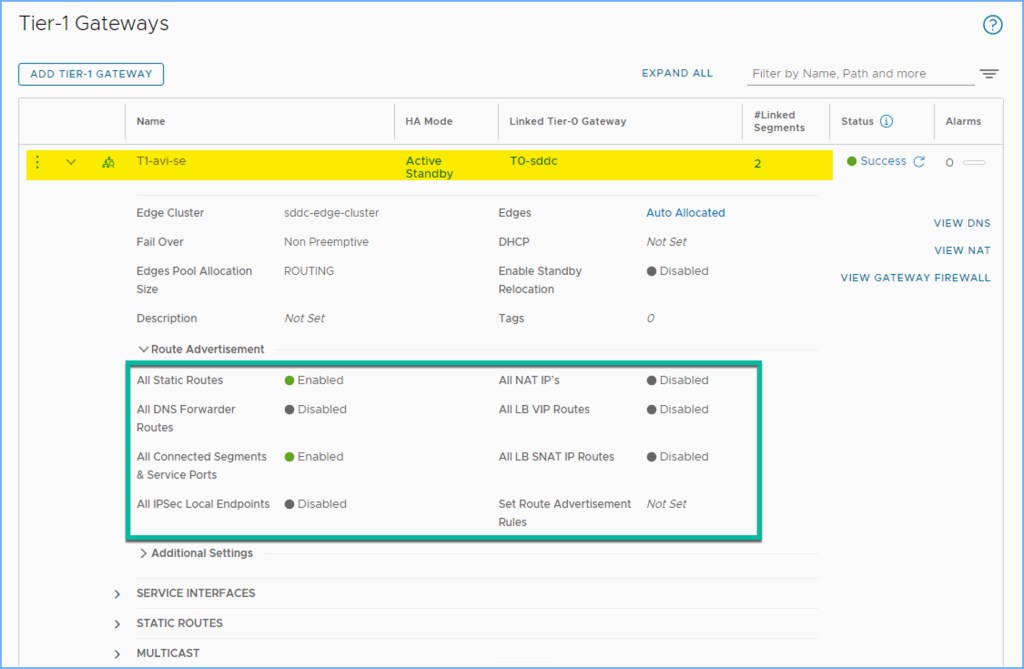
Next we are going to configure a new T1 gateway, a couple segments and attached the them together. They will be used by the AVI Service Engines (SE). I already have a T0 gateway deployed and configured. The new T1 gateway that I am going to create will connect to this existing T0.
First, let’s take a look at the T1 gateway named ‘T1-avi-se’ below. As you can see it is connected to my upstream T0-sddc gateway. The only things you want to enable Route Advertisement for right now is Static Routes and All Connected Segments & Service Ports. Leave the rest disabled for now.
Next I am going to create my two segments for the SE’s in my overlay transport zone. One segment is used for SE LB Management and the second is used for the SE LB VIP’s. The address space I configured for this step is AVI-SE-mgmt (10.10.0.0 /26) and AVI-SE-vip (10.10.0.64 /26). The gateway for each segment is the first IP available in each; 10.10.0.1 /26 for management segment and 10.10.0.65 /26 for my VIP segment. You can configure these using separate /24 networks if you wish. As long as they’re separated you are good to go.

I also create a DHCP Server in NSX for my AVI SE Management segment. I need this to hand out IP addresses to my SE’s as they are deployed into my environment. Create the DHCP Server Profile and then apply the DHCP config to the AVI Management Segment. Don’t worry about the SE VIP segment at this time, AVI IPAM will be used to configure IP’s for this network.


Create NSX-T Cloud
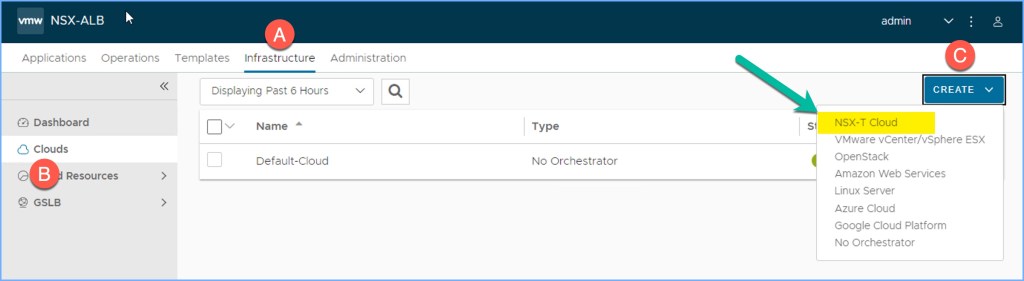
Now we are going to establish the integration between AVI and NSX-T by creating a Cloud from the Infrastructure section of the management UI.
1. From the management UI, navigate to ‘Infrastructure > Cloud’ and click on the Create drop-down menu and select NSX-T Cloud.
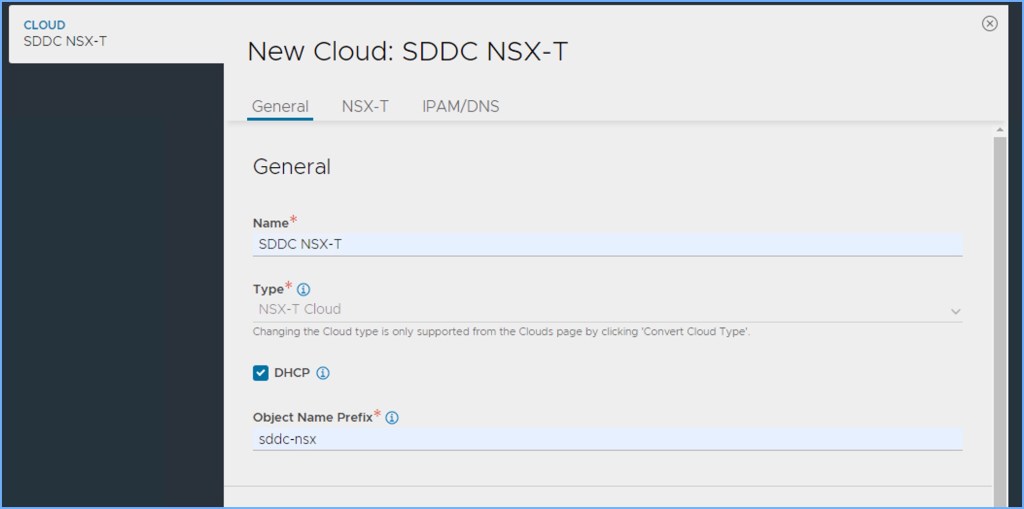
2. New window will appear to begin creating the NSX-T cloud instance. Under the General section provide a Name, select DHCP (optional if used) and enter an Object Name Prefix.
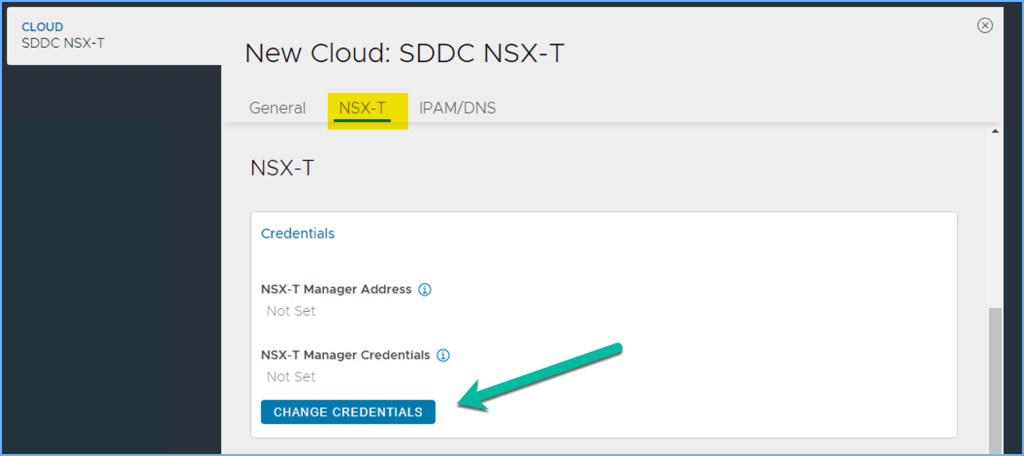
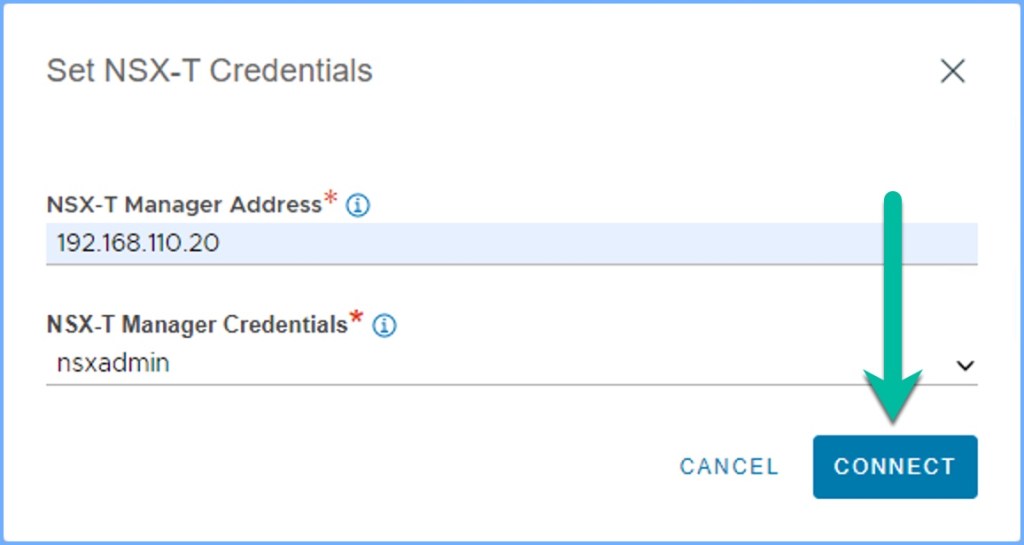
3. Under the NSX-T section, select the ‘Change Credentials’ button and enter the credentials to authenticate with the NSX Manager appliance. Click Connect.
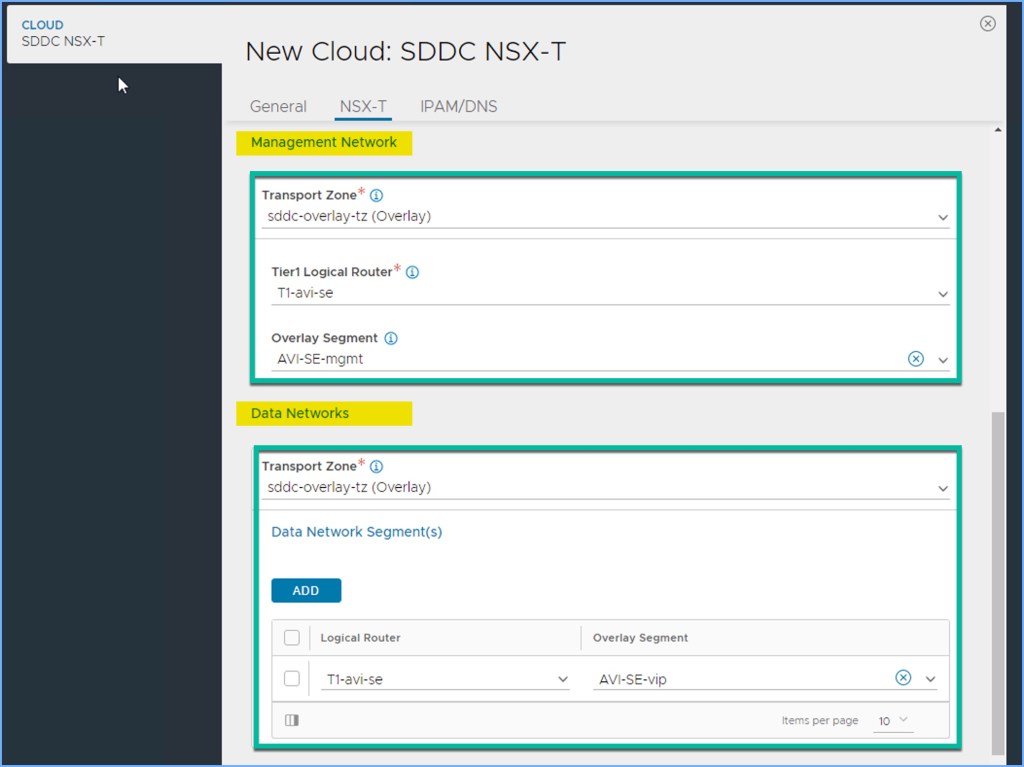
4. Once connected, scroll down to the ‘Management Network’ portion below and select the Transport Zone (overlay), T1 logical router, and the Overlay Segment for the SE Management that we created above. Then under ‘Data Networks’ choose the Transport Zone (overlay) and then add the Logical Router and Segment for the SE VIP’s.
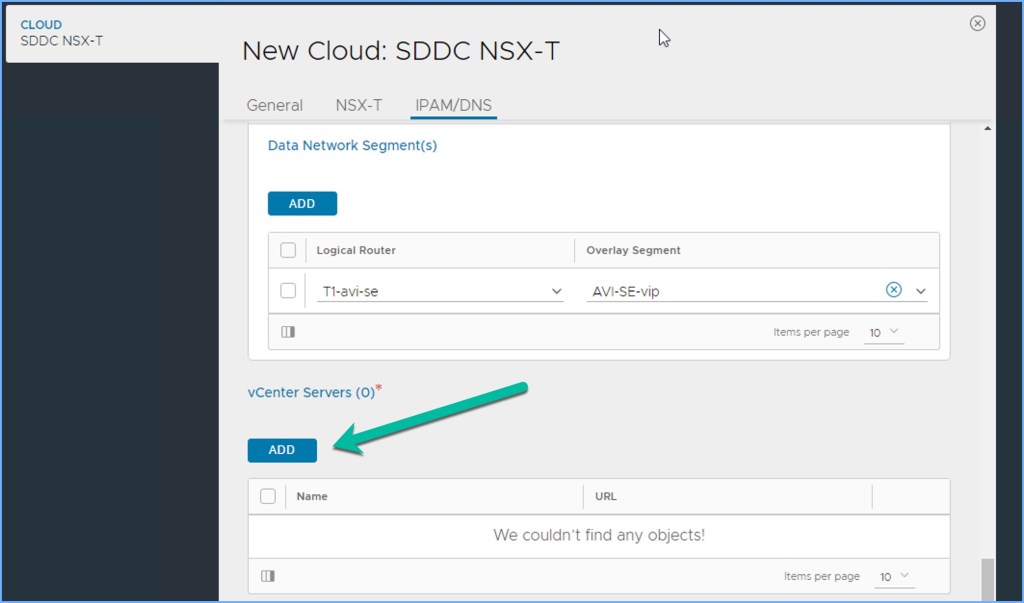
5. Next under the IPAM/DNS section we will add the vCenter Server to the configuration and use the credentials we configured earlier. Click Connect and
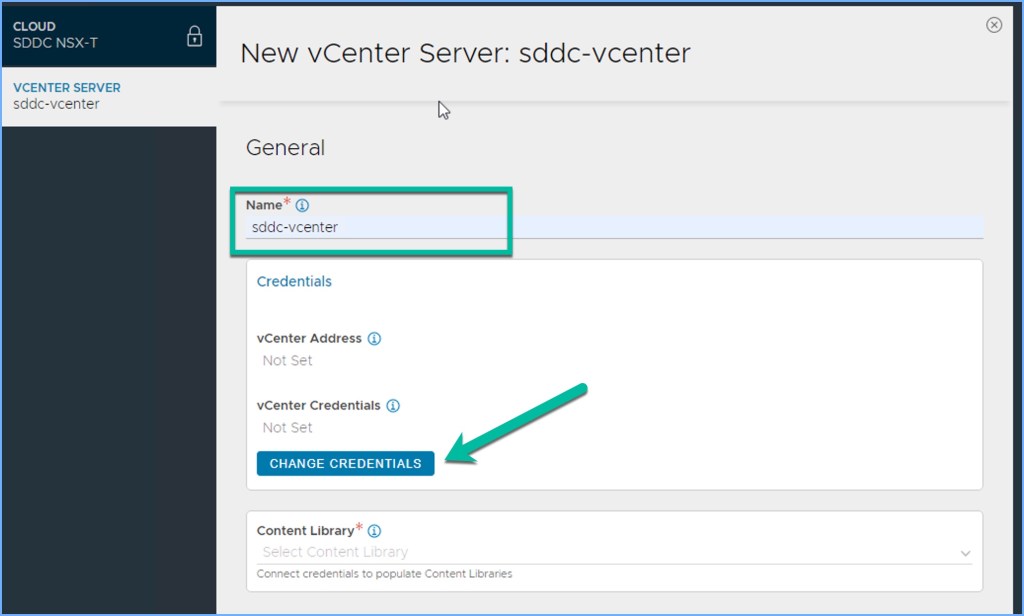

6. Once vCenter is added to the configuration, you can now select the Content Library. In this case I select ‘AVI-CL’ from the drop-down menu and click DONE in lower right-hand corner.

7. We are not going to add the IPAM/DNS profiles or a DNS Resolver. Click SAVE. The status column should have a YELLOW dot. Wait patiently for the process to complete.

And that is it for now when it comes to adding an NSX-T Cloud to your NSX Advanced Load Balancer configuration. From here you can add additional NSX-T Clouds to your environment, assuming they exist. You can have up to five (5) as of AVI version 20.1.3. From here you can proceed with SE Group Scoping for SE Placement and proceed with the overall deployment including your IPAM, Virtual Service(s) and test this against an application.
USEFUL LINKS
NSX-T Integration Best Practices (VMware NSBU – January 2022) (PDF)
NSX Advanced Load Balancer (Avi)
NSX Advanced Load Balancer Documentation
NSX-T LB Encyclopedia (VMware Communities / PPTX deck link on site)
Creating an NSX-T Cloud (Version 21.1)
Creating an NSX-T Cloud (Version 21.1 – PDF)
We have a great practice at WWT and have a lab available on our ATC (Advanced Technology Center) for Avi Ansible Automation. Purpose of the lab is to get familiar with automating Avi for your network infrastructure.
