Wow it has been a long time since my last post. I have been incredibly busy working with my customers and making sure they’re on track with everything they need during this global pandemic. Rest assured, we will get through this together!
I finally have some ‘downtime’ to do some blogging and the first thing that came to mind was upgrading NSX-T 2.5 to NSX-T 3.0. As with any upgrade you are performing (not just NSX) it can go sideways if you are not well prepared. Make sure you review ALL of the prerequisites before you perform an upgrade. Before you touch anything, review the upgrade documentation, release notes, compatibility lists, interoperability guides multiple times. Create a customized runbook that tracks your preparation and progress. I highly recommend this becoming a ‘best practice’ of yours with any upgrade you are readying yourself for.
What’s New in 3.0?
Here is a brief outline of the new features available in NSX-T 3.0.
- NSX Federation – enables you to manage multiple NSX-T Data Center environments with a single pane of glass view.
- Integrated Role Based Authentication – this version no longer requires the use of VMware Identity Manager (vIDM); leverage eleven (11) built-in roles.
- Distributed IDS/IPS – functionality that enhances the security capabilities of the service-defined FW.
- VRF Lite – new routing construct that is used to configure ‘per tenant data plane isolation’ all the way up to physical network infrastructure.
- Converged NSX on vDS 7.0 – This means you no longer require additional NICs to deploy NSX-T in a greenfield deployment which simplifies the overall deployment and maintaining it moving forward.
- Container Networking Enhancements – great Kubernetes (K8s) enhancements which will help continue to modernize operations and deliver a more integrated experience between on-prem and cloud based networks.
NSX Upgrade Preparation
Let’s get into the upgrade and the preparation you must complete before you fire up that upgrade procedure. There is a strict task sequence you must follow in order to for your upgrade to be successful. Miss a step and the upgrade is immediately at risk. The NSX-T 3.0 Upgrade Guide (PDF) is a great resource and you should review this document several times.
Is there an ‘operational impact’ for the NSX upgrade? Yep! The amount of time you will spend upgrading depends on the number of components that need to be upgraded; number of hosts? Number of edges? The more there are the more time required.
There are three (3) steps during the upgrade procedure and in the following order:
- NSX Edge Cluster
- Hosts (aka Transport Nodes)
- Management Plane
There are impacts during the upgrade of the Edge Cluster as well as the Hosts. The documentation has a great table summary on Page 8 of the NSX-T 3.0 Upgrade Guide (PDF) that I linked for you above. There are various things you will experience during the upgrade and post upgrade that you should be well aware of and must include in your preparation. There are limitations on ‘in-place upgrades’ which is also summarized on Page 8-9; Management Plane impacts are summarized on Page 9.
Update Sequences & Interoperability Matrices
Assuming you have other VMware based solutions in your environment such as vRealize Suite (vROps, vRA, vRLI, etc.), Site Recovery Manager (SRM), NSX and/or vSAN there is a required update sequence that you must adhere to ensure interoperability between the solutions remains consistent, maintains compatibility. Your current environment version of vSphere will dictate which update sequence you will take. Below are links for vSphere 6.5, 6.7 and 7.0.
Update Sequence for vSphere 6.5 and compatible VMware Products (KB 2147289)
Update Sequence for vSphere 6.7 and compatible VMware Products (KB 53710)
Update Sequence for vSphere 7.0 and compatible VMware Products (KB 78221)
Another best practice when preparing the upgrade of any VMware environment is to review the HCL as well as the VMware Product Interoperability Matrices. In this blog article I am using my nested lab. The Interoperability Matrix link below summarizes only the specific solutions currently deployed.
Lab Environment Interoperability Matrix
The lab environment for this blog article I am using vSphere 6.7 and NSX-T 2.5. Specific build numbers are summarized below.
- vCenter Server 6.7 U3 – Build 16275304
- VMware ESXi 6.7 U3 – Build 16316930
- NSX-T 2.5.1 – Build 15314292
Make sure you know the versions of your environment followed by reviewing the release notes for the targeted version you plan to upgrade to. This is a critical step that needs to be taken to ensure the upgrade is successful. Hopefully your environment is well documented. You can also leverage free tools such as RV Tools to pull the information you need about your existing vSphere environment.
The nested lab is a very simple setup. I have two clusters, each with two ESXi hosts (so 4 hosts total) and one vSphere Distributed Switch that spans both clusters. I have an SDDC Compute cluster for my workloads that are currently using NSX-T 2.5 overlay network connectivity. The other cluster is a dedicated ‘Edge-Management’ cluster for my NSX edge VM appliances and other management components. There is a 3-tier application deployed and connected to NSX-T overlay segments; completely routed and operating flawlessly. My NSX-T backups are also successful and ready to go.
Three node management cluster is deployed and stable. Below is a couple screenshots from NSX Manager.


Pre-Upgrade Tasks
There are a few extra steps required before getting started. First, provision a secondary disk of 100 GB on each NSX Manager appliance. When you execute the ‘Upgrade Coordinator’ from NSX Manager the disks should be detected. If they are not then simply reboot each NSX Manager appliance one at a time. Then re-run the Upgrade Coordinator, which you will see in a moment when I take you through the procedure step-by-step.
For obvious reasons, make sure you have a successful backup of NSX. If you have automatic backups (assuming you most likely do), you will have to disable it before you begin the upgrade procedure.

The remaining pre-upgrade tasks are on pages 9-11 of the NSX-T 3.0 Upgrade Guide PDF that I provided you earlier. I’m not going to go through each and every one at the moment as they are fairly easy. The ones I just reviewed are commonly overlooked and may require some workarounds.
As stated previously, the lab environment I am working with is running vSphere 6.7. If you are following along with the upgrade guide and see the ‘Upgrading Your Host OS’ section starting on page 11, this procedure is here in the event you are running an unsupported version of ESXi for NSX-T 3.0 or other unsupported host OS such as RHEL, CentOS, Ubuntu or SUSE .
vSphere ESXi 6.5 U2 or U3 are both supported for running NSX-T 3.0. Anything prior to 6.5 U2 you weren’t running NSX-T 2.4 or later anyway; 6.7 U1 or later is required for running NSX 2.4 or 2.5 so you should not have much to worry about there either. Basically, don’t forget to review the Supported Hypervisor Upgrade Path in Table 2-1 on page 9 is all this is saying. In the event you must upgrade any hosts, double check the HCLs prior to upgrading. Don’t assume things will continue to work when using the latest and greatest.
NSX-T 3.0 Upgrade Procedure
Here is the step-by-step upgrade procedure for upgrading my NSX-T 2.5.1 infrastructure to NSX-T 3.0. The NSX upgrade bundle (.mub file) is downloaded and ready to go.
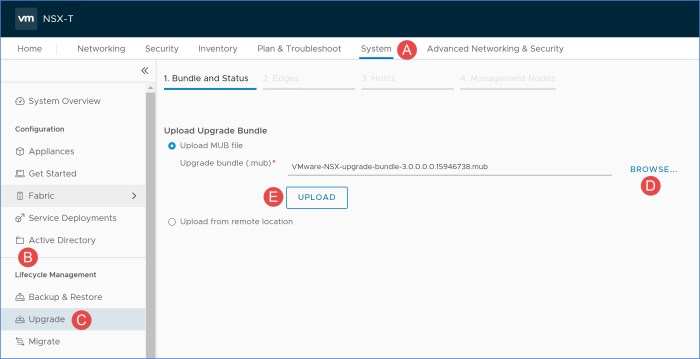
- From the NSX Manager, browse to ‘System -> Lifecycle Management -> Upgrade’ to upload the upgrade bundle (.mub) file that you have downloaded. Click Upload and wait patiently for the ~8GB file to upload. Once uploaded it will begin verifying the upgrade bundle signature and check compatibility matrix of bundle.
- Once the upload and verification is complete the procedure will state ‘Upgrade Bundle retrieved successfully’ and you can now click Begin Upgrade.

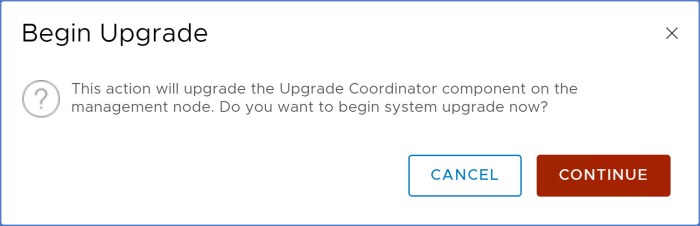
- The EULA will appear (not pictured). Scroll to the bottom, check the box and click Continue. A ‘Begin Upgrade’ dialog box will then appear (below) stating the action will upgrade the ‘Upgrade Coordinator’ component on the management node. Click Continue.
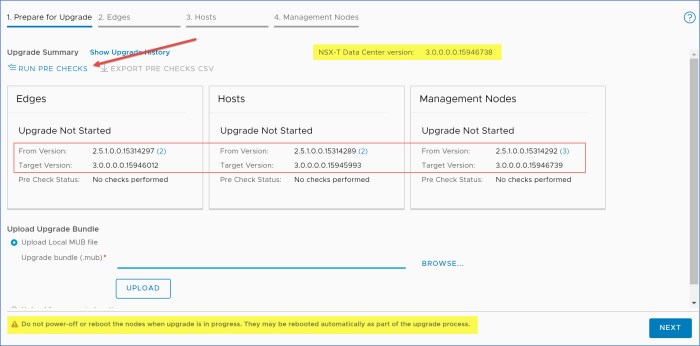
- The screen will refresh for a brief moment. You will then see a summary for the Edge, Hosts and Management Nodes summarizing the current version to the target version. Note the warning message below to not manually power-off or reboot any of the nodes when upgrade is in progress. Select ‘Run Pre Checks’ link at the top left.
- The ‘Run Upgrade Pre Checks’ dialog box will appear. Select Run Pre Checks.

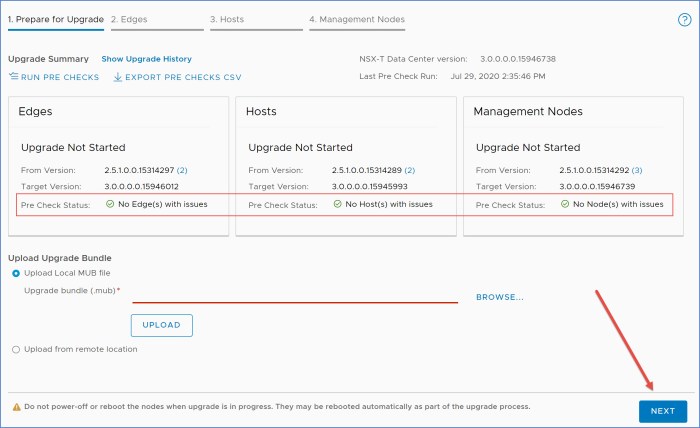
- The screen will refresh and you will see the ‘Pre Check Status’ for the Edges, Hosts and Management nodes execute a quick process. May take some time depending on the number of components in your NSX-T 2.4/2.5 environment.
NOTE: This is the point in the procedure if the secondary 100 GB disks are not detected on each of the NSX Managers, it will error out and tell you you may need to reboot. If that happens, reboot each NSX Manager one at a time and then re-run the pre-check process. Wait for the Management Cluster to be in a stable state before rebooting each node. I also recommend kicking off another NSX backup (manual) once the cluster is back online.

- Once the pre-check is finished and everything is ready to go, click Next.
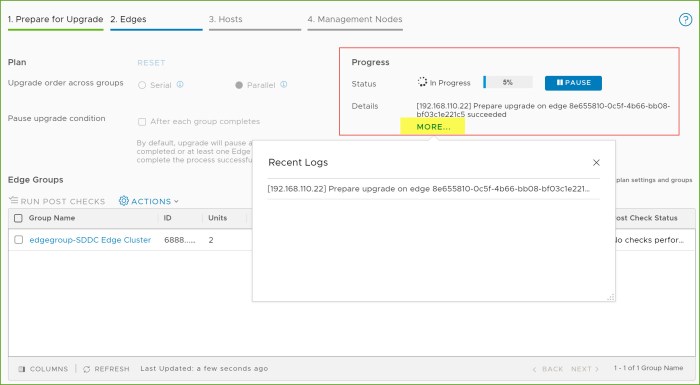
- Next the upgrade is going to start with upgrading the NSX Edges but some preparation for upgrade must occur first. I have a single Edge cluster w/ 2 Edge VMs at this time so serial and parallel options are not relevant to me right now. If I had multiple Edge Clusters in the environment, these options (settings) would allow me to define how the Edge Clusters are to be upgraded, either Serially or in Parallel. Click Start to begin the upgrade. The ‘Upgrade Status’ below will change to ‘In Progress’ and click ‘More’ next to details to view the steps of the upgrade process per the logs.

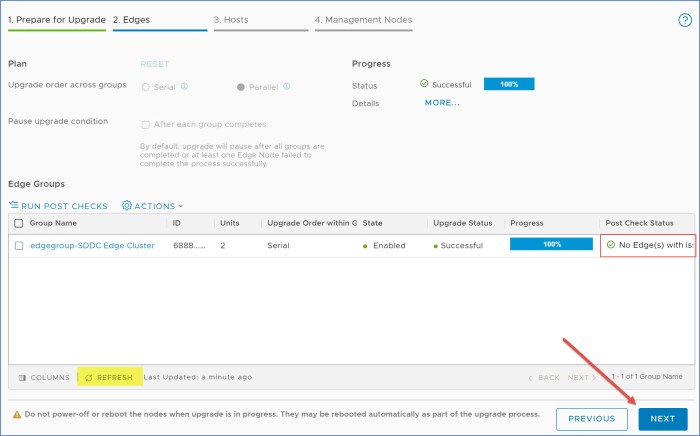
- Once the preparation to upgrade the Edges is complete, click on the ‘Run Post Checks’ link. A small dialog box will appear (not pictured), click the Run Post Checks button.

- Post Check comes back with no issues (might have to click Refresh at the bottom). The Edges are upgraded, click Next to proceed.
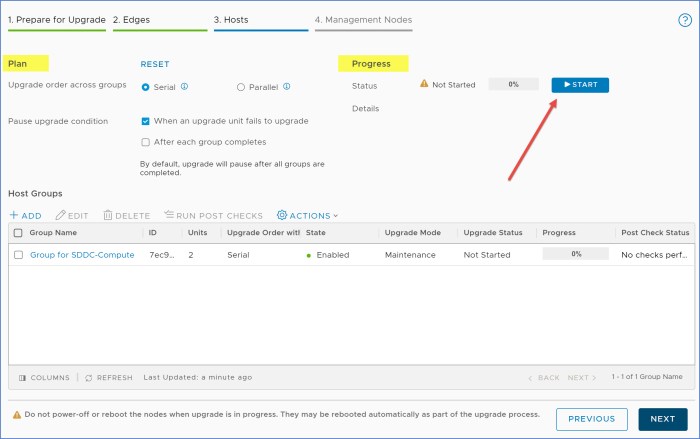
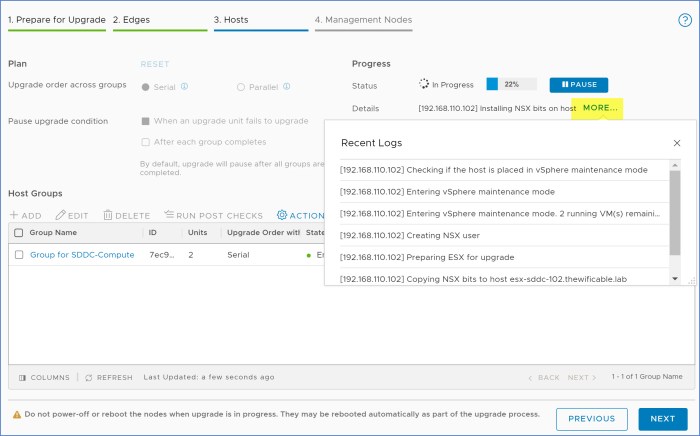
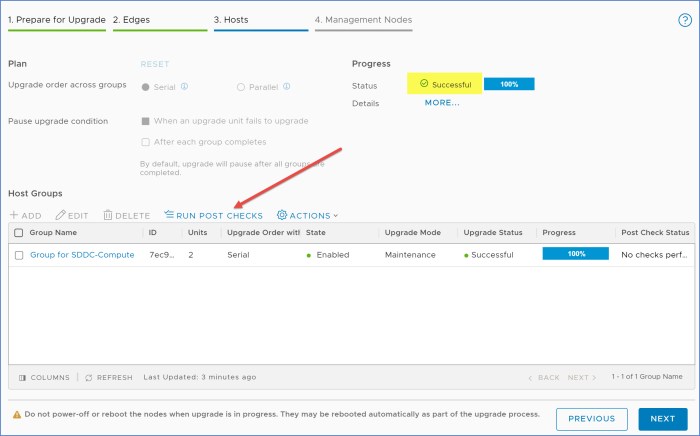
- Next the Hosts will be upgraded. You will see the Plan settings as well as the Progress just as you did during the prep phase. Click Start. The Status will change to ‘In Progress’ and click ‘More’ to follow the details of the upgrade process.
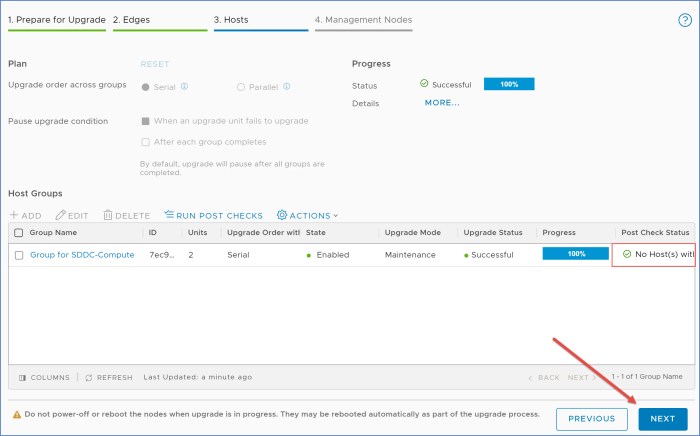
- The upgrade completes successfully and click Run Post Checks just as we did in the previous step. A small dialog box will appear (not pictured), click Run Post Checks.
- The Post Check comes back successful with no issues, click Next to proceed to the final portion of the upgrade and the Management Nodes.
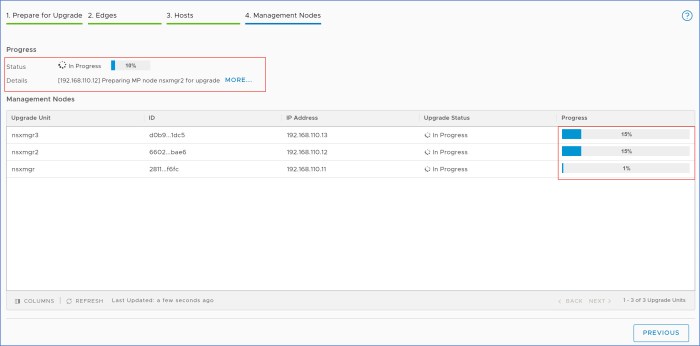
- Here you will see the three (3) nodes that are the NSX management cluster. Click Start to begin the procedure.

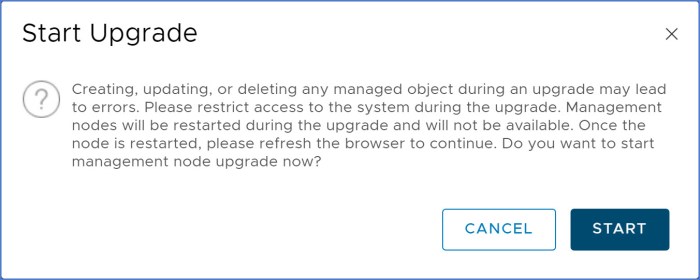
- The ‘Start Upgrade’ dialog box appears with some important information. Make note that during this step the management nodes will become unavailable as they will be restarted during the upgrade. Once a node is restarted you should refresh the browser window to continue. Click Start when you are ready. My recommendation here is to open VMRC console windows for each of the management nodes and monitor the upgrade procedure.
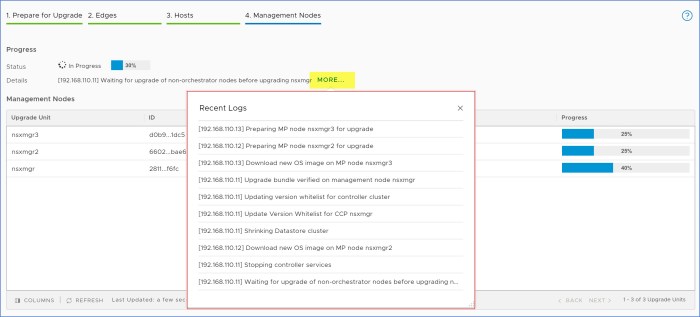
- You will see the progress with the other two management nodes (non-orchestrator nodes) as they will be upgraded prior to the primary management node that is also the upgrade orchestrator node. Click ‘More’ to monitor the progress and logs, the most recent task in the upgrade procedure is at the bottom. The nodes will upgrade and reboot one by one.
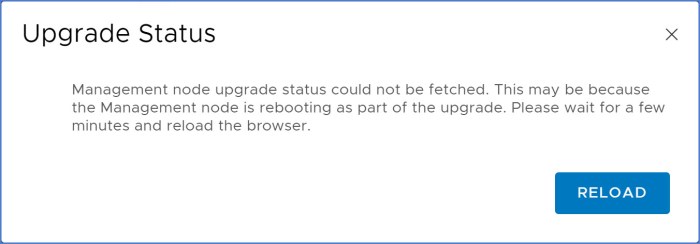
- Will receive a message in your browser when the primary management node (orchestrator node) is rebooted. Click Reload to refresh the browser. It may take a few moments before the upgrade process screen reappears. If you are following the rebooting management nodes from the console windows, you will see at the top of the window when it reboots the version of NSX-T on the appliance is now 3.0. Be patient as it will take a little time for the manager to come back online and resync with the other nodes.

- Once the upgrade completes and the main node that was running the upgrade orchestration (upgrade coordinator node), you will log into the NSX Manager. The interface will look a little different because you are now officially running NSX-T 3.0! So congratulations. You will also notice a licensing warning at the top of the browser screen, so get your NSX-T 3.0 license ready. Navigate to ‘System -> Lifecycle Management -> Upgrade’ and view the status. Notice the ‘In Progress’ icon on the page.

- The screen will refresh for a brief moment. The upgrade process is still ongoing at this point. Wait patiently for the process to complete. You will likely get at least one more notification to ‘reload’ the web page again.

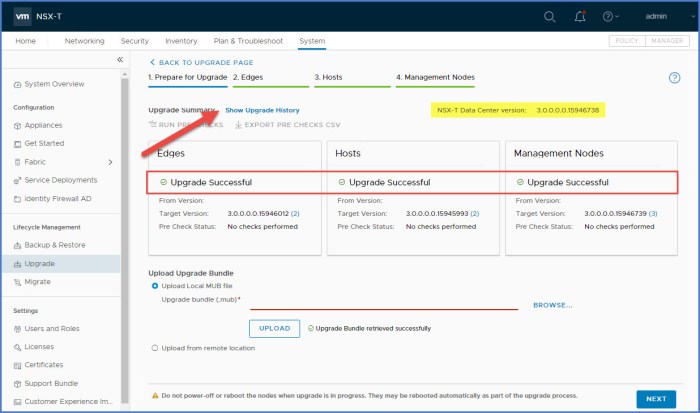
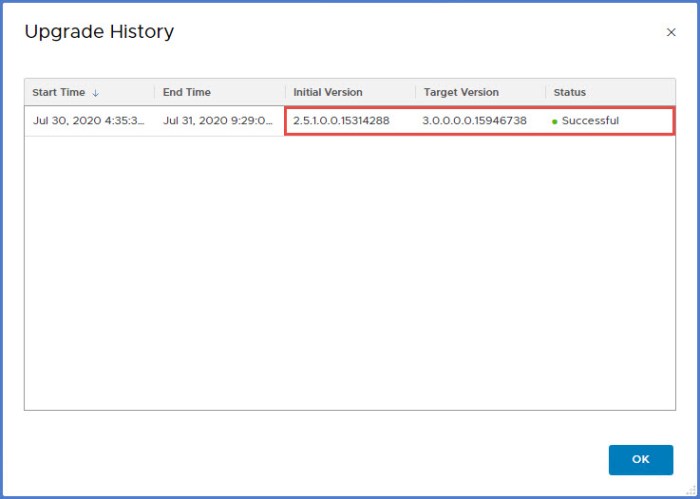
- The page refreshes and you will see ‘Upgrade Successful’ for the Edges, Hosts and Management Nodes. The new NSX-T Data Center is at the top (highlighted in graphic). Click Show Upgrade History link and you will see your upgrade was a success!
- Click on ‘Home’ and select ‘Alarms’ to view any open alerts. As you can see below I have a few open alerts. The important column you want to focus on is the ‘Alarm State’ on the right. I have an one ‘Open’ alarm associated with my licensing. The other alerts state that they have been ‘Resolved’ and upon examining the time stamp, these alerts occurred during the upgrade procedure. Remember routing interruptions will happen during the upgrade as it was mentioned in the documentation. After applying the license you can come back here, click on the alert and the ‘Actions’ drop down man and have the choice to ‘Acknowledge, Resolve or Suppress’ the alert.

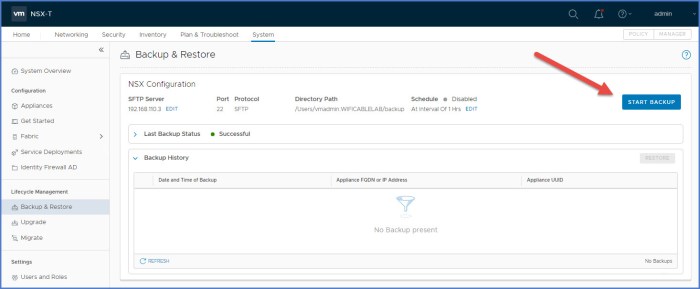
- Navigate to ‘System -> Lifecycle Management -> Backup & Restore’ and initiate a post upgrade backup and re-enable scheduling which was disabled prior to starting the upgrade per the requirements.
Wrap Up
There you have it, the upgrade procedure for NSX-T 2.5 to 3.0 in a nutshell. As you can see there is some legwork for you to do in the early stages with preparation but the overall procedure itself is fairly easy to do. Have patience with the procedure, keep monitoring each component as it is upgraded and pay very close attention to what the upgrade coordinator is telling you during the process. If something does awry it will tell you.
Aside from verifying functionality and status messages from NSX Manger, don’t forget to start testing functionality between your VMs as well to ensure they are functioning properly as well. There are some traffic interruptions that occur during the upgrade. Depending on your workloads or applications, they may be a little more sensitive to this interruptions when compared to others.
Now that the upgrade is complete I can now proceed with upgrading the rest of my environment per the ‘Update Sequence’ for vSphere 6.7 (link provided earlier in blog). So onto vCenter 7.0 and vSphere 7.0 for the nested lab environment!
I’ll also be upgrading NSX-T again from 3.0 to 3.0.1. When I started this blog article the latest and greatest was not yet available. So I will be doing that upgrade as well.
Useful Links
VMware NSX-T Data Center 3.0 Release Notes
NSX-T Product Documentation Homepage
NSX-T Data Center Upgrade Guide (web based, not PDF)
VMware NSX-T Design Guide – great online resource and can be exported to PDF.

I am upgrading my NSX-T to 3.1 tomorrow. Wish me luck.
LikeLike