In this article I’m going to talk about and demonstrate how to configure and manage DHCP in a VMware NSX-T 3.0 lab environment. The information I am going to cover here can also be referenced in the NSX-T Data Center Administration Guide. It is available both online and can be downloaded to PDF. It is a lengthy document if you do decide to download it (989+ pages). This document is constantly being updated so chances are the pages I reference in this article may change over time, so just be aware. The DHCP concepts that I going to cover is found in ‘Chapter 11- IP Address Management (IPAM)’ which begins on page 203 and the DHCP portion of that chapter begins on page 205.
Introduction
Let’s begin with a quick DHCP introduction. As you know DHCP is used to automate IP address assignments by providing DHCP clients an address, subnet mask, default gateway, DNS server and other options which are configured on the DHCP scope. All this is done without admin overhead.
DHCP in NSX-T is configured on a segment but before you can do that you must configure a DHCP Profile in NSX Manager. There are two types of DHCP Profiles because you can configure DHCP in one of two ways for the NSX-T segments:
- Configure it to function as a DHCP Relay for a segment.
- Configure it to function as a DHCP Server for a segment.
You can do one or the other for a segment but not both. DHCP Relay is used in a scenario where you have an upstream DHCP server on your management network. The DHCP Server functions like a DHCP server would for a given segment. I’m going to walk you through both scenario’s.
My lab environment is running vSphere 7.0 U1 and NSX-T 3.0.1. I have not had the chance to upgrade to NSX-T 3.0.2 yet but the concepts are still the same.
DHCP Profiles
First thing we need to do is configure a DHCP profile which can be used concurrently by multiple segments and gateways. There are several conditions you must be aware of when you attach this DHCP profile to a NSX segment or gateway.
- You can attach either a DHCP Server Profile or a DHCP Relay Profile to a Tier-0 or Tier-1 gateway or gateway connected segment.
- When it comes to DHCP Server Profiles, you can create multiple profiles for your network; furthermore you can attach a single profile to multiple DHCP servers.
- When it comes to DHCP Relay Profiles which relays DHCP traffic to upstream/remote DHCP server (i.e. Microsoft DHCP or other), these upstream/remote servers can be in any NSX overlay segment, outside of the SDDC on a separate distributed switch or attached to the physical network.
- Standalone NSX segments that are not connected to a T0/T1 gateway, the only option is to use a DHCP Server Profile (local DHCP server instance). This is due to no upstream network connectivity and therefore limited.
One prerequisite before you create a DHCP Server Profile. The NSX Edge nodes must be deployed and part of an Edge Cluster. So make sure your Edge Nodes and services are good to go before proceeding.
DHCP Scenario 1 – DHCP Relay
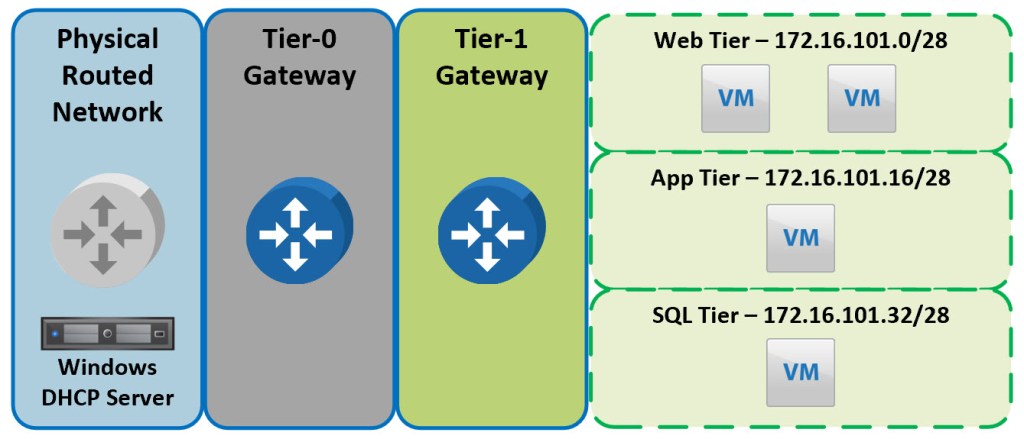
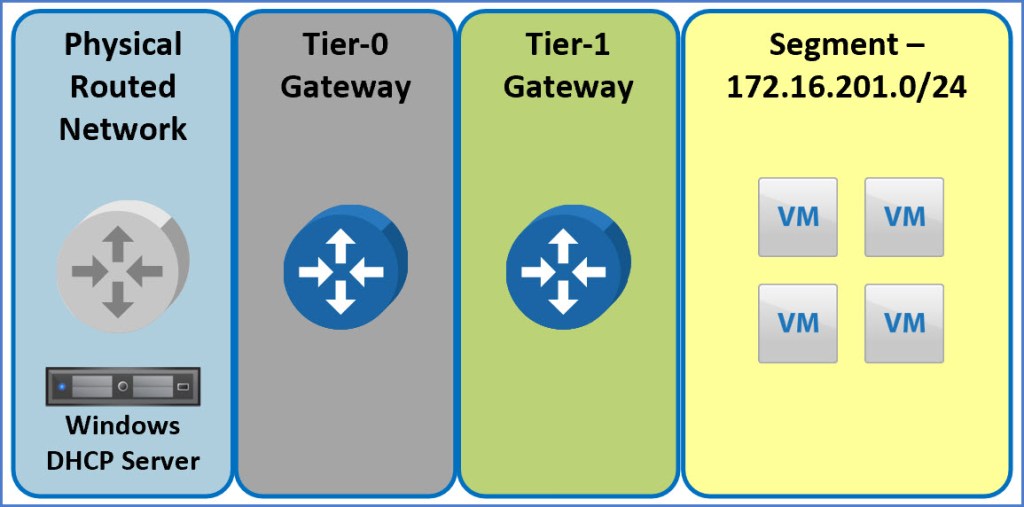
In this first scenario I am going to configure a DHCP Relay Profile that will be used to forward DHCP traffic from my 3-tier application segments to an external Microsoft DHCP server. A logical diagram of the environment is below. I am using the 172.16.101.x /28 IPv4 subnet range. My Microsoft DHCP server has 3 scopes, one per segment.
Let’s create the DHCP Relay Profile from NSX Manager in my two-tier routed environment. Quick rundown of what we are going to accomplish step-by-step. One assumption here is that you have your external DHCP Server (Windows or other) properly configured and scopes are ready before beginning.
First we will create the DHCP profile followed by attaching the DHCP Relay Profile to the Tier-1 Gateway because that is where the segments are connected. If my segments were connected directly to the Tier-0 Gateway then I would configure the DHCP setting there. After the gateway is configured the segment configuration for DHCP is last.
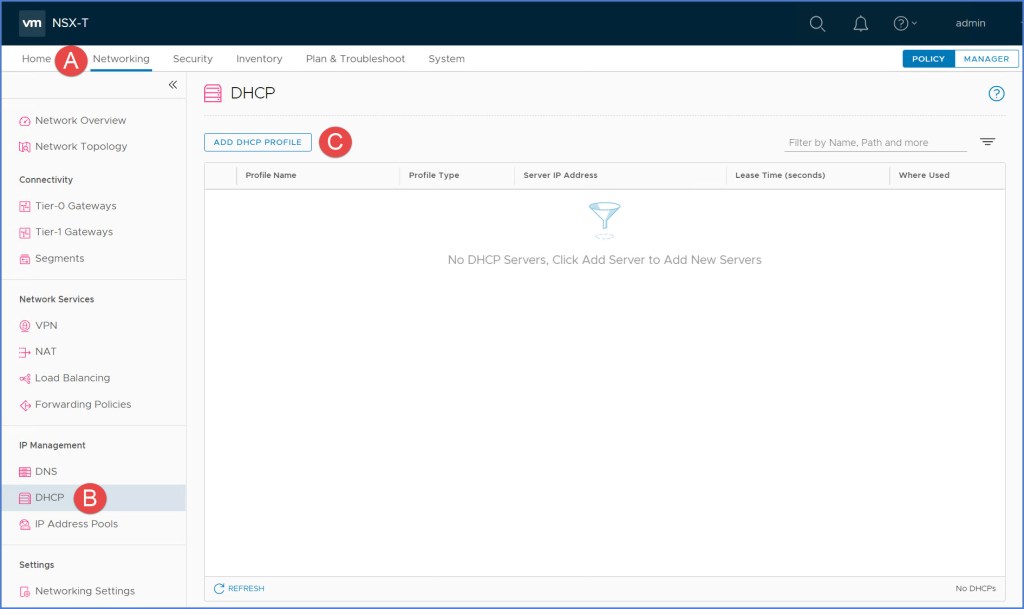
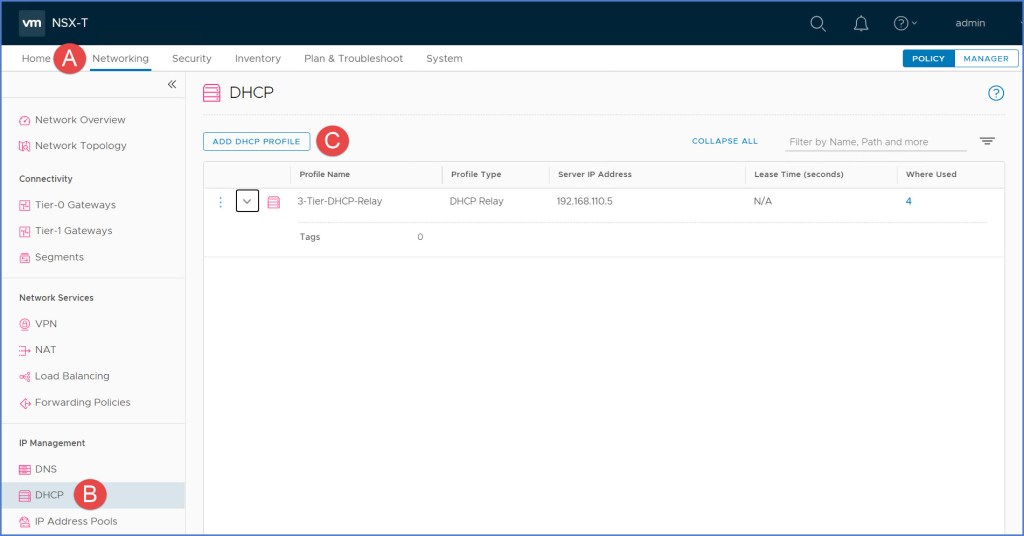
1. Navigate to ‘Networking -> IP Management -> DHCP’ and then select the ‘Add DHCP Profile’ option.
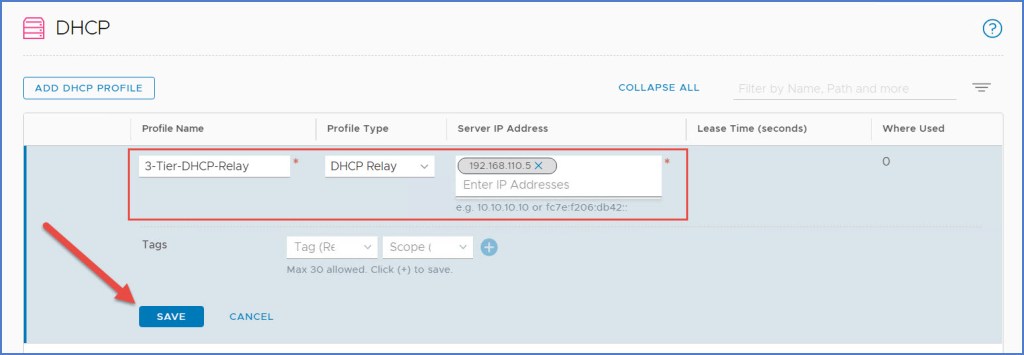
2. Enter a Profile Name, select the DHCP Relay for Profile Type and then enter the IP address of the upstream DHCP server. The IP address I have entered is my Microsoft DHCP server address. Click Save when finished.
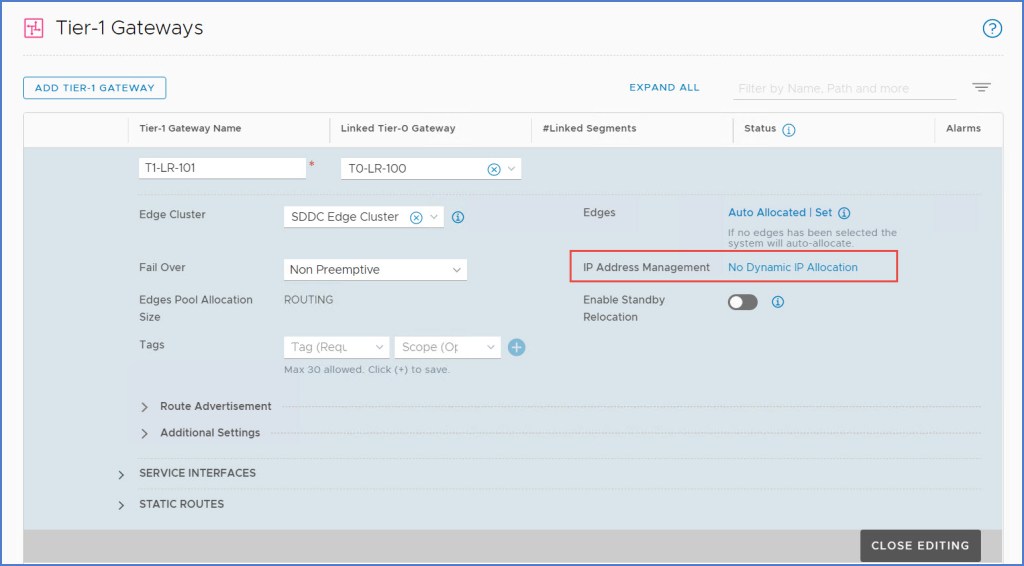
3. Next we are going to configure DHCP relay on the Tier-1 Gateway. Navigate to the Tier-1 Gateway, click Edit and then select ‘No Dynamic IP Allocation‘ link next to IP Address Management.
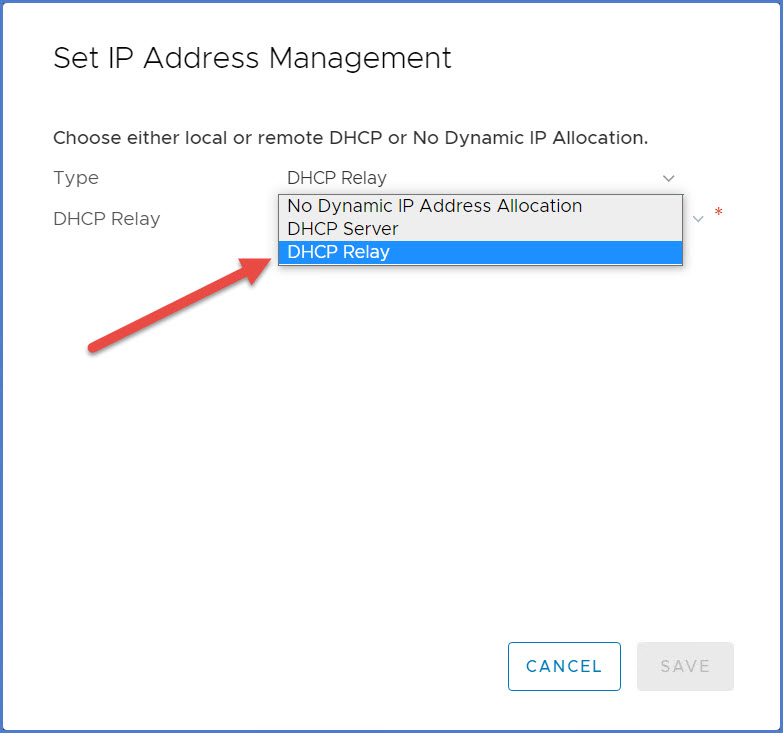
4. The ‘Set IP Address Management’ dialog box will appear. From the drop-down menu next to ‘Type’ select DHCP Relay. Then choose the DHCP Relay Profile that was just created above in Step 2. Click Save when finished.
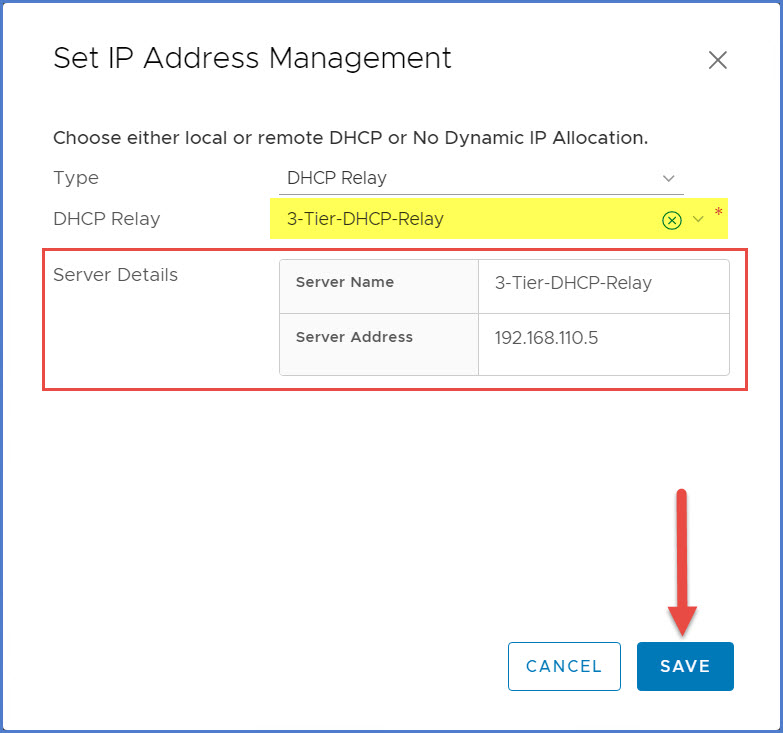
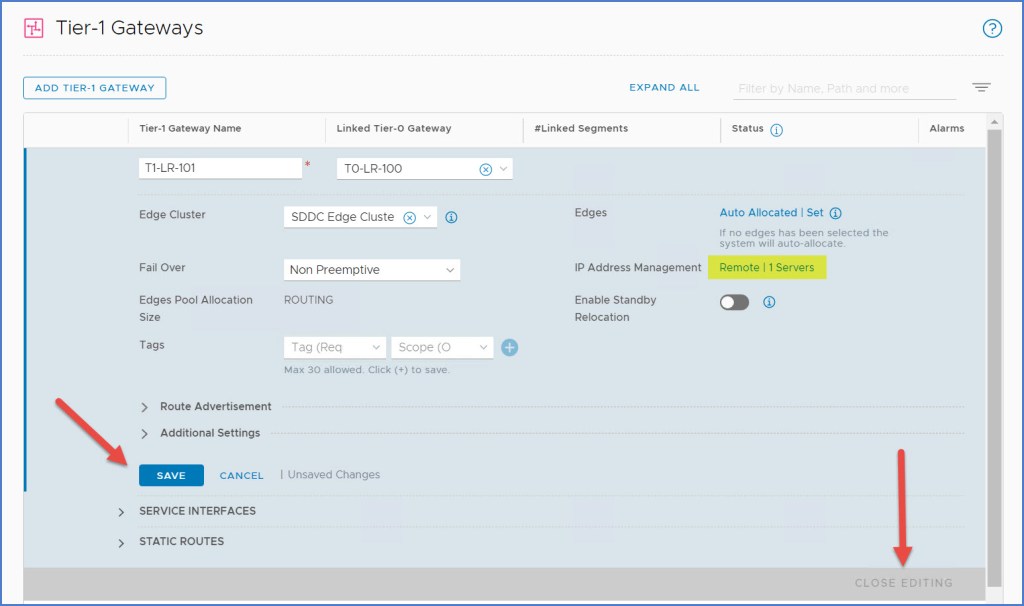
5. Notice next to IP Address Management it now indicates ‘Remote | 1 Servers’. Click Save and Close Editing for the gateway.
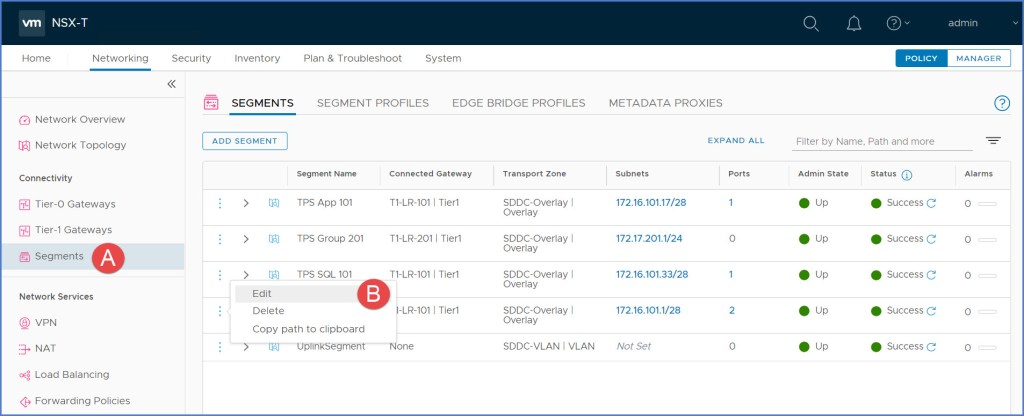
6. Select ‘Segments’ and then click on ‘Edit’ next to the segment that will use DHCP Relay. I am starting with my Web Tier for my application.
7. Click on ‘Set DHCP Config’ option and a dialog window will appear.
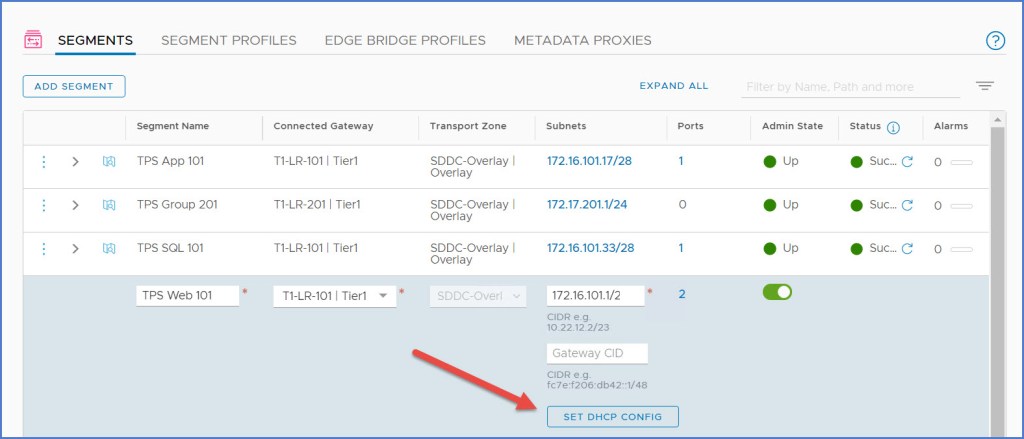
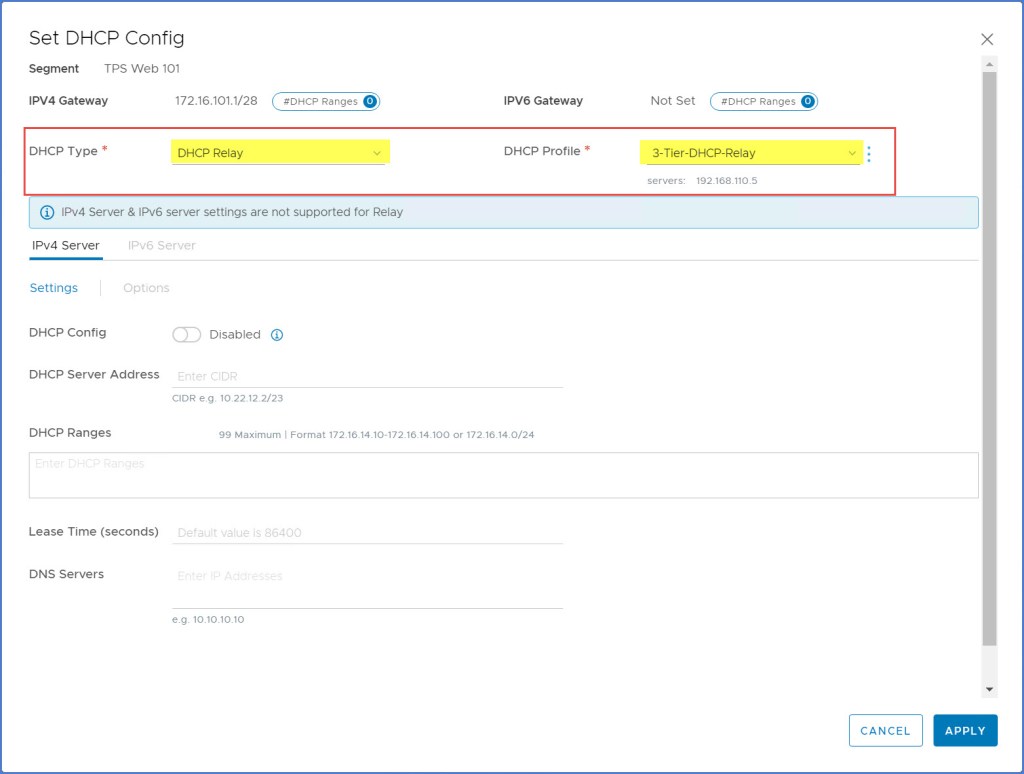
8. Select ‘DHCP Relay‘ from the drop-down menu next to DHCP type. Then choose the ‘DHCP Profile‘ that was created earlier. Click Apply when finished. Click Save and Close Editing for the segment (not pictured).
9. Repeat Steps 6-8 on the remaining segments. The virtual machines on each segment were previously connected but were not configured with an address (static or DHCP). I begin validation by browsing to the VMs in my vSphere Client and verify they are configured with an address.
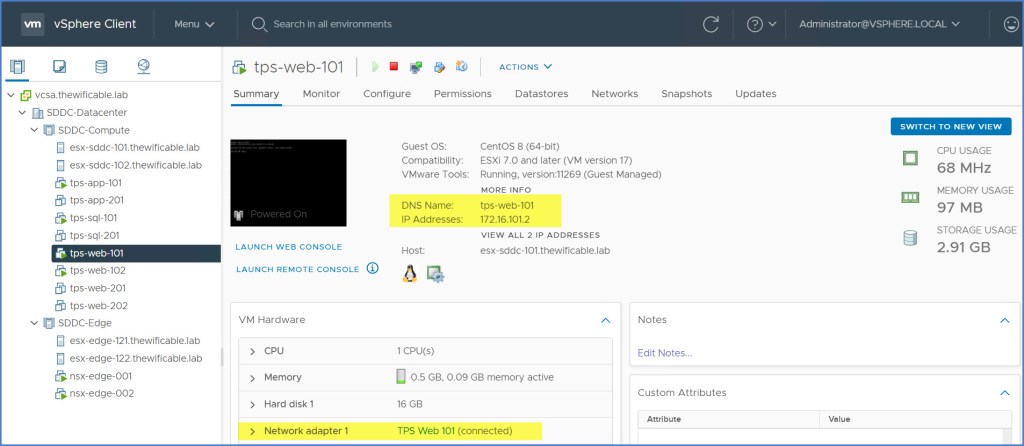
10. I validate further by using PING directly to the IP address listed in the vSphere Client. I also ping by hostname to verify DNS hostname resolution is working.

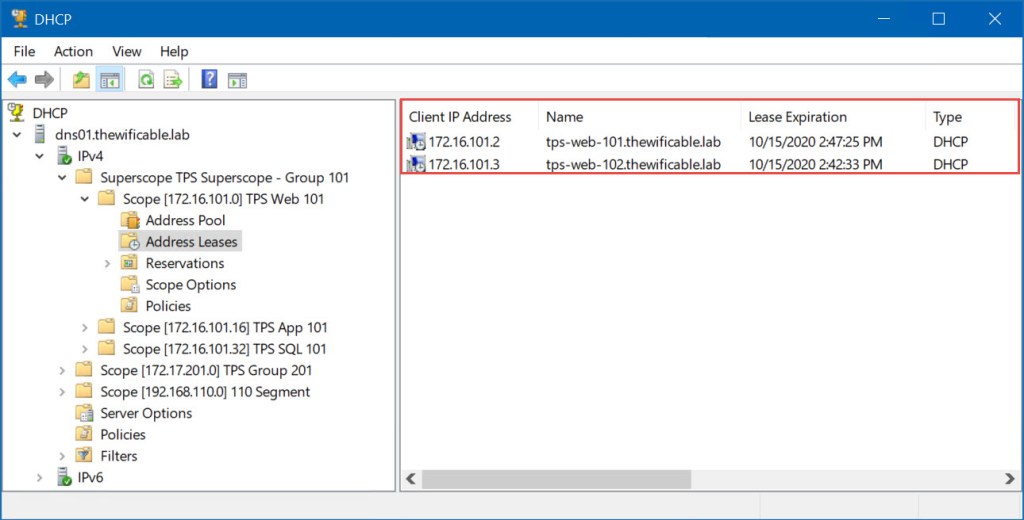
11. (Optional) Lastly I validate from my Microsoft DHCP server that addresses are being leased from the DHCP Scope pools. I configured my DHCP scopes to dynamically update DNS records which is why I am able to achieve name resolution so quickly.
To summarize the process:
- First, create a DHCP Profile for DHCP Relay that points to the external/remote DHCP Server (IP Address).
- Configure DHCP Relay on the gateway where the network segments are directly connected.
- Configure DHCP Config on a per segment basis.
- Validate DHCP addresses are being configured on DHCP Clients.
DHCP Scenario 2 – DHCP Server (Gateway)
In this scenario I am going to configure DHCP Server on a single network segment. This segment is connected to a different Tier-1 Gateway compared to the graphic above. This type of segment is commonly referred to as a ‘Collapsed’ segment where all of the VMs, regardless of type or use, are using the same network segment for network connectivity. I could very easily configure DHCP Relay on this network segment just as I did in the previous scenario.
One other thing I would like to point out with this deployment scenario is there are two possible options which you will see in a moment when configuring the segment. There is a ‘Gateway DHCP’ and a ‘DHCP Local Server’ option. What is the difference?
- Gateway DHCP means you intend on using NSX as a DHCP Server for that segment.
- DHCP Local Server means a DHCP server is present on the segment.
First we need to create a DHCP Profile for DHCP Server. Prior to configuring this make sure your Edge Nodes and Edge Cluster are ready to go from NSX Manager. The segment I am working with is using the ‘172.17.201.0 /24’ subnet. As part of your planning, make sure you select an IP address for the DHCP Service that is not part of this IP Range.
NOTE: Pick a different private address for DHCP Server IP. If you pick an address that is in the same range used by the segment, the NSX Manager will bark at you that there is an overlap in the config.
- From NSX Manager, Navigate to ‘Networking -> IP Management -> DHCP’ and then select the ‘Add DHCP Profile‘ option.
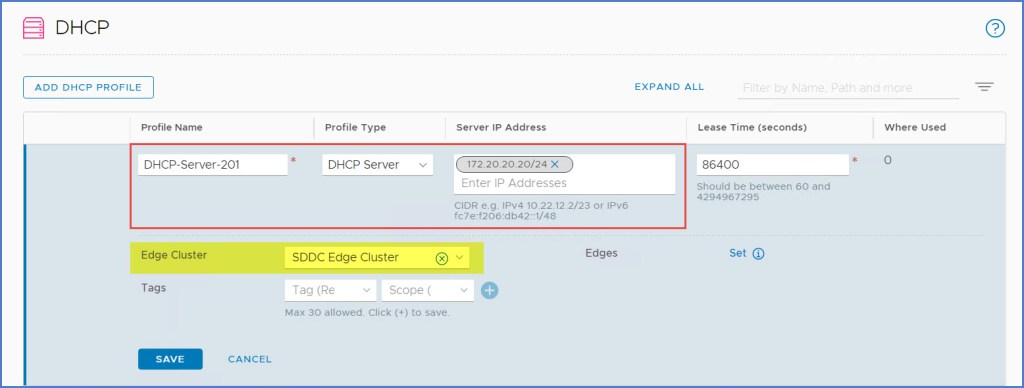
2. Enter a ‘Profile Name‘, select ‘DHCP Server‘ for the Profile Type and then enter the ‘Server IP Address‘ that you would like to use on the segment. Make sure it is in CIDR format and use an IP address that is not in the same subnet or IP range for the segment(s) that will use DHCP; the address I’m using is ‘172.20.20.20 /24’. Select the ‘Edge Cluster‘ and finally click Save when finished.
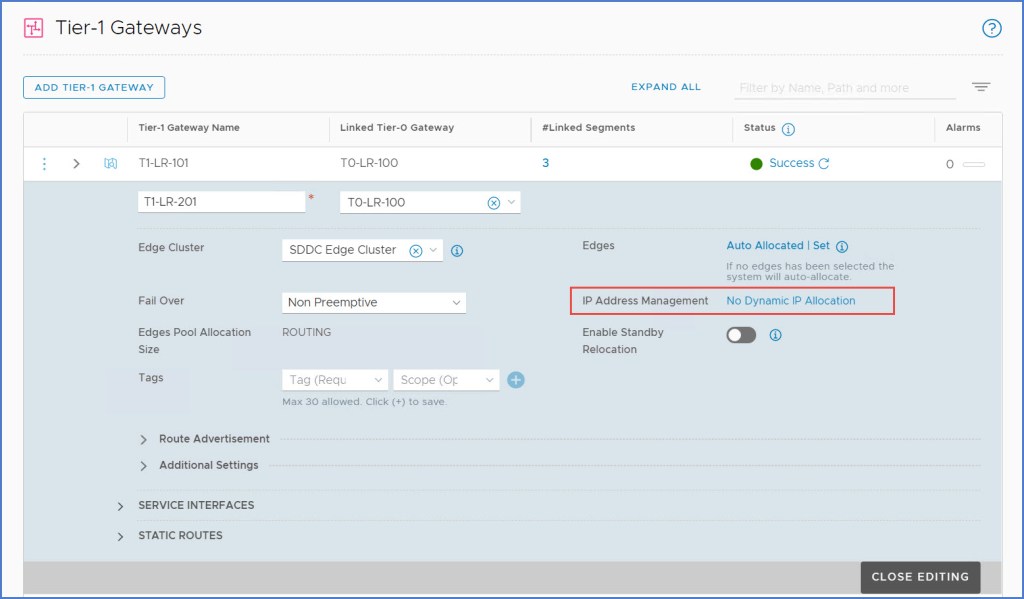
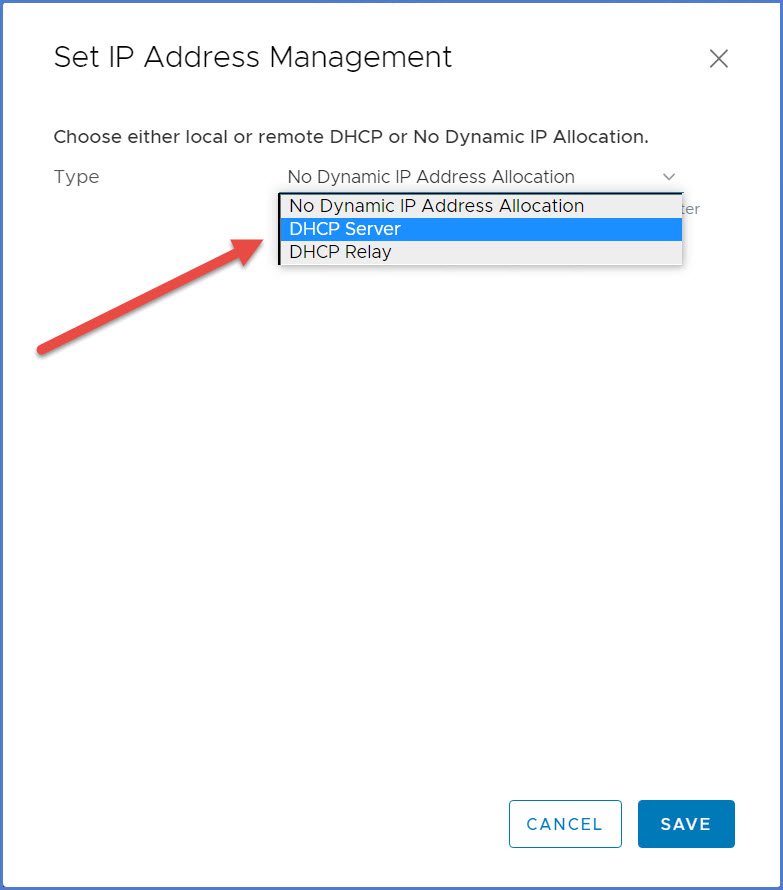
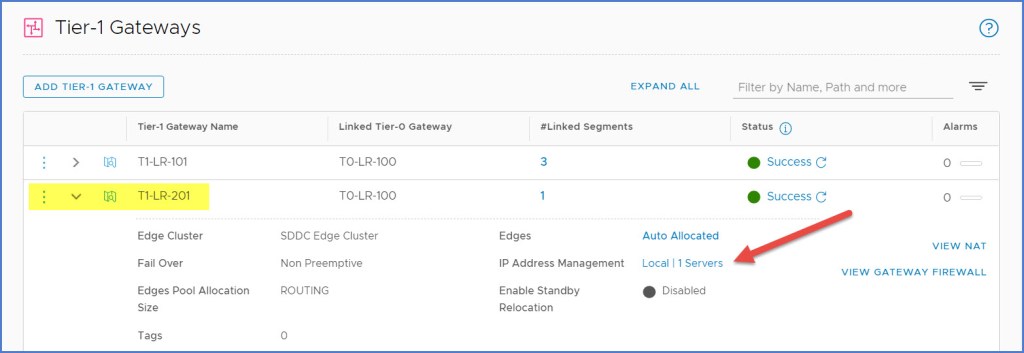
3. My segment is connected to a different Tier-1 router than the previous exercise. Remember you can only choose ‘one option’ for each gateway when it comes to using DHCP Server or DHCP Relay. Navigate to the Tier-1 Gateway, click Edit and then select the ‘No Dynamic IP Allocation‘ link next to IP Address Management. Be very careful before proceeding because once you set this it remains in the config, you cannot remove it.
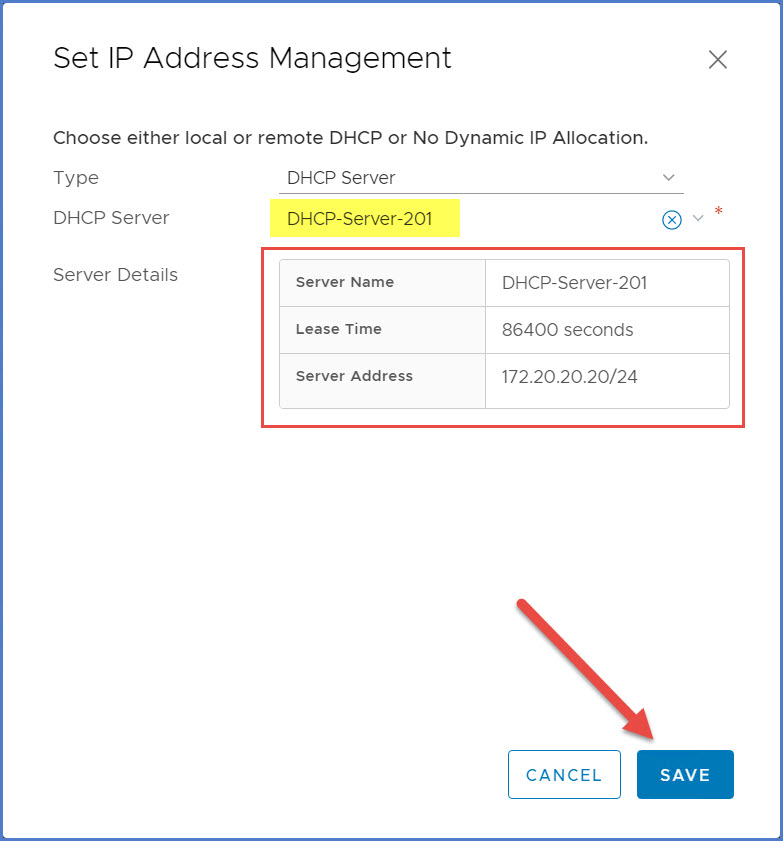
4. The ‘Set IP Address Management’ dialog box will appear. From the drop-down menu next to ‘Type’ select DHCP Server. Then choose the DHCP Server Profile that was just created above in Step 2, in this case I select the ‘DHCP-Server-201‘ profile. Click Save when finished.
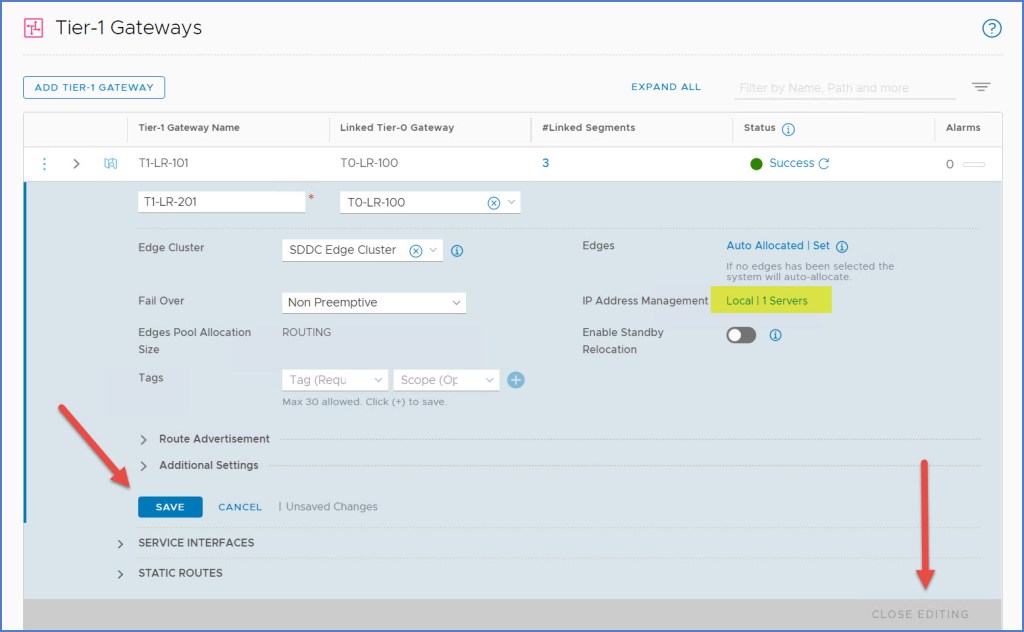
5. Notice next to IP Address Management it now indicates ‘Remote | 1 Servers’. Click Save and Close Editing for the gateway.
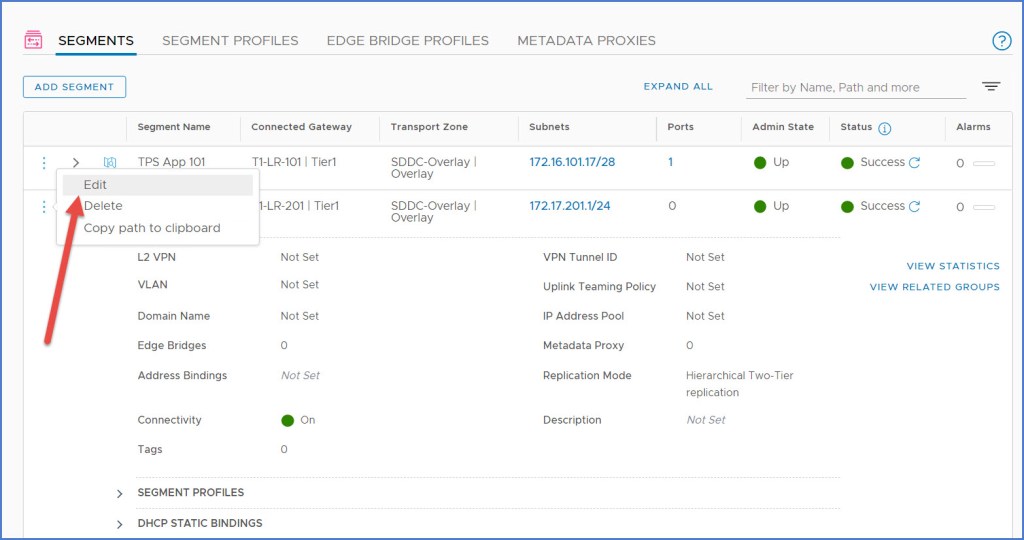
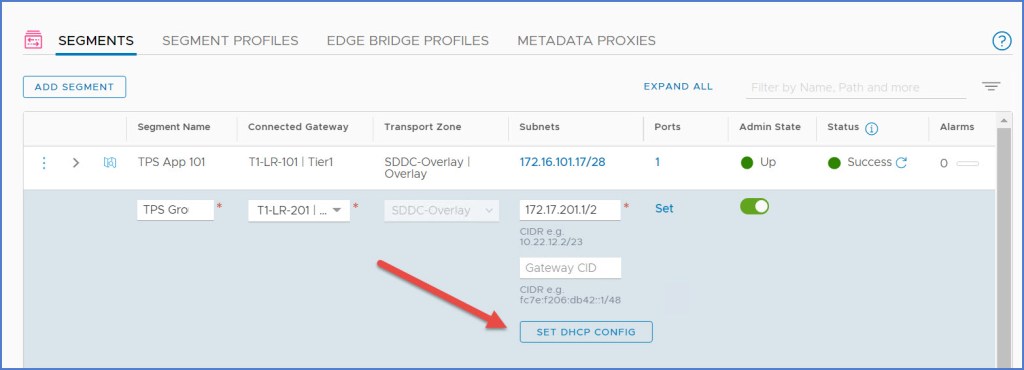
6. Next I am going to configure DHCP on my segment. Navigate to ‘Segments‘ and click ‘Edit‘ for the segment we will be configuring DHCP Server.
7. Click on ‘Set DHCP Config’ option and a dialog window will appear.
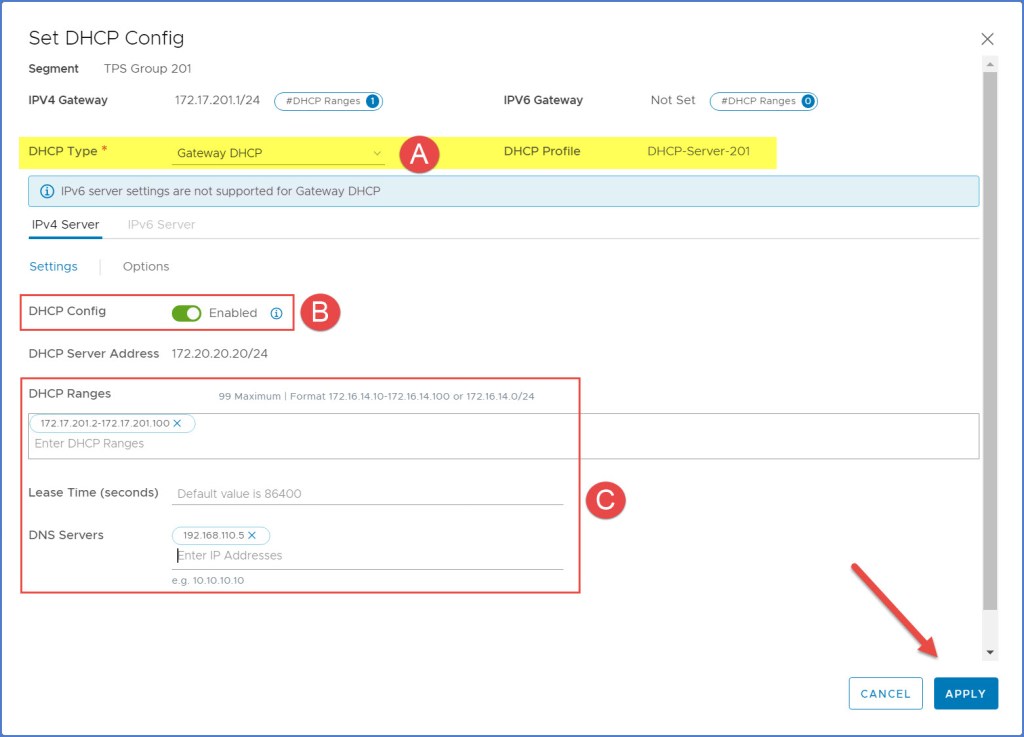
8. In the ‘Set DHCP Config‘ dialog box, select ‘Gateway DHCP’ from the DHCP Type drop-down menu (it is the default but always make sure). Then ‘DHCP Profile‘ is automatically selected based on the DHCP Profile that was created earlier. Enable the ‘DHCP Config‘ and then provide the settings for your DHCP Clients. This concept is the same as setting your DHCP scope if you were working on an external DHCP server. Specify the DHCP Range, the DNS Server(s) and lastly the Lease Time (the default is 86400 seconds which equals 1 Day). Click Apply when finished. Then select Save and Close Editing (not pictured).
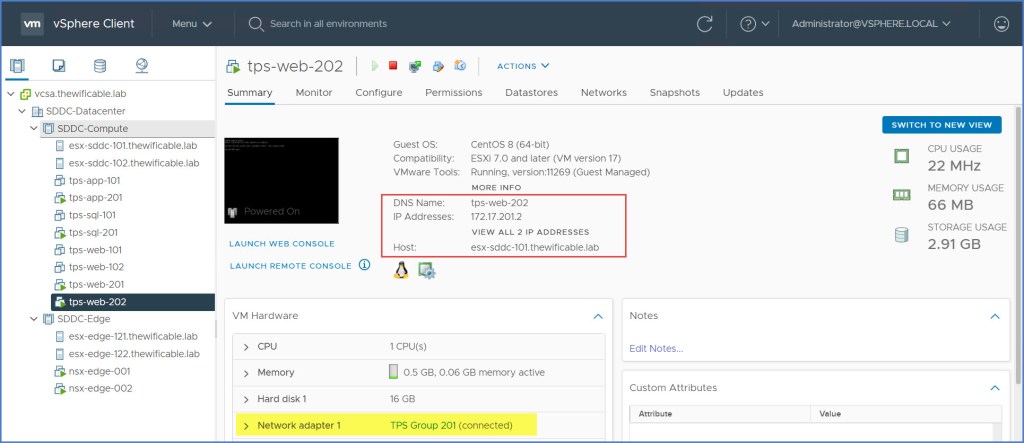
9. Begin validating that your DHCP Clients are receiving IP addresses from DHCP. Log into the vSphere Client, locate the VM information and verify they are receiving IP addresses from the TCP/IP range that you configured.
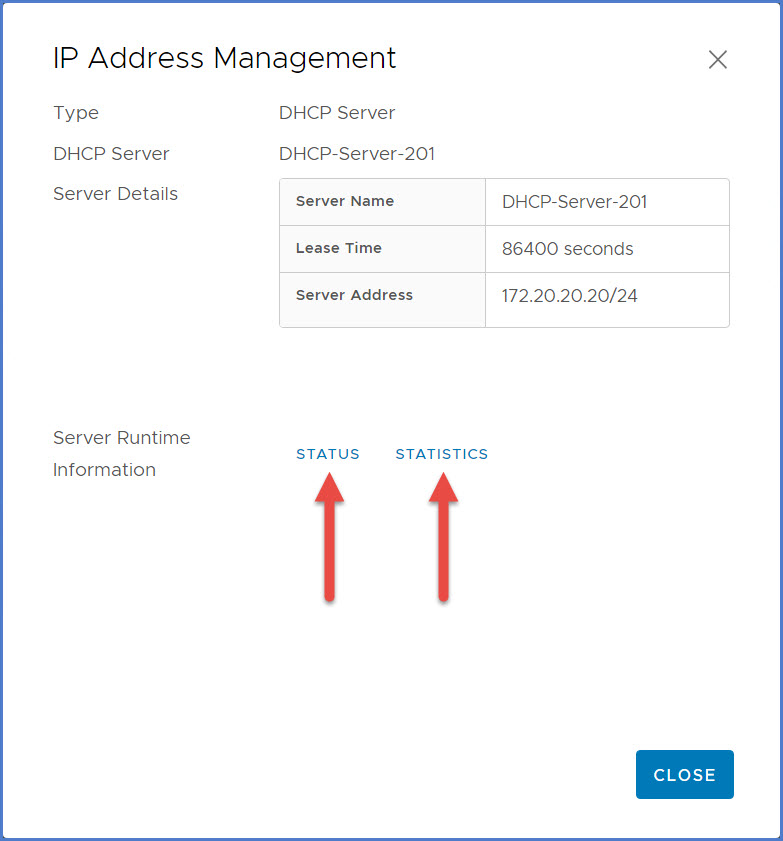
10. Return to the NSX Manager UI and navigate to the Gateway where IP Address Management was configured. The IP Address Management dialog box will appear.
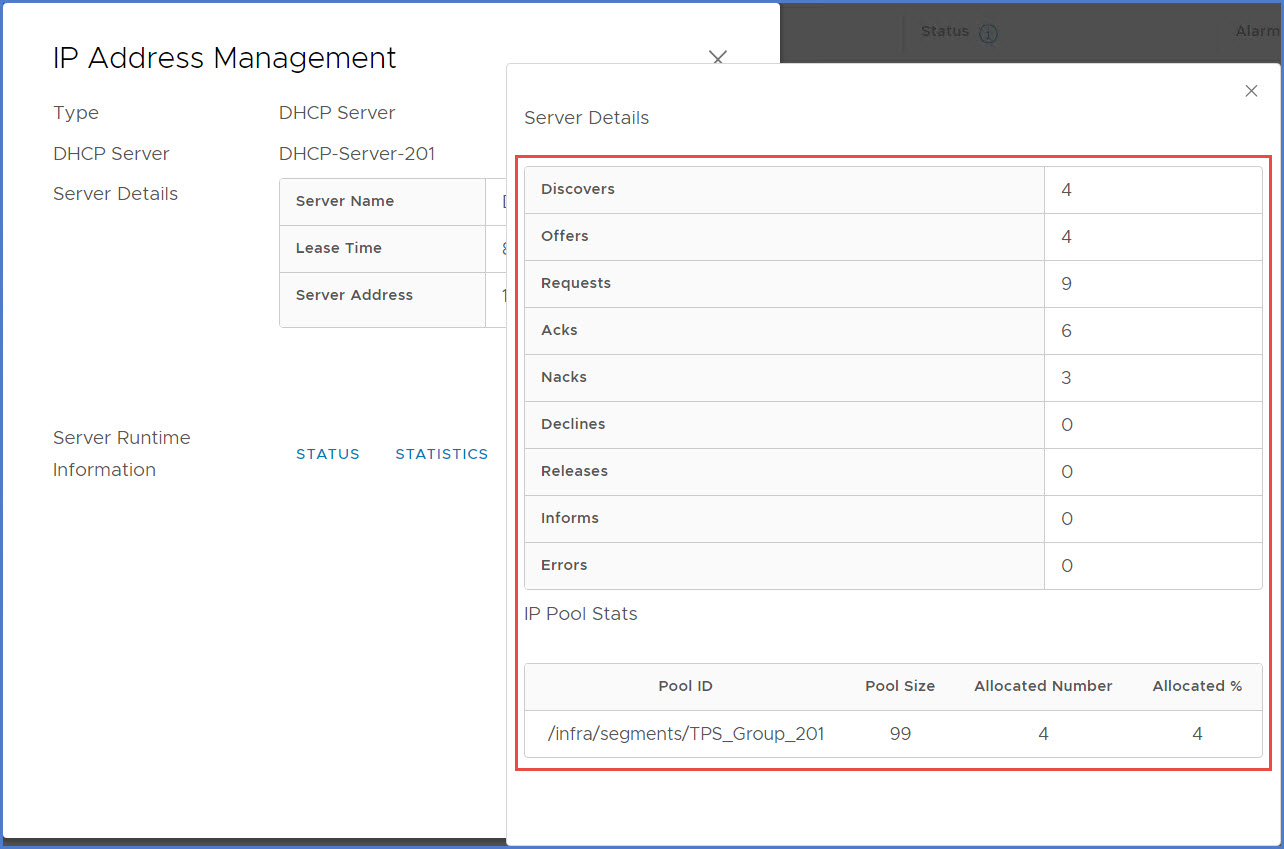
11. Next to Server Runtime Information, click the two links for ‘Status’ and ‘Statistics’. If you click Status you will simply see if the service is UP or DOWN. The Statistics link will provide you information like you see below including Server Details and Pool Stats.
Lastly I’m going to test my connectivity from my VMs on that segment.
- Can they ping external resources? Yes.
- Can they ping one another by IP? Yes.
- Can they ping one another by hostname? No.
They cannot ping one another by hostname at this time because I have not configure DNS Services in NSX yet. DNS name resolution worked in Scenario 1 using the Relay Agent because my VMs were getting their IP address from an external Windows DHCP Server which is configured to dynamically register DNS records. In Scenario 2 we are using NSX to provide IP addresses to DHCP clients and therefore I would need to configure DNS Services (DNS Forwarder) in NSX for this to work properly. That’s a blog topic for another day.
New in NSX-T 3.0.2
This blog article and demonstration used NSX-T 3.0.1 and the features that are available in that release. NSX-T 3.0.2 has some new features and capabilities which can be found in the Release Notes. Some of the features include:
- API Support to upgrade N-VDS to VDS.
- Ability to change the MAC address of a Distributed Router (DR) in an existing Transport Zone (TZ).
- Federation Enhancements:
- Global Manager auto deploy.
- Onboarding of NSX Local Manager objects into Global Manager.
- Layer 4 DFW support for Oracle Enterprise Linux (Physical Servers).
- Basic constraint check for end-entity certificates according to RFC 5280.
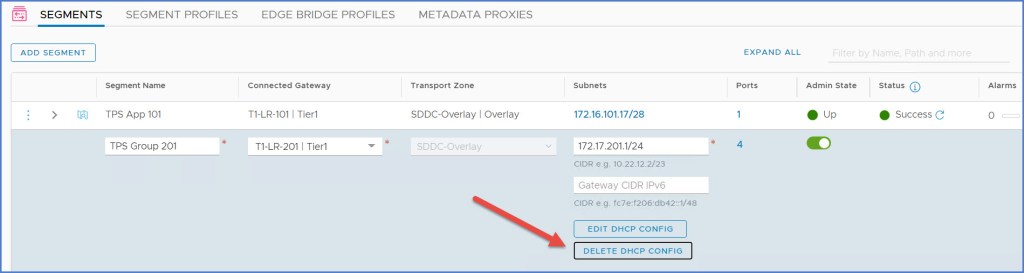
There is also a new option for ‘Delete DHCP Config’ which was not available in previous releases as seen below.
Conclusion
That is how you configure DHCP services in NSX-T 3.0. Some things to keep in mind with NSX-T 3.0.1 and earlier is once you configure DHCP on a gateway it remains in the configuration. So be very cautious when specifying the settings. Version 3.0.2 as seen in screenshot above, helps get around this issue.
The DHCP Service runs on the edge nodes; that Edge Cluster likely contains 2 or more Edge Nodes which means DHCP HA is autoconfigured. Starting in NSX-T 3.0.2, the Edge Cluster on the ‘Gateway DHCP’ server after the DHCP server is created and deployed. Prior to NSX-T 3.0.2, you could not do this. Keep in mind this action has ramifications as it forces all existing DHCP leases that are assigned to the DHCP clients to be lost.
After a segment has been configured with DHCP, be very careful with making changes to the connectivity of the segment. The changes are only permitted when the segments and and gateways belong to the same Transport Zone (TZ).
In the NSX-T Data Center Administration Guide there are multiple scenarios for selecting the Edge Cluster for the DHCP Service and they are highly informative. I suggest reading through the 5 Scenario’s outlined on pages 210-215. There are also scenarios involving the IMPACT of changing segment connectivity from pages 215-218. I highly recommend reviewing them as well.
Hope you enjoyed this one.
Please share! 🙂
Useful Links
NSX-T Design Guide: Designing Environments with NSX-T (online guide and printable to PDF)
VMware NSX-T Data Center Documentation (primary documentation homepage)
VMware NSX-T Reference Design Guide 2.0 (PDF)
Next-Generation Reference Design Guide for NSX-T
Installing and Configuring NSX-T Data Center v3.0 for Tanzu Kubernetes Grid Integrated Edition

simply love the work that you have posted.
LikeLike