Many of us are familiar with upgrading vCenter Server using the GUI based installer. Very easy and user friendly so more often than not, you are likely using this method to upgrade your vCenter Server instance or instances. The CLI installer can be used to deploy, migrate or upgrade an existing vCenter Server instance in an ‘unattended’ manner. There are several JSON files that serve as templates for this type of situation. Simply edit the JSON script that fits your infrastructure, execute the necessary commands from the CLI and away you go. I’m going to leverage one of the JSON files to execute an upgrade of vCenter Server 6.7 appliance in my nested lab to 7.0 and show you what that process looks like.
First and foremost, let’s quickly review the upgrade tasks associated with upgrading vCenter and these apply whether you choose to upgrade via GUI or CLI. You can upgrade your existing vCenter 6.5 or 6.7 versions directly to 7.0.
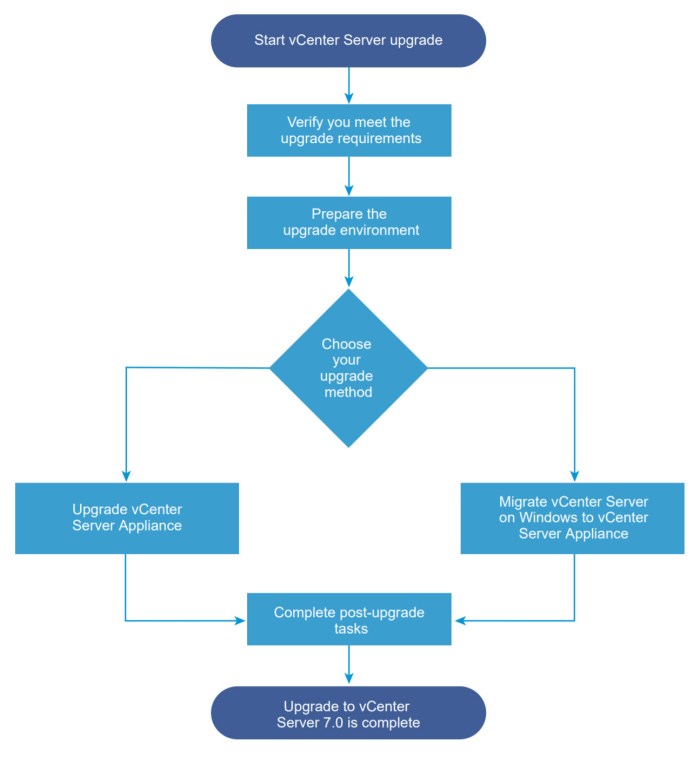
vCenter Server Upgrade Procedure
- Verify upgrade requirements are complete.
- Prepare upgrade environment.
- Choose upgrade method based on your current situation:
a. Upgrade existing vCenter appliance (VCSA).
b. Migrate Windows-based vCenter Server to new VCSA. - Post-upgrade tasks.
- Upgrade to vCenter Server 7.0 is completed.
Below is a high-level overview of the workflow you need to take. There are sub-tasks associated with each. This graphic overview can also be found on Page 10 of the vCenter Server Upgrade Guide (PDF) for vSphere 7.0 and vCenter Server 7.0 (April 2020).
Upgrade Preparation
Prior to upgrading you have some prep work to do. Do not skip it. Aside from performing backups of the existing vCenter Server there are several other tasks you must complete. Start with compatibility and how vCenter Server 7.0 can affect other software components within your virtual data center.
- How many vCenter Server’s are their in your environment? What version are they running and are they compatible with 7.0?
- How many vSphere clusters and ESXi hosts are present in your environment? Which version of vSphere ESXi are they running?
These are a couple areas where you will need to start and focus. vSphere and vCenter upgrades from 6.5 and 6.7 are supported. Anything prior to 6.5 will require you to upgrade to at least 6.5 before you get to 7.0. So if you are running 5.0, 5.1, 5.5 or 6.0 you will have some extra work to do prior to upgrading. It is very critical to understand changes in component behavior can affect the overall upgrade process. Most importantly, having a deep understanding of this will help you in your upgrade planning.
Here are a few links to important documents and other information that you should review during your planning phase.
VMware vSphere 7.0 Release Notes (ESXi and vCenter Server)
VMware vCenter Server 7.0.0c Release Notes – (07/30/2020)
VMware vCenter Server 7.0.0b Release Notes – (06/23/2020)
VMware vCenter Server 7.0.0a Release Notes – (05/19/2020)
VMware Compatibility Guide (HCL)
VMware Product Interoperability Matrices
VMware Product Interoperability Matrices / Upgrade Path for vCenter Server
Removal of the Platform Services Controller (PSC)
With the beginning of vSphere 7.0, the deployment or upgrade of vCenter Server 7.0 requires the use of VCSA. In this version, vCenter Server contains all PSC services and no longer requires the use of an external PSC. All functionality, workflows, certificates, licensing and authentication is preserved. If you upgrading or migrating, all PSC services are consolidated into vCenter Server.
Prior to upgrading or migrating to 7.0 you must review your existing deployment topology. If that existing topology is ‘deprecated’ you must move that topology to a supported one. When you first installed your 6.5 or 6.7 vCenter Server, that deployment gave you the option to deploy the PSC externally or embedded.
Review the Upgrade Guide (PDF) to understand these implications. Component Behavior changes that can impact your upgrade starts on Page 13 of the guide. The topology recommendations can be found between pages 17-21. I’m not going to dive into full detail in this blog article for these requirements and the actions you need to take but you should be fully aware and address them where needed. The before and after topology for what I am going to accomplish here via CLI is below and can also be found in Figure 2-5 on Page 19.

Upgrade Overview
Upgrading your existing vCenter Server appliance (VCSA) is fundamentally a new version being deployed in parallel followed by a migration of the old appliance to the new. It is not an in-place upgrade as if you were upgrading a Windows or Linux server OS. The upgrade process basically looks like this in a nutshell…
- New 7.0 appliance is deployed parallel to your existing vCenter Server. Original appliance remains online ‘as is’ in the current virtual data center.
- The new VCSA is configured with temporary network parameters to maintain network connectivity between source and target appliances.
- Data in the VCSA database is then migrated from the source vCenter to the new target vCenter appliance.
- Once the data is migrated the original VCSA is powered down and the new VCSA assumes the persona of the original vCenter including hostname and static IP address. The temporary network parameters are released.
- New VCSA comes online running the new version.
You can keep the old powered off VCSA appliance around for a brief period to ensure the new one is functioning properly. Then delete the old appliance when you are satisfied with the upgrade. If for whatever reason the new appliance needs to be returned to service, simply power off the new appliance first and then return the former back to it’s original state by powering it on. That fast you are back in business. Hopefully it never comes to that for you but just know that the fallback procedure is very easy.
The installation software for vCenter contains executable’s for both GUI and CLI installers for the upgrade. The CLI upgrade technique requires a CLI command against a JSON file that you must prepare prior. The CLI installer analyzes the config parameters and their values and generates another command, an OVF Tool command which will deploy the new VCSA. The OVF Tool command will also transfer configuration data and services from the former VCSA to the new.
You can read more in-depth about the overall procedure, requirements and the differences between the GUI and CLI installers starting on Page 22 of the vCenter Server Upgrade Guide for 7.0 (PDF).
The overall upgrade is a 2-step process. Phase 1 is the deployment of new appliance and Phase 2 focuses on the data being migrated from the source. Depending on the amount of data you want migrated from old to new will impact how long Phase 2 takes to complete. So be patient. Prior to starting your upgrade, make sure your backups are complete and you can even take a snapshot if you like. I always recommend testing a ‘restore’ prior to starting because I’m a firm believer that your backup is only as good as your restore capabilities. If you cannot restore something that you have backed up then that backup is no good regardless of the number of times the backup completed successfully.
CLI Upgrade Procedure
Let’s get into the upgrade procedure via the CLI. First and foremost, mount the ISO image for the VCSA installation media and then browse to the following directory to locate the JSON templates. I’m upgrading from 6.7 so I will be using the ‘vcsa6.7’ directory. If you are upgrading from 6.5 make sure you select that directory.
<VMware VCSA>\vcsa-cli-installer\templates\upgrade\vcsa6.7

I will be using the ’embedded_vCSA_on_ESXi.json’ template file for my upgrade procedure because my current vCenter Server appliance was deployed with an embedded PSC. I do encourage you to examine each file so you can see the differences between each.
Open the file with a word editor such as Notepad++ which I am using in this exercise. Read the contents of the JSON thoroughly first. Being very familiar with the GUI-based installer for vCenter, you will find the JSON file reads in the same manner. Copy the JSON file into a local folder somewhere on your workstation and edit the file from there.
Contents of my modified/edited JSON file (embedded_vCSA_on_ESXi.json) for my unattended upgrade is below.
{
    "__version": "2.13.0",
    "__comments": "Sample template to upgrade a vCenter Server Appliance 6.7 with an embedded Platform Services Controller to a vCenter Server Appliance 6.8 with an embedded Platform Services Controller.",
    "new_vcsa": {
        "esxi": {
            "hostname": "192.168.124.6",
            "username": "root",
            "password": "VMware1!VMware1!",
            "deployment_network": "vSphere-Mgmt-110",
            "datastore": "management-datastore"
        },
        "appliance": {
            "thin_disk_mode": true,
            "deployment_option": "small",
            "name": "vcsa01"
        },
        "os": {
            "ssh_enable": true
        },
        "temporary_network": {
            "ip_family": "ipv4",
            "mode": "static",
            "ip": "192.168.110.7",
            "prefix": "24",
            "gateway": "192.168.110.1",
            "dns_servers": "192.168.110.5"
        },
        "user_options": {
            "vcdb_migrateSet": "all"
        }
    },
    "source_vc": {
        "managing_esxi_or_vc": {
            "hostname": "192.168.124.6",
            "username": "root",
            "password": "VMware1!VMware1!"
        },
        "vc_vcsa": {
            "hostname": "vcsa01.thewificable.lab",
            "username": "Administrator@vsphere.local",
            "password": "VMware1!VMware1!",
            "root_password": "VMware1!VMware1!"
        }
    },
    "ceip": {
        "settings": {
            "ceip_enabled": true
        }
    }
}
NOTE: Keep in mind, if you omit the passwords from the JSON file the command will prompt you for these passwords when you execute the command. Not fully unattended but if you are concerned about storing passwords in a JSON file, just be aware an admin will be prompted to enter a password before proceeding.
Now that the JSON file is formatted you can execute a command to validate the file. The ‘vcsa-deploy’ command that I want to run from my Windows 10 system is located on the installation media. If you executing the command from your Linux or Mac system you will find the ‘vcsa-deploy’ command in the ‘lin64’ or the ‘mac’ directories respectively.
<VMware VCSA>\vcsa-cli-installer\win32\vcsa-deploy.exe
As I stated, I’m using Windows 10 so I then navigate to this directory from within PowerShell. The path for the JSON file that I edited locally on my system is in my C:\_UTILS\ directory. I’m going to use the ‘-verify-template-only’ switch to test my template which will basically tell me whether or not my JSON template is good to begin my upgrade. I also use the ‘-accept-eula’ and ‘-no-ssl-certificate-verification’ switches. Before you do that, run the ‘–help’ command to familiarize yourself with the arguments associated with vcsa-deploy command by typing the following:
.\vcsa-deploy.exe upgrade --help
Examine the output. The information is lengthy (not pictured) but very helpful.
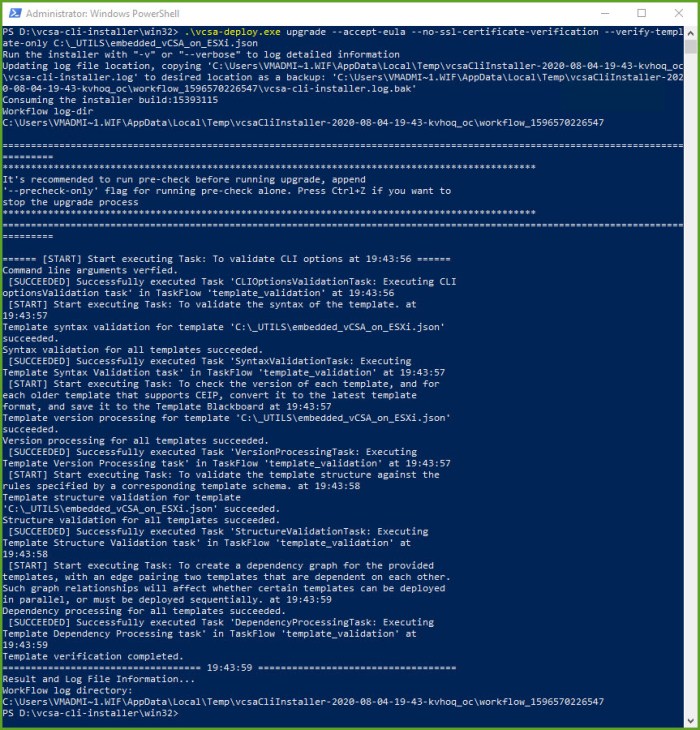
Now let’s do the validation for the JSON template from Powershell. The output of my command is below. If there were any issues with the parameters in your JSON file the output would tell you where the issue is located.
.\vcsa-deploy.exe upgrade --accept-eula --no-ssl-certificate-verification --verify-template-only C:\_UTILS\embedded_vCSA_on_ESXi.json
Next we are going to do the upgrade ‘pre-check’ before initiating the official upgrade of the VCSA appliance. We simply execute the same command except we replace the ‘–verify-template-only’ argument with ‘–precheck-only’ and because I had ‘ceip enabled’ set to ‘true’ in my JSON file I must include the ‘–acknowledge-ceip’ argument. If you CEIP was set to false in your JSON you would not require this argument.
The precheck will take a little bit longer than the previous command so be patient while that process completes. Continue to examine the output as it proceeds. You will notice estimated disk space for exported data will be displayed.
.\vcsa-deploy.exe upgrade --accept-eula --no-ssl-certificate-verification --precheck-only --acknowledge-ceip C:\_UTILS\embedded_vCSA_on_ESXi.json
Troubleshooting Tip: If for whatever reason you run into an issue with either command you will notice there is a set of log files generated. The path to these log files is at the end of the command where it states ‘Workflow log directory’. In that directory you will be looking for the ‘vcsa-cli-installer.log’ file. If you continue to have issues simply add the ‘-v’ or ‘–verbose’ argument to the end of the command and execute it again. This will provide you greater detail as to what could be causing your issue(s).
Screenshots of a successful ‘precheck-only’ task below.
Next we can officially perform an unattended upgrade of vCenter Server from the CLI using the JSON file that was created which has been validated by the previous two commands. I execute the following command to begin my upgrade:
.\vcsa-deploy.exe upgrade --accept-eula --no-ssl-certificate-verification --acknowledge-ceip C:\_UTILS\embedded_vCSA_on_ESXi.json
The command initiates the upgrade and I can monitor the status of my vCenter Server upgrade by opening a console from the ESXi host that is running the appliance. As I monitor the progress from both PowerShell and the ESXi host directly, I see my new OVA appliance being deployed and the overall process continues to churn through. Once new system powers on the script will verify that it can communicate with the temporary IP address that you specified for the deployment. Then a continuous ‘VCSA Deployment Progress Report’ will kick out a status every 30 seconds.
A few minutes into the process you will also begin seeing a task called ‘Export existing appliance data’ which is when the source appliance begins migrating it’s database information over to the target. The task progress percentage will be indicated on the left where it will say ‘RUNNING 25/100’ and then ‘RUNNING 41/100’ and so on until the task completes.
Eventually the source vCenter Server will begin shutting down. At approximately 50/100 portion of my procedure I witnessed the ‘Shutting down source machine’ task take place. Once that completes the target system will begin applying the network configuration of the source and begins taking on the persona of the original vCenter Server (IP, hostname and so on). Then you will see firstboot scripts kick off and various services begin to start.
Below are the screenshots from the entire process from start to finish.
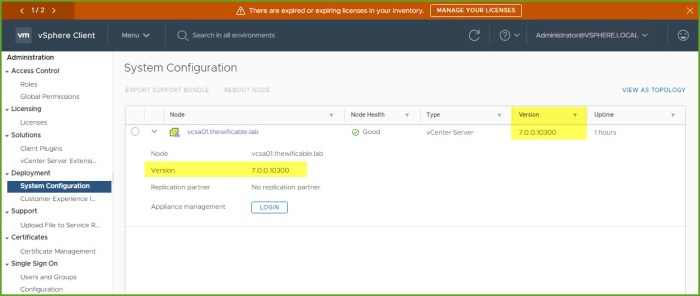
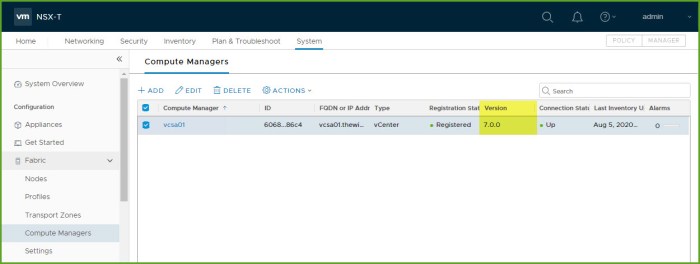
I also log into the vSphere Web client to verify my vCenter Server version is now 7.0. I also have NSX-T 3.0 deployed in my environment which I upgraded in my previous blog article. NSX-T Compute Manager’s also see that vCenter is now running 7.0. As you can I have a warning message about my licenses so make sure you remember to update your licensing before you go any further.
And that concludes the unattended upgrade of vCenter Server using a JSON template. Simple and easy to use. Don’t forget to run another backup once the process completes. Feel free to keep the previous vCenter Server appliance, which is powered off, around for another week or two to ensure you do not have to rollback. Just a recommendation I make, don’t rush to delete the old system until you are 100% sure you no longer need it.
Next step? Upgrade the ESXi hosts.
Useful Links
vCenter Server Upgrade Guide (PDF) – vSphere 7.0 and vCenter 7.0
Example Upgrade Paths from vCenter 6.5/6.7 to vCenter 7.0
About vCenter Server Configuration
VMware ESXi Upgrade Documentation
