There are some organizations out there that didn’t make the jump to vSphere 6.7 and are running vSphere 6.5. This blog article is intended for that specific audience. There are going to be a lot of great articles out there for upgrading 6.7 to 7.0 so keep an eye out for those. I felt the need to start here to help provide some guidelines for those still using 6.5.
As I do in my previous step-by-step articles I provide a brief summary of the software versions that I am starting with in my lab environment. As you can see, very basic lab setup that I am going with with and upgrade both my vCenter Server and ESXi hosts; basically a ‘naked vSphere’ deployment.
- vCenter Server 6.5 U3 – Build 14020092
- vSphere ESXi 6.5 U3 – Build 13932383 (single 3-node HA/DRS cluster)
Preparing for Upgrade
Regardless of which version you are currently running, I highly recommend creating an upgrade run-book (spreadsheet) to track the tasks associated with your upgrade. It is a very good practice and habit to get into. Great way to remain organized and review everything thoroughly before proceeding with your upgrade. Always review the documentation (multiple iterations) prior executing any tasks. Upgrading your environment will likely involve the following.
- Verify the upgrade path for the solution(s) you plan on upgrading.
- Review the release notes.
- Review the documentation associated with upgrading. Great point in time here to create your run-book if you have not already.
- Verify your environment is backed up and ready to go. Aside from having that all important backup, I would also execute a restore operation as a test. Remember, your backup is only as good as your restoration. If you cannot restore from backup then that backup is not very useful.
- Review the upgrade sequence for your environment (VMware KB Articles).
Upgrade Sequences for vSphere 6.x
This blog article is specific for 6.5 to 7.0 but VMware has multiple Update Sequence KB articles publicly available for each version of vSphere 6.x. Review the sequence for the specific version you plan on upgrading from. The information provided in these KB articles is extremely useful and highly critical for VMware customers out there that use multiple VMware solutions. If you are using additional VMware solutions such as vSAN, NSX or anything from vRealize Suite (vRA, vROps, etc.) then you must review this information. Skipping over this step in planning could be catastrophic to your environment so please do not overlook this information.
Update Sequence for vSphere 6.0 and compatible VMware Products (2109760)
Update Sequence for vSphere 6.5 and compatible VMware Products (2147289)
Update Sequence for vSphere 6.7 and compatible VMware Products (53710)
Interoperability Matrices
Interoperability Matrices are also very important. There is a chance you might not have to upgrade depending on the version of that particular solution. For example, let’s say you are using vRealize Automation (vRA) 7.6 and you are currently running vSphere 6.7 U3 and want to upgrade to vSphere 7.0. If you analyze this matrix you will see vRA 7.6 will interoperate with both vSphere 6.7 and 7.0 and therefore will not require you to perform an upgrade of vRA. Let’s take this same scenario and say you are running vRA 7.2 to 7.5. In this situation you would need to upgrade vRA before upgrading your core vSphere components.
Another example, let’s say you have NSX-T 2.4.x or 2.5.x in your environment and are interested in upgrading from 6.5 U2 to vSphere 7.0. The matrix for these solutions will quickly show you cannot upgrade and maintain interoperability. You will have to upgrade to NSX-T 3.0 prior to upgrading your core vSphere components. NSX-T 3.0 GA’d on April 7, 2020.
VMware Product Interoperability Matrices
VMware Product Interoperability Matrices – Upgrade Path for vCenter
VMware Product Interoperability Matrices – Upgrade Path for ESXi Hypervisor
If we are to only focus on upgrading the core components of vSphere (vCenter, ESXi and VMs) the process would look like this at a high-level. There are certainly sub-tasks for each that you should review/prep before ripping through these steps.
- Begin vSphere Upgrade
- Execute backups.
- Upgrade vCenter Server.
- Upgrade ESXi hosts.
- Upgrade virtual machines (VM Tools & HW)
- Upgrade complete.
Overview of vCenter Server Upgrade Procedure
There are two options available to get your vCenter Server to version 7.0; upgrade in place or migrate your existing vCenter Server 6.5 (or 6.7). Assuming backup and restore testing is complete you can proceed with the following.
- Begin the vCenter Server upgrade.
- Confirm the upgrade requirements have been met.
- Prepare upgrade environment (or migration).
- Choose method:
A. Upgrade VCSA.
B. Migrate Windows-based vCenter Server to VCSA. - Complete post-upgrade tasks; verify functionality and execute a backup.
- Upgrade/Migration to vCenter 7.0 complete!
The upgrade that I am going to demonstrate will be the GUI upgrade of my VCSA based vCenter Server.
vCenter Upgrade with GUI
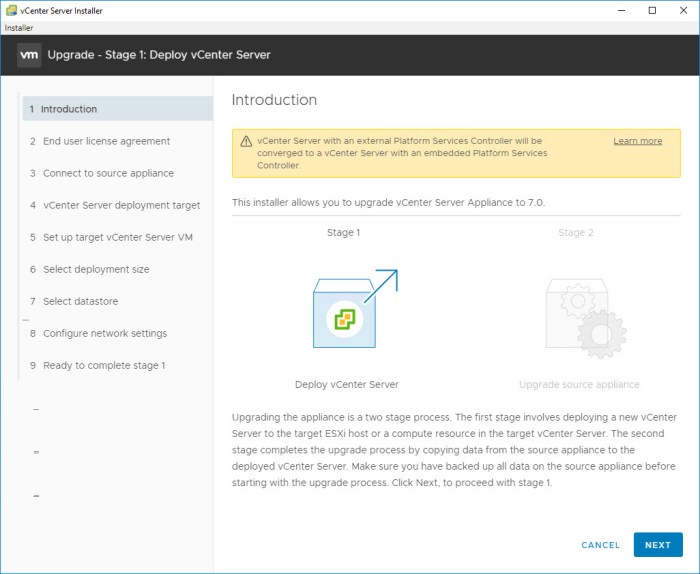
In this demonstration I’m going to cover the step-by-step procedure for upgrading an existing vCenter Server 6.5 VCSA instance to vCenter Server 7.0. Something to keep in mind whether you plan on using the GUI or CLI upgrade process the following tasks will take place during a 2-stage upgrade process; Stage 1 is OVA deployment, Stage 2 is Appliance Setup.
- A new VCSA appliance will be deployed in parallel to existing vCenter Server with a temporary network configuration. Make sure the temporary IP address you choose is available (not in use) on the intended target network.
- Exporting the services and configuration data from source to target; you must select the data type you want to transfer from the original vCenter Server to the new appliance.
- Transferring of the exported data from source to ‘new’ target will take place.
NOTE 1: Keep in mind if you are deploying direct to ESXi, non-ephemeral distributed virtual port groups are not supported and will not appear as options during the upgrade. When the upgrade is complete you can manually connect the appliance to the original non-ephemeral distributed virtual port group. This process is not a limitation when deploying the appliance through a vCenter Server.
NOTE 2: If you are upgrading a VCSA appliance that uses Update Manager (UM), the UM instance will be migrated to the new ‘vSphere Lifecycle Manager’ on the newly upgraded appliance. - If you are upgrading a vCenter Server that utilizes an external PSC, it is converted to a vCenter Server instance with those services embedded. All PSC services are consolidated into vCenter Server during the upgrade.
- Once the exported data is imported into the new appliance, the source appliance will be powered off. The newly upgraded VCSA assumes the network configuration of the source (hostname and static IP). The temporary network configuration is no longer used.
NOTE: Keep in mind I’m performing this deployment/upgrade in a ‘nested’ lab environment. Therefore everything you see below will not be exactly what you will encounter should you do this.
My installation media for vCenter Server 7.0 is downloaded and ready to go. I’m executing this from a Windows 10 workstation. Navigate to the installation media ‘\vcsa-ui-installer\win32\installer.exe’ to initiate the process.
You can find this procedure starting on page 47 of the vCenter Server Upgrade Guide for vCenter Server 7.0 (02 APR 2020).
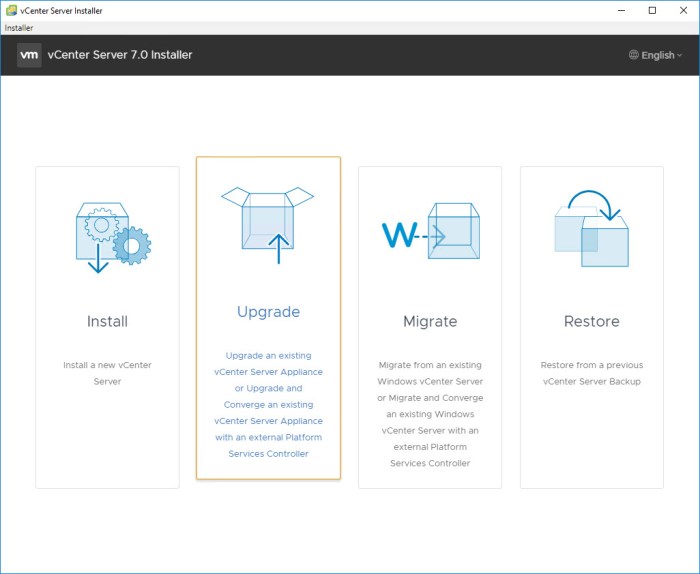
- Launch the installer and select the Upgrade option.
- Review the Introduction and click Next.
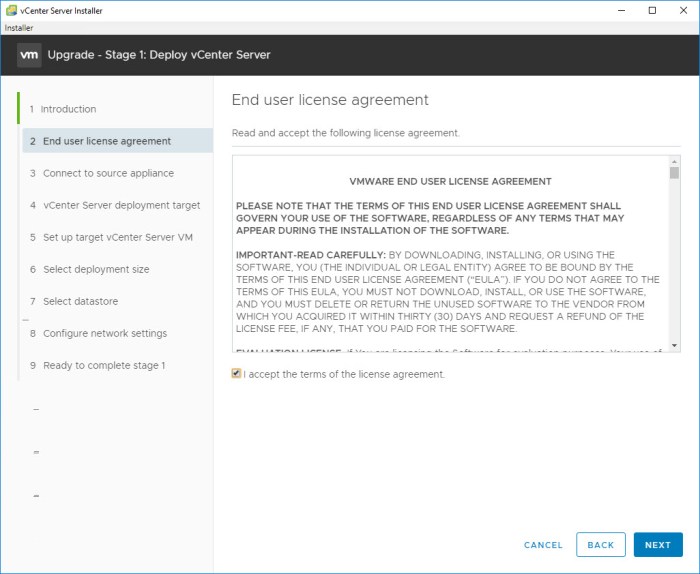
- Accept the EULA and click Next.
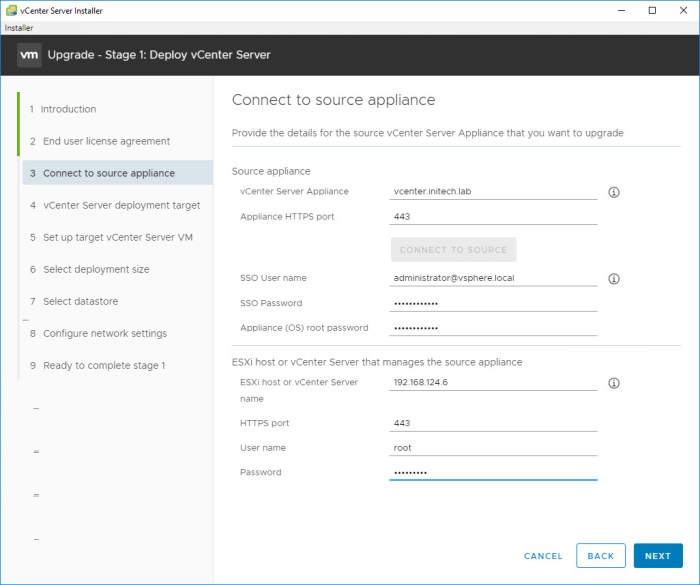
- Enter the source vCenter Server information and click the ‘Connect to Source’ button. Accept Certificate message.
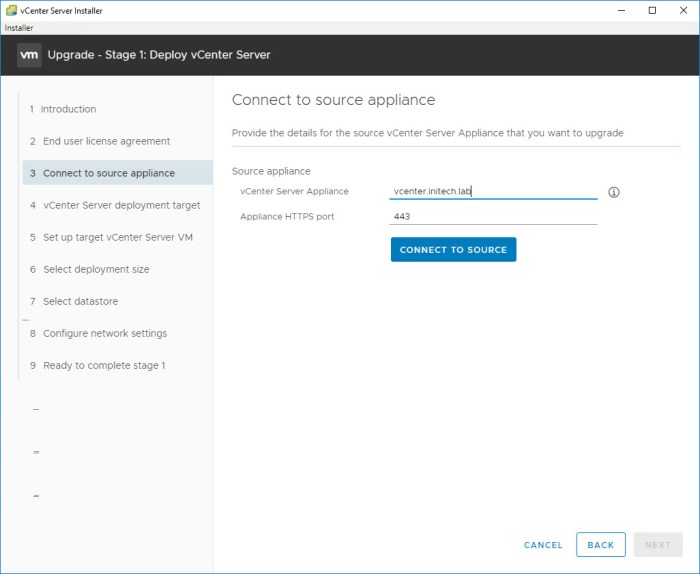
- Provide the details for connecting to and authenticating with the source vCenter Server. Click Next and Accept the Certificate message.
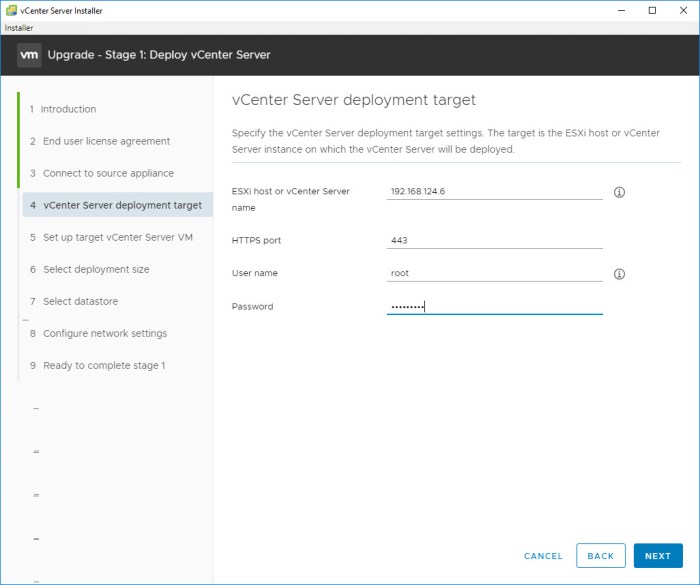
- Enter the information for the deployment target. In this case I’m going directly to the ESXi host that manages my lab. Click Next.
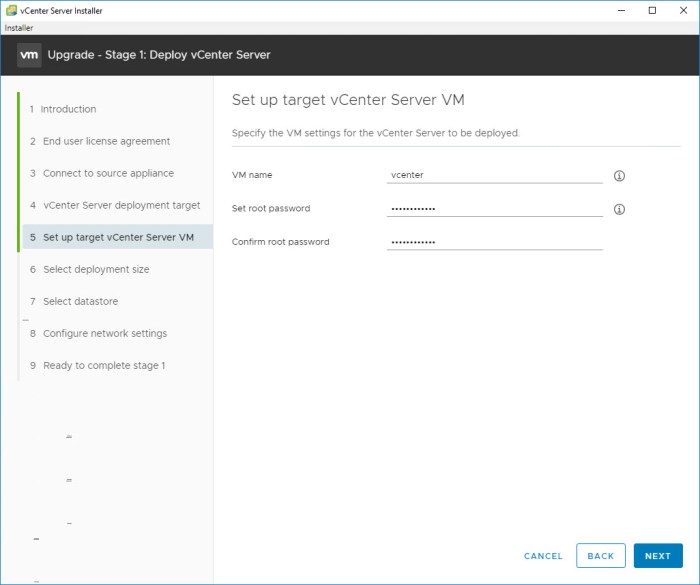
- Enter the name of the target vCenter Server VM and the root password.
NOTE: I appended the ‘_old’ suffix to the name of the vCenter Server source VM in the inventory. If I did not do this and attempted to use the same name I would receive an error message.
- Select the target deployment size. I’m using TINY for my lab environment but you should choose the size that fits your requirements. Click Next.

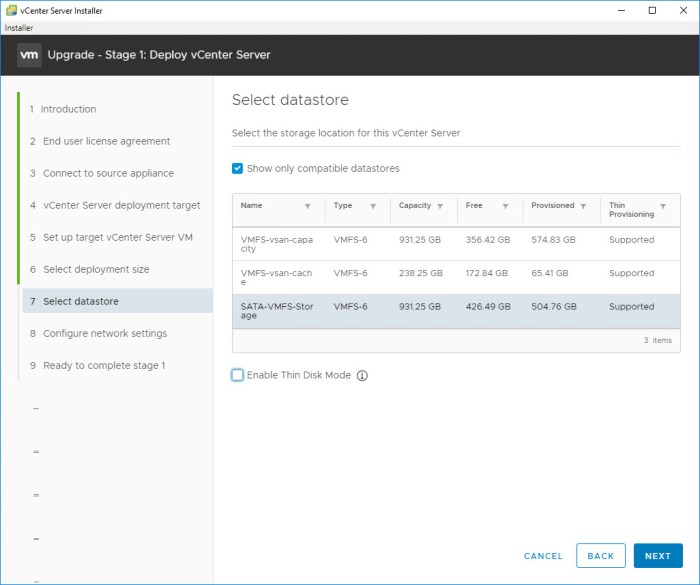
- Select the datastore for the new vCenter Server VM (optional: enable thin disk mode). Click Next.
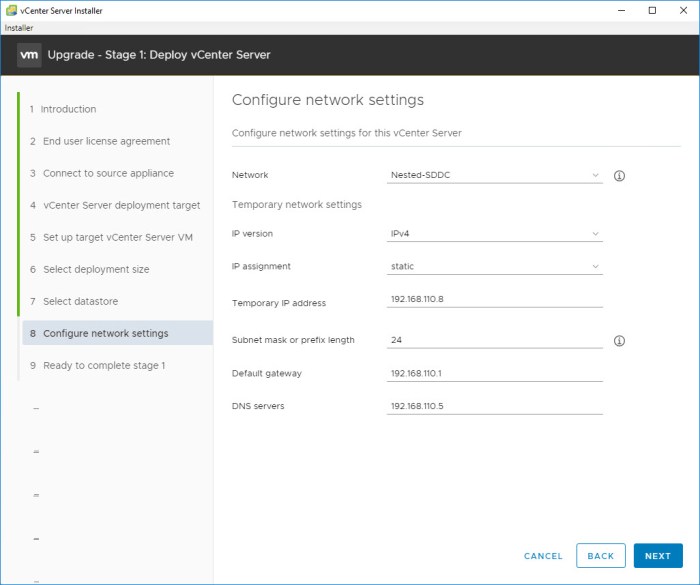
- Enter the network settings for the new appliance. This is where you will enter the ‘temporary IP address’ for the new appliance during deployment. Click Next.
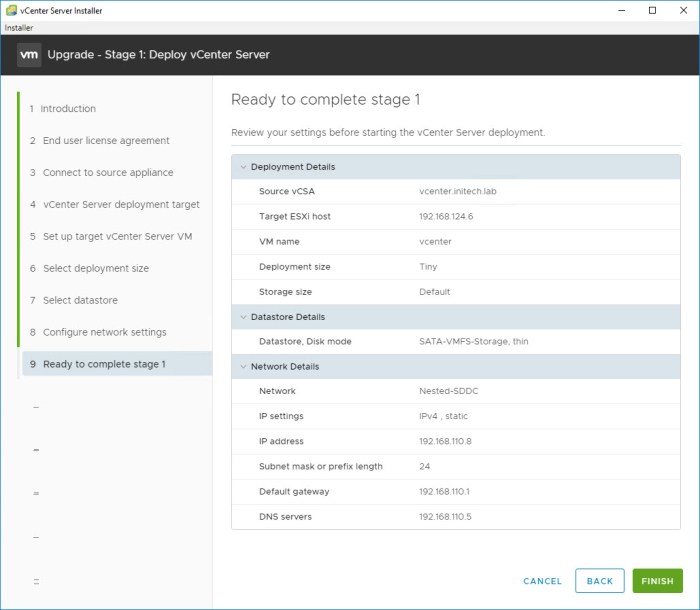
- Review the summary of Stage 1 and click Finish.
- The OVA deployment (Stage 1) will begin. Monitor the progress of the deployment.
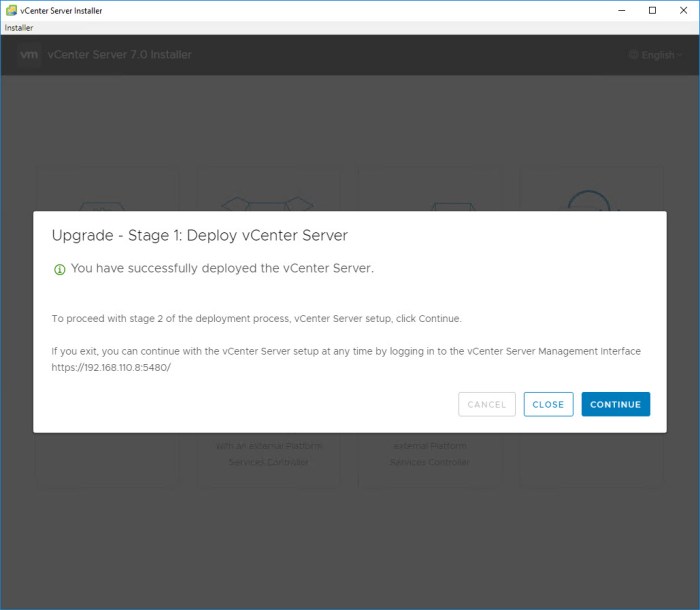
- When Stage 1 completes you will see a ‘successful’ message. Review the information and click Continue when ready.
- Stage 2 will then begin. Click Next and a validation process will begin and provide you with Pre-upgrade check results. Click Close.
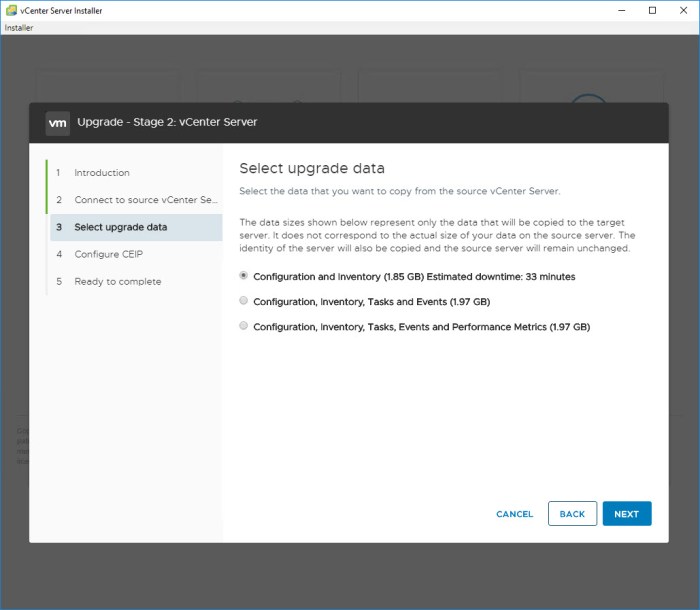
- Next you will select which data you want to import during the upgrade. The amount of data will be listed along with an estimated amount of time. Reference this LINK for some additional information as it will be important for you and your team to estimate the amount of time vCenter Server will be down (unavailable) during the process. Click Next.
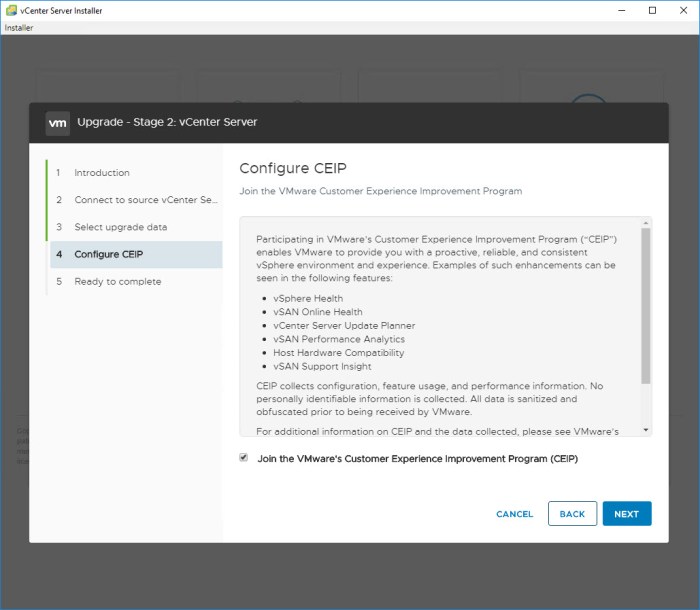
- Accept the CEIP(optional) and click Next.
- Review the information in the Ready to Complete and click Finish. A Shutdown Warning message will appear. Click OK.
- The upgrade is then initiated.

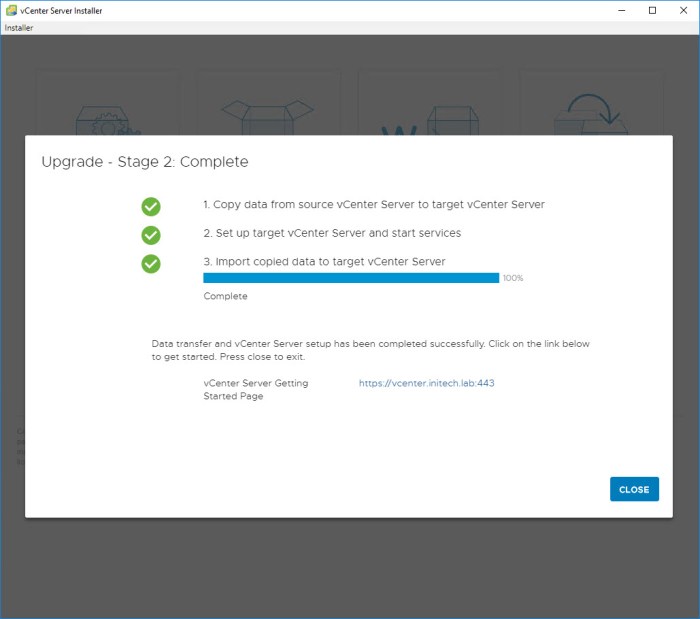
- Monitor the progress of Stage 2. Data Copy from source to target will be Step 1 followed by setting up the target vCenter Server and starting services in Step 2.
- Setup of the target vCenter Server will begin and start services.
- Import copied data is Step 3. A message window will appear at the end of the process.
- Stage 2 of the Upgrade Process completes. Click Close and your default web browser will launch.
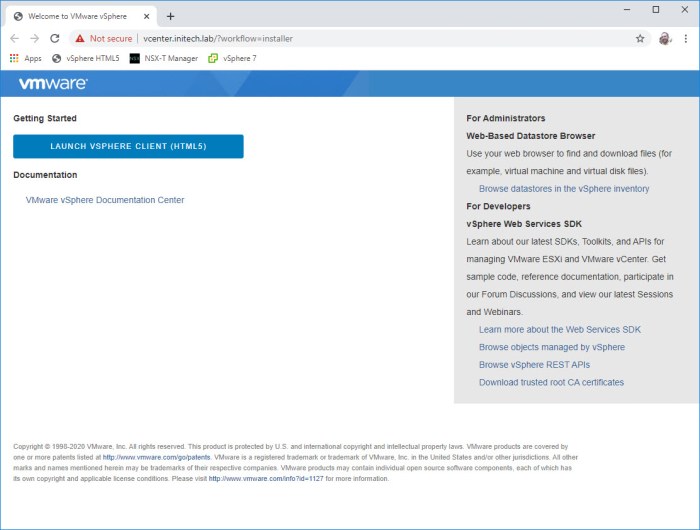
- Click on the ‘Launch vSphere Client (HTML5)’ button and you’ll be redirected to the login page. Log into your vCenter Server using your credentials.
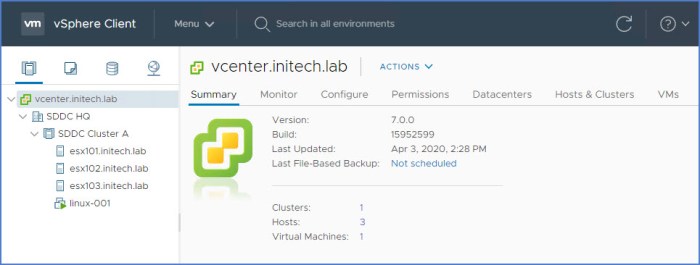
- Verify your vCenter Server is now running version 7.0. Done!
That is the end of the upgrade and hopefully a happy day for you. Once you are finished here I would run another backup immediately. The planning phase for the next phase of your upgrade would be next including upgrading of the ESXi hosts and the VM Tools and Virtual Hardware of your virtual machines. Pace yourself, I would not do this all in the same planned outage window.
Lastly, don’t forget to apply your vSphere 7 licenses!
Other Useful Links
vSphere Documentation Homepage
Introducing vSphere 7: Features & Technology for the Hybrid Cloud – by Adam Eckerle
VMware Product Interoperability Matrices
Documentation for the upgrading of your ESXi hosts and VMs can be found below.
VMware ESXi Upgrade Guide for 7.0 – PDF
vSphere Virtual Machine Administration for 7.0 – PDF – reference Chapter 10 starting on page 274 for upgrading VMs.

Is it possible to upgrade a windows vcentre server 6.5 to vcentre 7 applicance?
LikeLike
Yep! You can find the information here to get you started.
https://docs.vmware.com/en/VMware-vSphere/7.0/com.vmware.vcenter.upgrade.doc/GUID-9A117817-B78D-4BBE-A957-982C734F7C5F.html
LikeLike
Awesome! Thank you very much.
LikeLike
Thanks for the article.
I have a two site upgrade scenario in one SSO domain. First site had an external PSC and as part of the upgrade we embedded the PSC. Now the second site is failing when attempting to add to the 7.0 SSO domain. I have a feeling its still looking for the old “site1” PSC.
Any links or docs on how to upgrade the second site?
LikeLike
Thank you for sharing this information. 🙂
LikeLike
Awesome tutorial. I only wonder about the temp IP address. The new vCenter will be accessed on the temp IP address or on the old one?
LikeLike
Temp IP is only used during the transition from the old appliance to the new one. One the data is migrated by the installer the old appliance is powered down completely. The new appliance reboots and takes on the persona of the legacy appliance and releases the temp IP. It is no longer used after that.
LikeLike
Thank you a lot. A moment after writing the comment I scrolled up and saw that you have mentioned that under point 5.
LikeLike
Hi John… We’re just getting to this point of upgrading our 6.5 environ to 7. We have an external SSO/PSC(?). Will the upgrade take care of this second appliance or is there anything that has to be done to it outside of the steps you mentioned? And thank you for the write-up – it’s going to be a great help!
LikeLike
Hi Todd, I have this process outlined in a separate blog article which you can find here: https://thewificable.com/2021/02/17/upgrade-to-vcenter-7-0-and-decommission-external-psc/
It’s pretty straightforward. The installer will detect that the source has an external PSC and automatically converted it to an embedded. There is a command-line process at the end of that article where you have to manually decomission the old PSC.
LikeLike