In this blog I am going to walk you through the basic steps of deploying and configuring vRealize Orchestrator (vRO). I will also navigate you through the interface a little to get you familiar with some of its features. You should have a firm understanding and grasp of using vSphere before going any further.
So what is vRealize Orchestrator (vRO) and what can it do for you? First it was originally known as VMware vCenter Orchestrator and was part of your vCenter Server licensing and is now known as VMware vRealize Orchestrator. It is a very powerful automation tool that not only automates a lot of daily tasks in your vSphere environment but you can also utilize a lot of other scripts that you may have used in the past (i.e. PowerShell scripts, Bash Scripts, Java Scripts, etc.) and now orchestrate them using things called “workflows.” These workflows are both available out-of-the-box with vRO and from 3rd party vendors. You can find these 3rd party vRO plug-ins in the VMware Solution Exchange and the VMware Sample Exchange.
The best description for vRO and what it can do from you is actually in the NOTES section of the virtual appliance in vSphere once it is deployed. The notes section reads…
Automate tasks for VMware vSphere and enable orchestration between multiple solutions. VMware vRealize Orchestrator allows administrators to capture their best practices and turn them into automated workflows.
Doesn’t get much simpler than that!
My guide will help any of you out there looking to simply enhance your vSphere knowledge, create a foundational understanding of automation or even help you at your daily job where it may already be deployed or you are planning on deploying it in the near future.
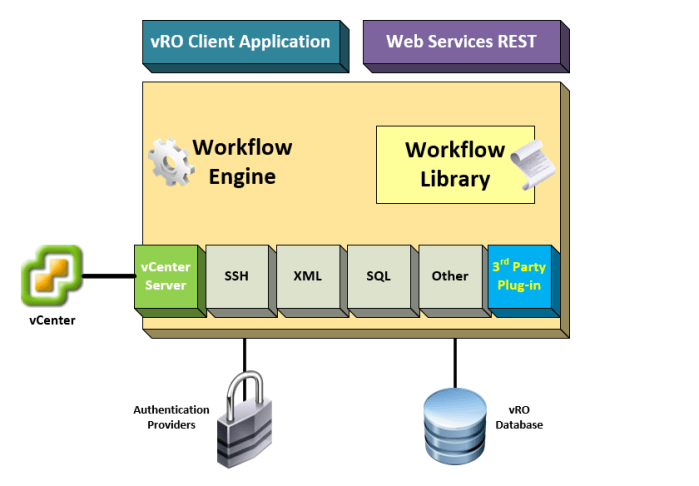
Next let’s take a look at the vRO architecture so we have a little more of an understanding of what is going on behind the scenes. vRO includes both a workflow library and a workflow engine. Together they enable you to create and run workflows that automate orchestration processes. You then run these workflows on objects that vRO accesses via a series of plug-ins. As I stated a little earlier, these plug-ins are either integrated with the vRO appliance or available from 3rd party applications / vendors. You can manage just about anything! If vSphere can see it then there is a good chance a vRO plug-in exists to help you manage and automate common tasks. This open architecture makes it very powerful. So make sure you browse the Solutions Exchange regularly because if it isn’t there now it could be in the very near future.
Deploying the vRO Appliance
First thing’s first, we need to deploy the vRO virtual appliance. I will be deploying version 7.3 into my vSphere 6.5 lab environment. The lab that I am working with here is very small. I have two (2) ESXi 6.5 hosts and a single VCSA appliance (w/ embedded PSC).
The vRO appliance is just another OVA appliance. You are familiar with deploying OVA’s then this process will be very easy for you. The vRO appliance has the following virtual hardware requirements:
- 2 vCPUs
- 6 GB of memory
- 17 GB of disk space
As it is stated in the documentation, do not reduce the amount of memory as the server appliance requires at least 2 GB of free memory. Stick to this rule if you are deploying this for future production use. If you are deploying in a lab like I am doing you can reduce it.
The following web browsers are also supported:
- Mozilla FireFox (my choice)
- Google Chrome
- Internet Explorer 10 or later
Has anyone seen Microsoft Edge ever listed anywhere for any deployment for supported browsers? Because I have yet to see it 🙂
You should also download and install Java JRE 1.8 or later (64-bit) if you intend on installing the vRealize Orchestrator Client available for Windows, Linux and Mac OS X.
I will be deploying the appliance from the HTML5 interface for my vCenter Server. You can also do this from the soon to be deprecated vSphere Web Interface (flash-based). Let’s get started with the deployment.
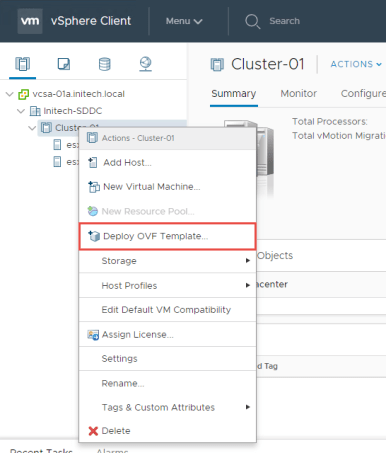
- Right-click your vSphere cluster (or ESXi host) and select the ‘Deploy OVF Template’ option. A wizard will appear.
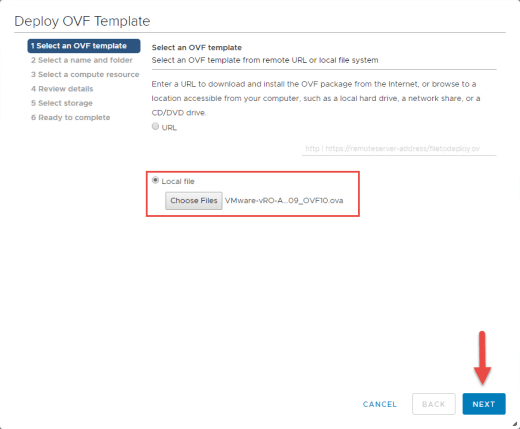
- From the Select and OVF template page of the wizard I choose the ‘Local file’ option and then choose the OVA file for vRO that I have previously downloaded. Click Next.
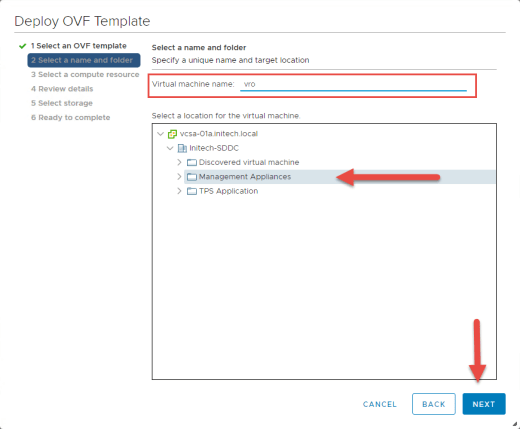
- Provide a name for the vRO virtual machine and choose a folder from your inventory. I use folders all the time to stay organized. Click Next.
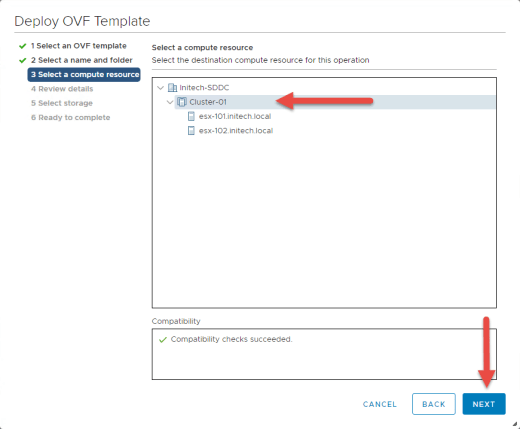
- Choose a compute resource and click Next. I selected my DRS enabled cluster in the screenshot below. If you do not have DRS enabled then you will have to select a specific ESXi host.
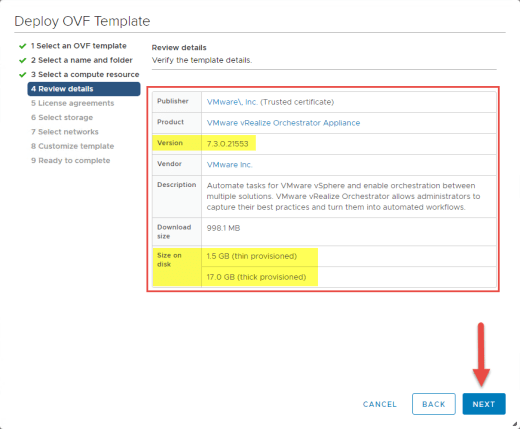
- Review the deployment details of the virtual appliance and click Next. Here you can see the version of the appliance I am deploying as well as the size on disk. Thick provisioned will be 17GB and thin provisioned will be 1.5 GB.
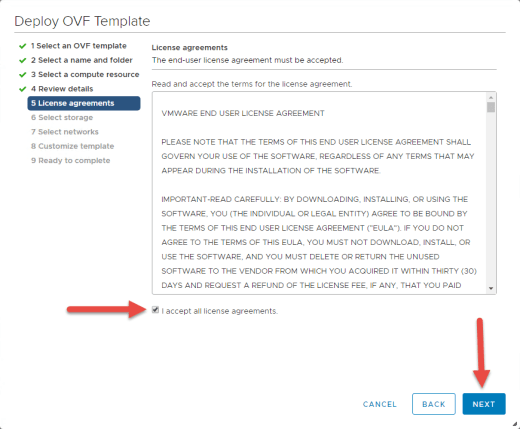
- Accept the EULA and click Next.
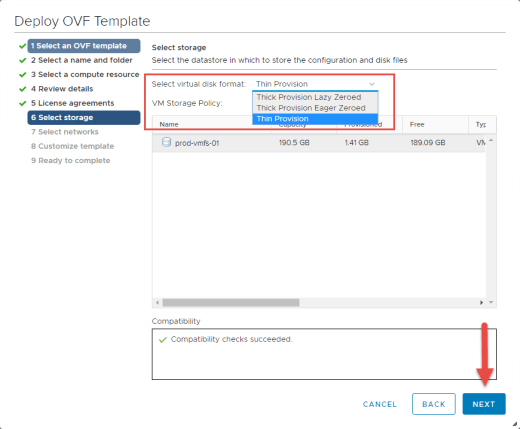
- Next select the storage destination for the vRO appliance. My lab has a single VMFS datastore and I want to deploy a few other things in my environment. So I’m going to select Thin Provisioning below. Make sure you select the correct options for your deployment.
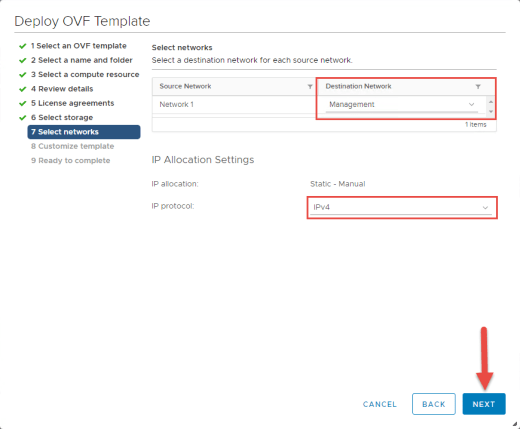
- Choose the network that you plan to use for your appliance. I have a separate Management network segment (VLAN). IPv4 is the default protocol option but you can also select IPv6.
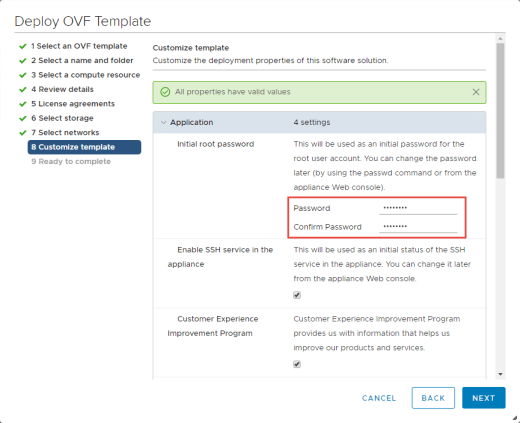
- On the Customize Template portion of the wizard you have to enter and choose several options. First enter the initial root password and then choose whether or not to enable SSH or participate in CEIP. Scroll down and enter the Networking Properties for the appliance including IP address, mask, gateway, DNS info and so on. Click next when you are ready to proceed.

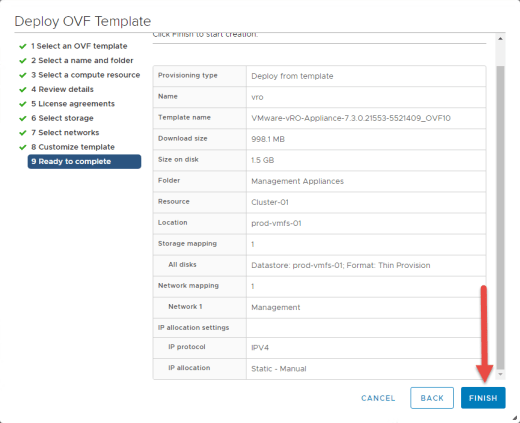
- Review the information on the Ready to Complete page and click FINISH. The appliance will begin deploying into your vSphere environment.
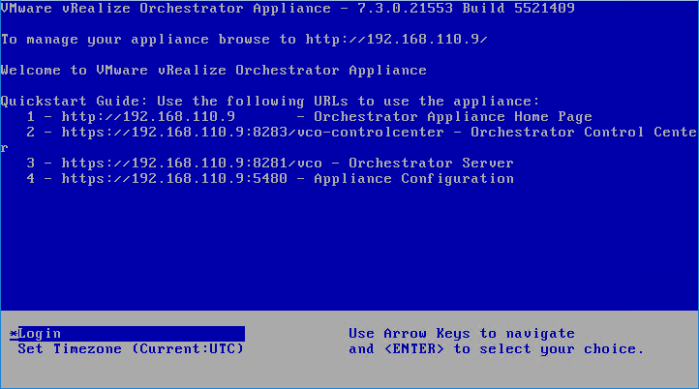
- Manually power on the virtual appliance once it is deployed and then select Launch Remote Console. I have VMRC installed locally on my system. Once vRO boots you will see some information that you will use to access it from a supported web browser. Make note of these URLs and bookmark them if you have to.
That concludes the deployment portion for vRO. As you can see it is very simple and straightforward. Next we will get familiar with the vRO interfaces and perform a few minor tasks.
Accessing vRO
Next we are going to access our newly deployed vRO appliance from a supported web browser. The URLs that we made note of during the last step of our deployment process will come in handy here. My new appliance has the following FQDN and IP address:
FQDN: vro.initech.local
IP Address: 192.168.110.9
I am going to access my appliance using the FQDN. Just so you are aware, when you use the ‘http://<fqdn-or-ip-address> URL for the vRO home page it will immediately redirect you to the third URL listed: ‘https://<fqdn-or-ip-address>:8281/vco’
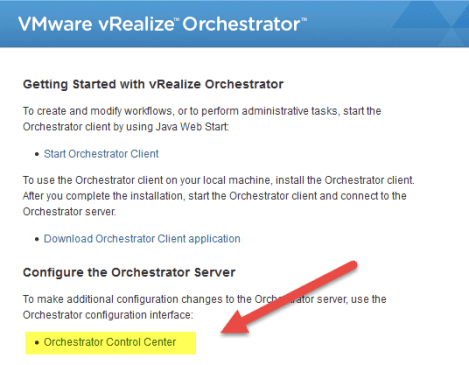
Accept the certificate warning and you will be immediately redirected to the secure vRO homepage. No login required to access this homepage. Next select the Orchestrator Control Center link under ‘Configure the Orchestrator Server’ and a new tab should open in your web browser.
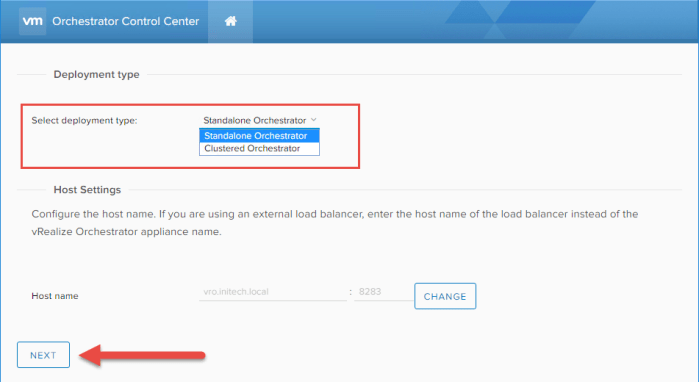
You will be immediately be prompted for some credentials. To access this page you will need the ‘root’ account and password you specified during the appliance deployment. By default the ‘Standalone Orchestrator’ deployment option is chosen. If you already have another deployment of vRO up and running and you now want to cluster them to make your vRO deployment highly available then you would choose the ‘Clustered Orchestrator’ option here. You would then be prompted for the remote vRO hostname (IP address) and credentials in order to begin clustering your vRO appliances. This is my first vRO deployment for this specific environment so I am going to remain a standalone vRO instance for the time being.
If you needed to change the hostname of your vRO deployment you have the option of doing so here as well.
Click Next.
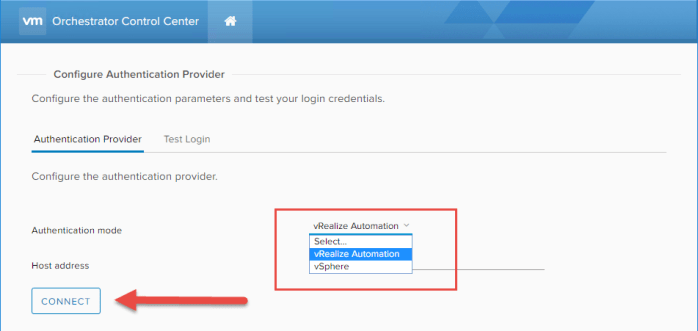
Next we will configure our Authentication Provider. There are two types available…vRealize Automation or vSphere. If you have a vRA instance deployed and want to use an external vRO instance versus the embedded option you can do so.
I’m going to choose vSphere from the drop-down menu and then enter the FQDN (or IP address) of my vCenter Server and then select Connect.
You will then be immediately prompted for credentials for vCenter Server. Enter the credentials you wish to use to provide access and then select Register.
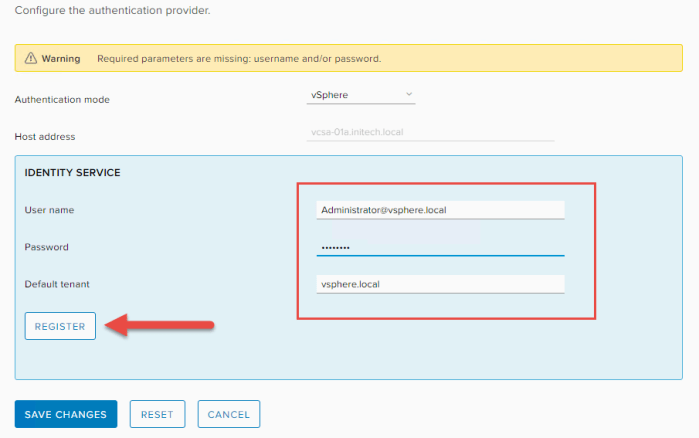
You will then be prompted to provide some missing parameters for ‘Admin Group’ for the account you just used. Click the SEARCH button and you will see a list of groups. I select ‘vsphere.local\Administrators’ and then select SAVE CHANGES.
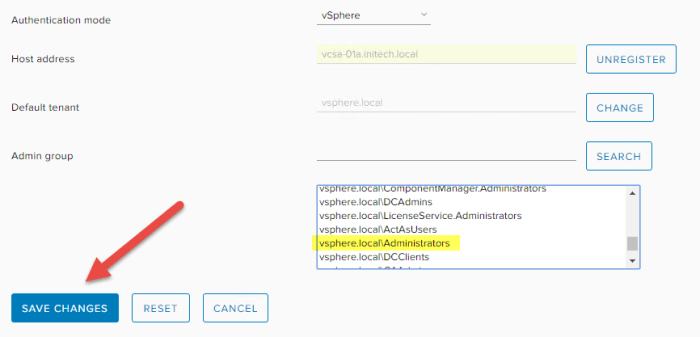
When you are finished the web browser will refresh and look something like this (below). If you need to make changes to the vRO appliance this is where you are going to do this from.
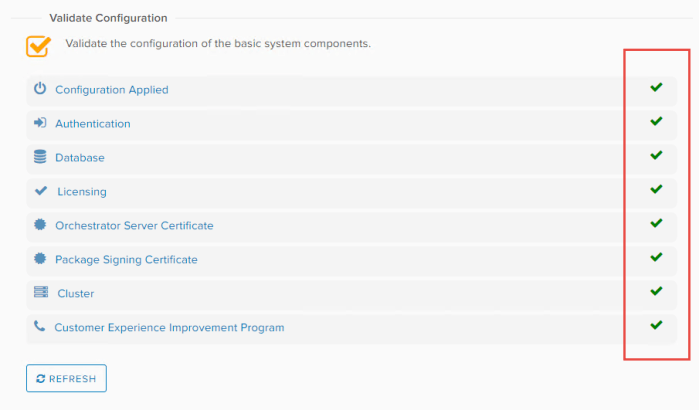
Now that we have completed this step we have two more things to do. Select Licensing and then verify that CIS is listed as the licensing provider. Last, select the Validate Configuration option and verify that the vRO node is 100% configured properly. You will likely need to restart the appliance in order for the configuration changes to be applied.
Now that we have completed this step and changed the Authentication Provider and rebooted; we can no longer log into the Orchestrator Control Center using the root account as we did initially a little bit ago. We must now access the control center using a user account that is a member of the admin group that we specified above. In this case they have to be a member of the ‘vsphere.local\Administrators’ group.

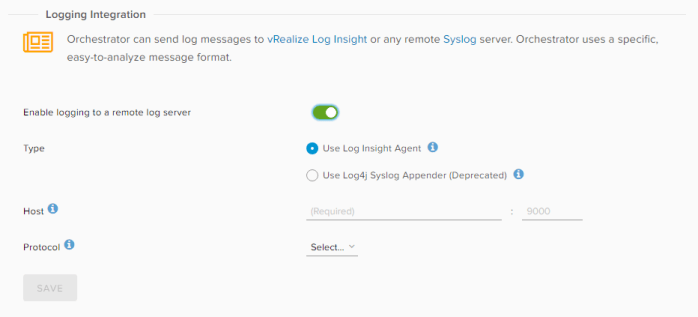
One of my favorites on this page is the ‘Logging Integration’ under the Log section. Here you can integrate your vRO instance with vRealize Log Insight. Simply enable logging to a remote server and enter the required information and click Save. This is extremely useful during troubleshooting or if you need to retain this information for compliance purposes.
Orchestrator Client
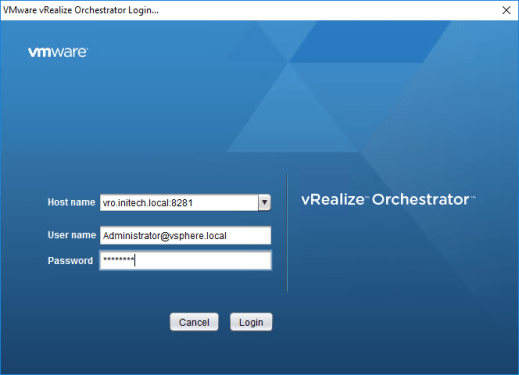
Next we are going to get familiar with the Orchestrator Client. If you have Java 1.8 (64-bit) or later installed you can simply select the Start Orchestrator Client option from the vRO homepage. You can also download and install the client locally if you want. Either way you will need Java installed locally on your workstation.
Enter the FQDN or IP address of your vRO appliance and then supply the credentials. Because we just integrated our vRO appliance with vSphere as the primary authentication provider we can use the ‘Administrator@vsphere.local’ account to log into the client or any other user that is a member of the vsphere.local\Administrators group in vCenter.
NOTE: If we did not complete the steps to change the Authentication Provider then the default built-in account would be needed to connect to the client and that default username/password is vcoadmin/vcoadmin.
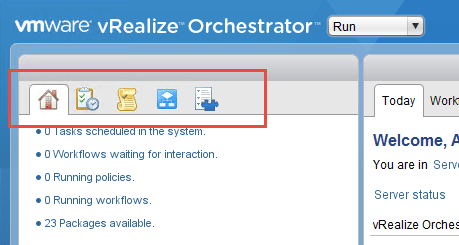
Now that we are logged into the client you simply want to familiarize yourself with it. First you want to locate the drop-down menu at the top. Note there are three (3) options available here: Run, Design and Administer. Let’s start with the top and work our way down.
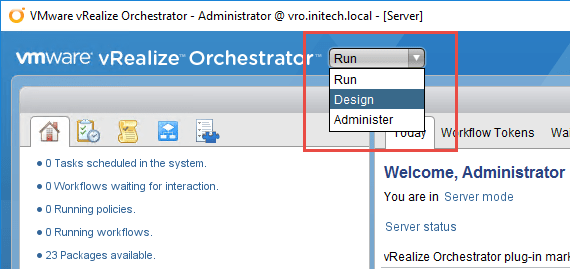
Select Run from the menu and you will quickly notice the icons. Hover your cursor over these icons and you will see what each icon is for. You will have the following options (from left to right):
- My Orchestrator
- Scheduler
- Policies
- Workflows
- Inventory
Next we will change the drop down menu from Run to Design. Notice the icons quickly change. You now have the following options (from left to right):
- Workflows
- Actions
- Resources
- Configurations
- Packages
- Inventory

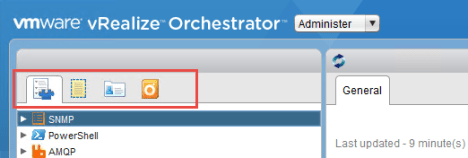
Next we will change the drop-down menu from Design to Administer. The icons have now changed for this menu and you now have the following options (from left to right):
- Inventory
- Policy Templates
- Authorizations
- Packages
Your goal here with these menus is simply browse the different options on for each menu (Run, Design, Administer) and get as familiar as possible with the client interface.
For example, select Workflows from the Run or Design menu. Then expand the Library option and take a look at all of the workflows that come with vRO by default. These are all built-in. Notice there are workflows for things such as:
- Microsoft Active Directory
- SQL
- PowerShell
- HTTP-REST
- SOAP
- vCenter
- and more…
As you can see this is a very powerful tool with a lot of out-of-the-box features that are readily available.
Add vCenter Instance to vRO
The last thing we are going to do is add a vCenter Server instance to our newly deployed vRO appliance. We need to do this before we can automate any tasks in vCenter. If you were to reference the vRO Architecture graphic above you will quickly notice the green colored vCenter Server plug-in. We are going to configure this right now.
We need to access our Workflows that are available on the Run or Design menu. I’m working from the Design menu because that is where I am going to do most of my work from with vRO.
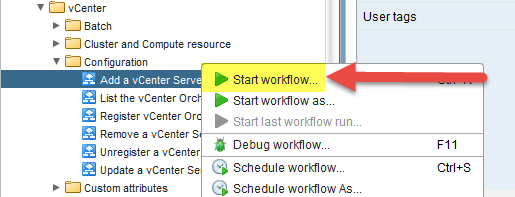
Expand Library and then expand vCenter and then Configuration as seen below.

Right-click the ‘Add a vCenter Server instance’ workflow and select the option Start Workflow as seen below.
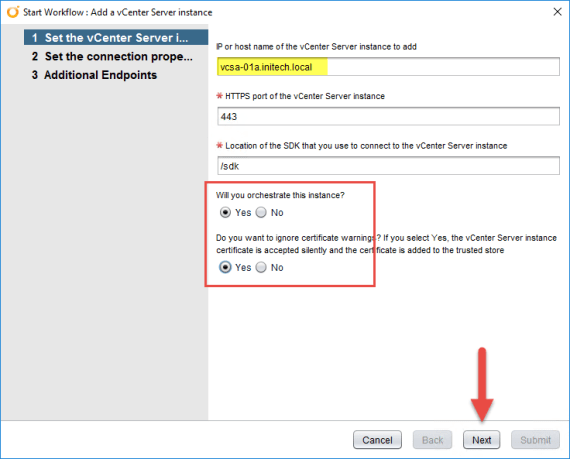
Add the local vCenter Server instance and select YES to accept the default certificate silently. Then click NEXT.
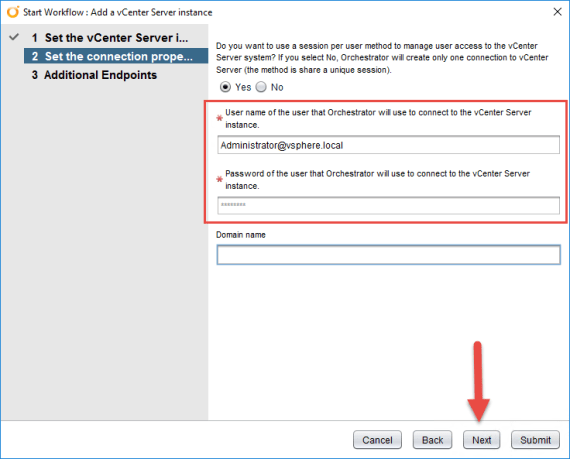
Next on the vCenter Connection Properties page enter the password for the account and then the domain name (optional). Click NEXT.
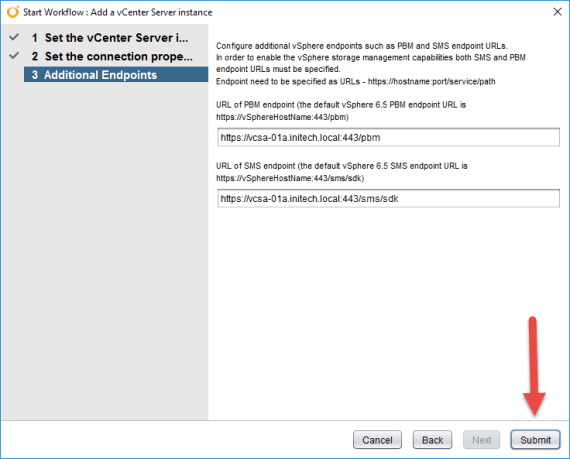
Review the Additional Endpoints parameters and click Submit. I did not make any modifications on this page.
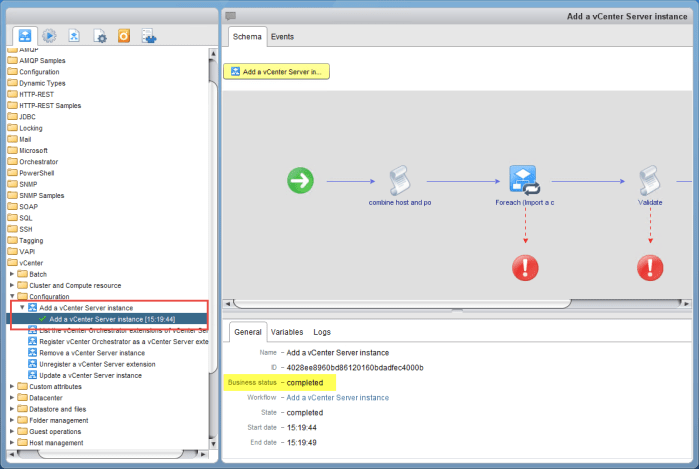
The workflow to add a vCenter Server instance to your vRO appliance should complete successfully assuming all of your parameters were correct. A green check mark will appear under the workflow with a time stamp. On the right side on the General tab you will see a status of ‘completed’ next to Business status. If there was an error during the workflow you will see the error and what may have caused the failure.
Conclusion
And there you have it. The basics involved with deploying and configuring vRealize Orchestrator 7.3 in a vSphere 6.5 environment. Very simple and straightforward process. In my next blog article for vRO I will cover some basic workflow tasks and show you how to import some 3rd party plug-ins that can be used for automating tasks outside of vSphere. Here is some documentation and other useful links that you may find helpful.
Helpful Links
vRealize Orchestrator Documentation
vRealize Orchestrator Homepage

One thought on “Deploying vRealize Orchestrator 7.3”