Finally back to writing some VMware blog articles after a brief hiatus here. Took a long break during the holiday season and then I had a life changing event when I switched jobs. Needless to say but I had a lot going on. Onward and upward 2021!
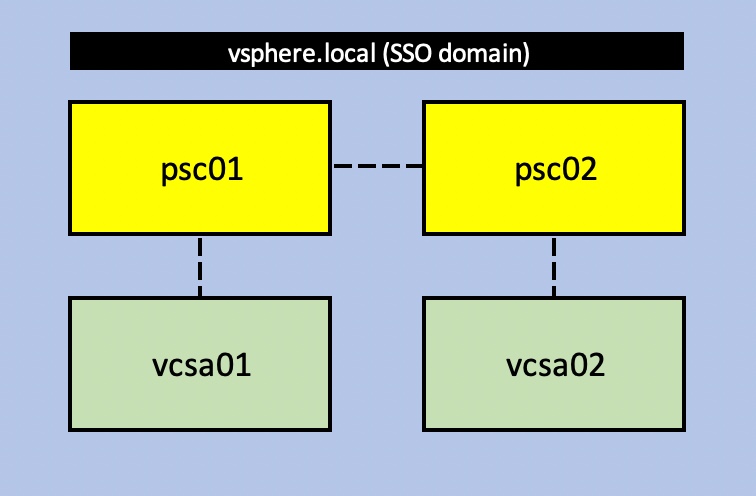
For my first blog post of 2021, I want to focus on an area that comes as a request from one of my blog followers. I have an existing article for upgrading vCenter Server 6.5 to 7.0 but that one is pretty simple and straightforward. The wrinkle that I am adding to this scenario involves the source vCenter 6.5 environment and topology to include an external PSC. Then to add an additional wrinkle, the source topology contains two (2) PSCs and two (2) vCenter Server appliances in a single SSO domain and single site (diagram below).
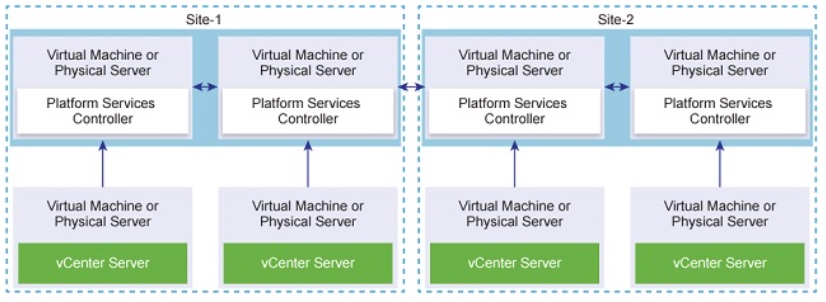
The supported topologies for 6.5 are summarized in VMware KB 2147672 and the closest the one above resembles is illustrated further below. Only difference in my home lab environment is I’m focusing on a single SSO site and not two (2) SSO sites which is depicted in the image below. Just want to point that out before we go any further. If you are using vCenter 6.5 and plan on upgrading to 6.7 or 7.0 in the near future you should review the supported topologies for both your source and target environments as some topologies become deprecated.
Pre-upgrade Best Practices
Before getting started you should always review and prepare. Failure to do so puts you at risk and you want to avoid entirely. Do not skip steps just to get to the finish line. Make sure you are thorough and concise every step of the way. Create or use an existing run-book in Excel or other program that will keep you organized. Check off each step as you proceed through the entire process.
Here is a quick run-through of the steps you will need to take. High-level steps are available in documentation and other online resources such as the VMware Documentation homepage for vSphere but I’ll dive a little deeper here for you.
- Begin the upgrade procedure.
a. Start with reviewing the release notes for your source version and target version.
b. Review the upgrade documentation provided by VMware for vCenter 7.0 (LINK HERE).
c. Create a workbook (or run-book) to document your steps. Use this as your checklist! - Backup the existing environment.
a. Execute backups for vCenter Server(s). Snapshots can be done but they are NOT BACKUP.
b. Test restoration of the backups if you can. Backups are only good if they can be successfully restored.
c. Taking snapshots is an additional option but in doing so make sure the PSC’s and vCenter’s are ‘powered off’ prior to taking the snapshot. This is to ensure consistency in the VMDIR (VMware Directory Service) Database and do not go out of sync should you have to be in a situation to ‘roll back’ to a known good state. Power them all down, snap them, power them back up! - Upgrading vCenter Server.
a. Review the upgrade procedure step-by-step per the documentation.
b. If you have extra resources and can do a mock of the upgrade in a test environment the better you will be in terms of preparation. - Upgrade ESXi hosts.
a. We won’t be covering this portion of the upgrade here but upon successful completion of upgrading vCenter here is where you would begin upgrading hosts.
b. Double and triple check all hardware compatibility lists before upgrading. - Upgrade Virtual Machines and/or appliances.
a. Here is a place where you will have to rely on your interoperability matrices from VMware for understanding which other solutions (appliances) will be upgraded.
b. Could be time consuming depending on the number of VMs that need to be upgraded as well as any SLAs tied to mission critical systems or applications. - Upgrade complete!
a. Execute the post-upgrade tasks which should include a BACKUP!
b. Troubleshoot as needed. Don’t forget to open support ticket with GSS!
Online Documentation and KB Articles
Another area of focus I highly recommend reviewing are the online articles and other documentation. Start with the product documentation homepage for vSphere and then locate the vCenter Server Upgrade guide; available online and as a PDF. Read through the entire document. During this blog I will be specifically focusing on upgrading the VCSA appliance using the GUI followed by the Decommission the Platform Services Controller sections.
IMPORTANT: Any external components that rely on the existing external PSC’s for SSO will need to be updated during post-upgrade process prior to the decommissioning of the external PSC’s.
Aside from the documentation there are a few KB Articles that you should review if you are upgrading a topology similar to what I have outlined above.
This is a great article which summarizes the process you will take to decommission the former external PSC after the upgrade/migration has completed and converted everything to an embedded PSC.
To summarize in a nutshell what you are about to do based on my logical diagram above, the two existing PSC’s are going to remain in place as in before, during and after the upgrade. The upgrade process will focus on upgrading the vCenter Server appliances. During the upgrade an embedded PSC will be installed on the new 7.0 appliances which results in four (4) PSC’s existing in the topology. This is basically the ‘convergence’ portion because the PSC’s will create a replication topology. Then we finalize the upgrade to 7.0 process by decommissioning the old PSC’s which brings us to the next KB article. Based on the diagram of my lab environment above I will accomplish the following steps:
- The existing external PSC’s will remain in place, won’t be touching them other than a backup.
- VCSA01 and VCSA02 will be upgraded one at a time.
- Once VCSA01 and VCSA02 are upgraded to 7.0 we will then begin with the decommission process for the two 6.5 PSC’s.
Decommission of external PSC after successful converge upgrade/migration (75177)
Once the vCenter Server appliances are upgraded from 6.5 to 7.0 and an embedded PSC resides on each new appliance, you will then focus to the decommission process of the external PSC’s. This is an irreversible process so be careful and plan accordingly. This is also why backups are so important to this procedure. Better to have it and never use it than to need it and not have it.
Upgrading the vCenter Server’s
Here we are going to go through the step-by-step process of upgrading the vCenter Server’s currently operating in linked mode. I will begin with upgrading VCSA01 first followed by VCSA02 next. My vCenter Server 7.0 installation media (ISO) is mounted and the installer is ready to go. I will zip through some of these steps quickly and focus on the key areas of the upgrade.
NOTE: Some of my screenshots may look different than yours in some cases as I am using a standalone ESXi host for my nested vSphere environment. So source and target could be a little different for you depending on how your environment is deployed.
- Mount the installation media, select Upgrade and follow the prompts as you migrate through the wizard.


2. After connecting to the source vCenter Appliance that I wish to upgrade, I enter the SSO info as well as the information as to where my VCSA is deployed. In this case my ESXi host.Then I will receive a message at soe point that will prompt me to accept to ‘Converged to an embedded Platform Services Controller’, Click Yes.


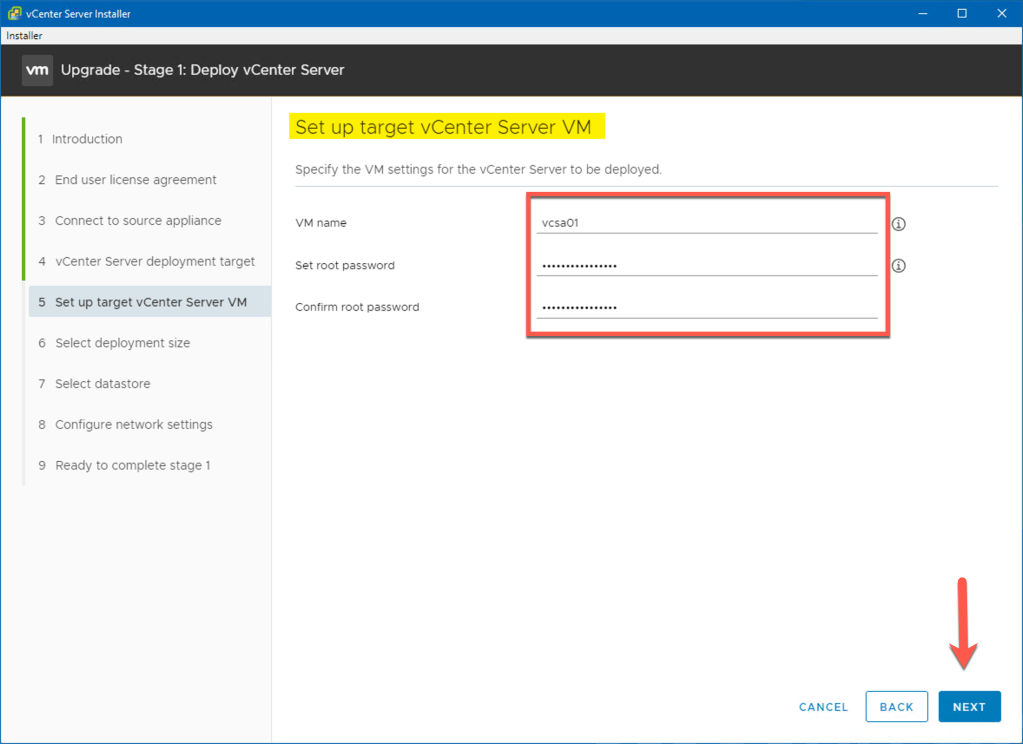
3. I then proceed with the upgrade wizard connecting with the Deployment Target, followed by setting up the new vCenter Server target VM, deployment size, datastore and networking settings. During these final steps you will specify a temporary IP address for the new appliance which will later be released during Phase 2 of the upgrade process after the data is copied over from the source vCenter Appliance to the newly deployed appliance. This is not an in-place upgrade. A new appliance is deployed in parallel and then takes on the persona of the old appliance (i.e. FQDN, IP address, etc.).


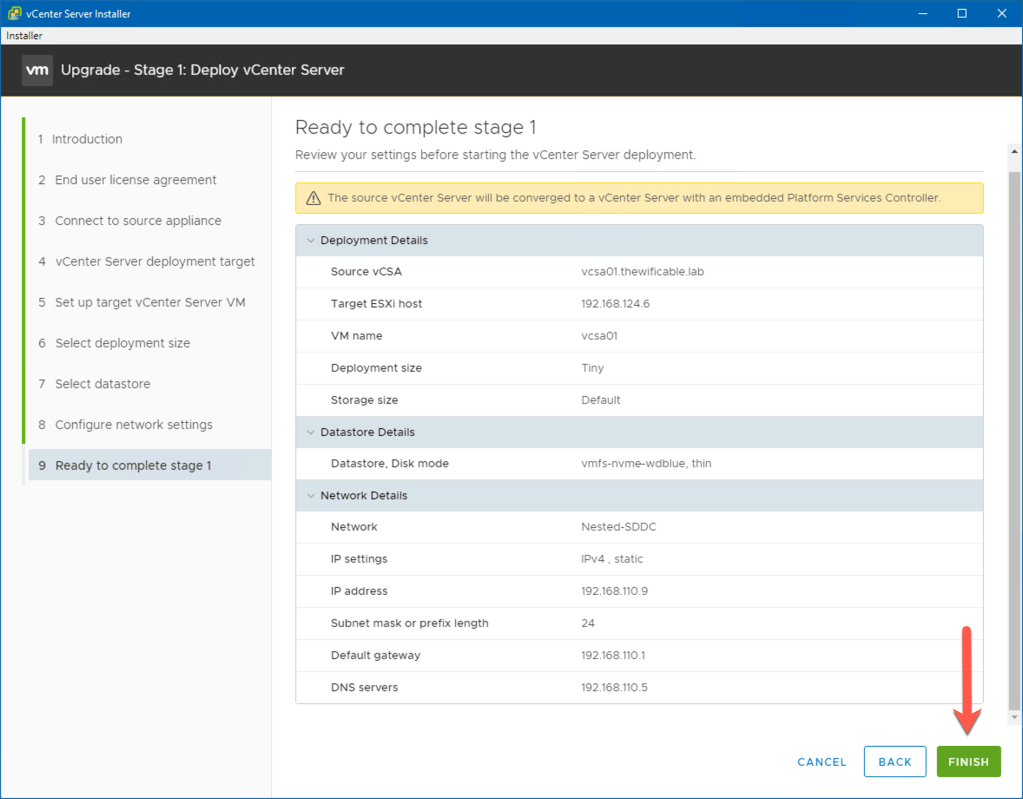
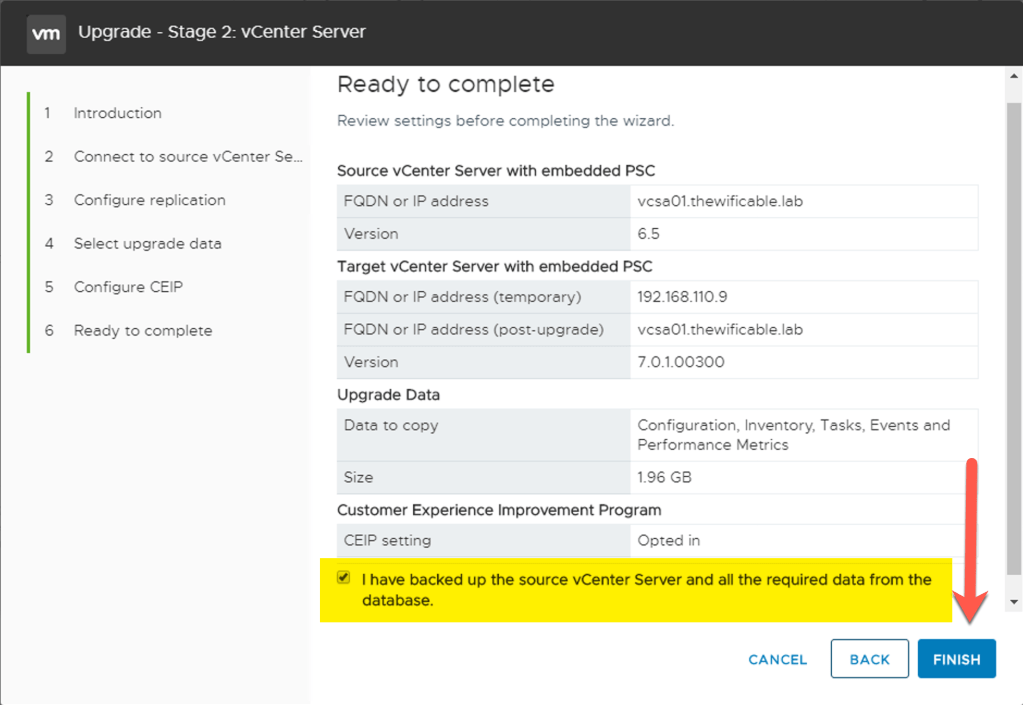
4. I then review my settings for the upgrade in the final screen before clicking on Finish.
5. The upgrade procedure will then begin. Monitor the upgrade process carefully and with patience. When the appliance is successfully deployed in parallel, Stage 1 will then be complete. Click Continue when the screen appears.


6. Now we are into Phase 2 of the upgrade procedure where we begin configuring the new appliance and select which data we want migrated from the old to the new appliance. Follow the wizard and read the pre-upgrade results (messages) thoroughly one by one as they continue important information.


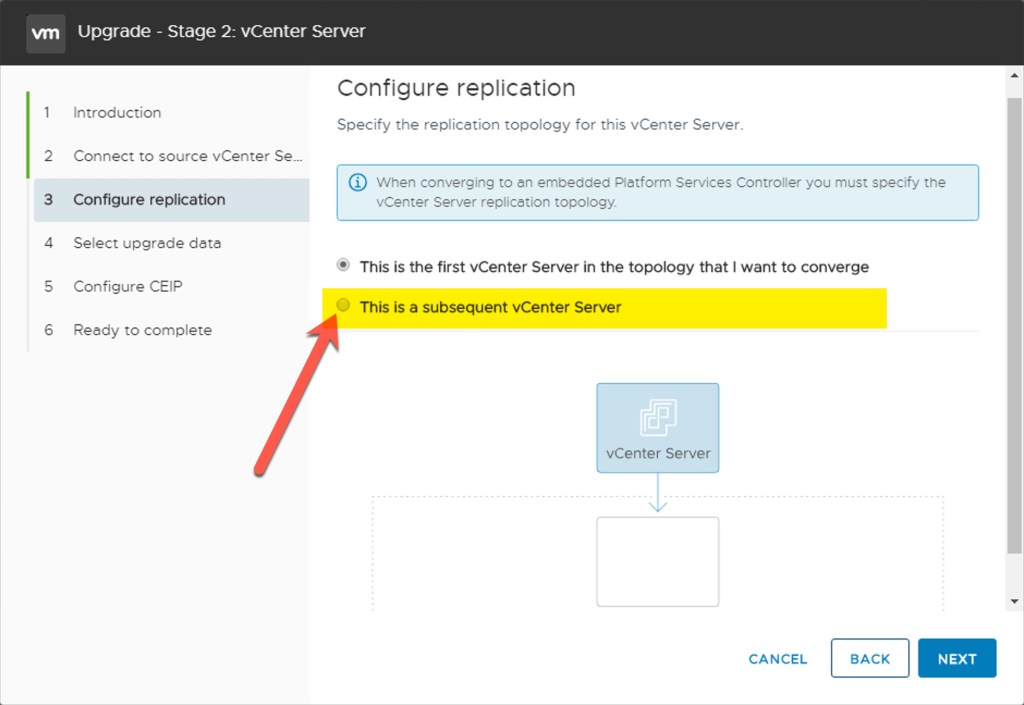
7. Next you will configure replication of the appliances. This will be the first vCenter Server appliance in the new topology that I wish to converge. When I upgrade VCSA02 to 7.0 I will choose the other option for ‘subsequent vCenter Server’ as it would be the 2nd appliance in the topology. We will see this again momentarily. Click Next.

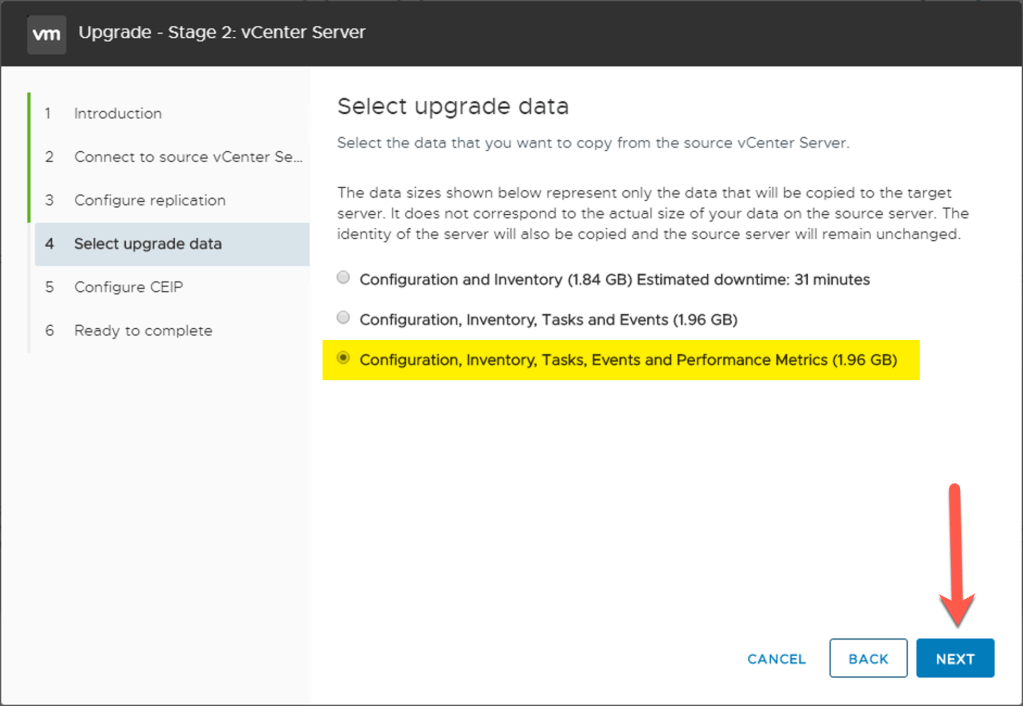
8. To finalize the procedure I will choose which data I want to copy from the source, enable/disable CEIP and then complete Phase 2. You will see a ‘Shutdown Warning’ during this period of time which happens when the cutover from the older 6.5 appliance to the new 7.0 appliance takes place. The temporary IP address is released and the new appliance takes on the persona of the old appliance.


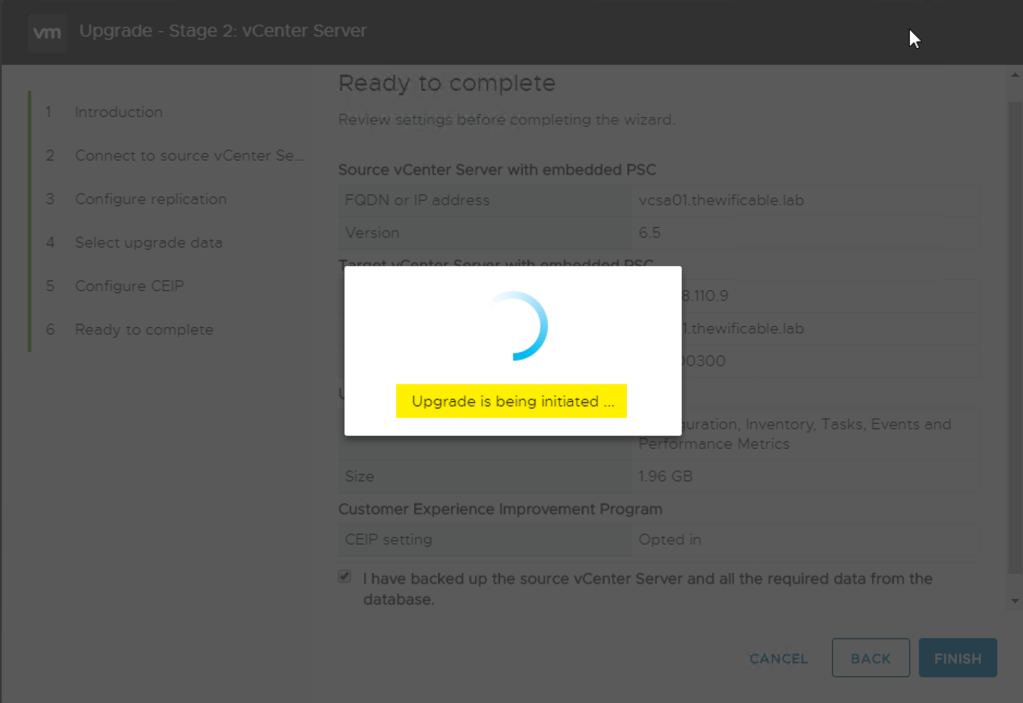


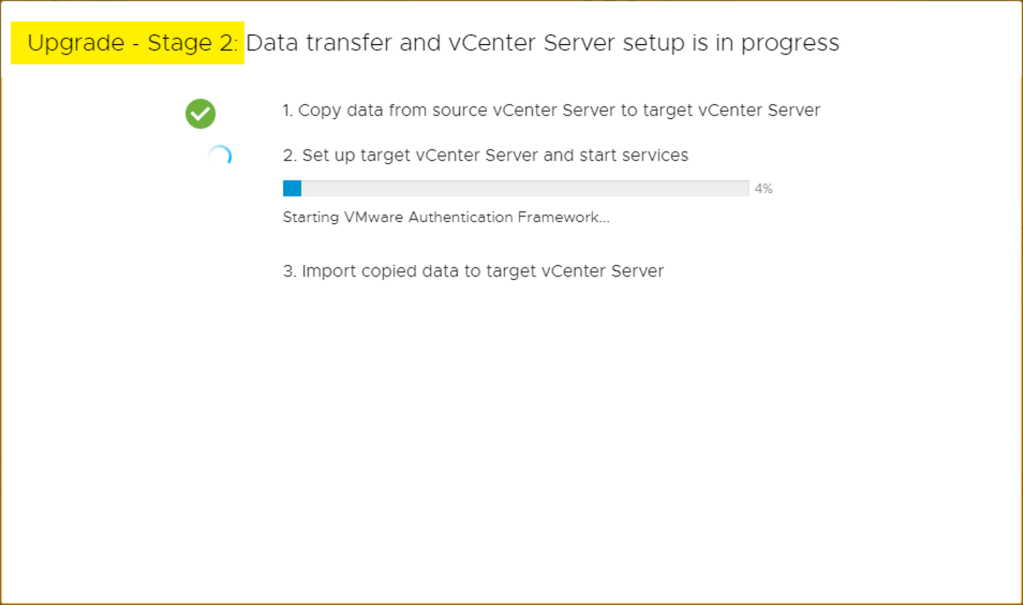
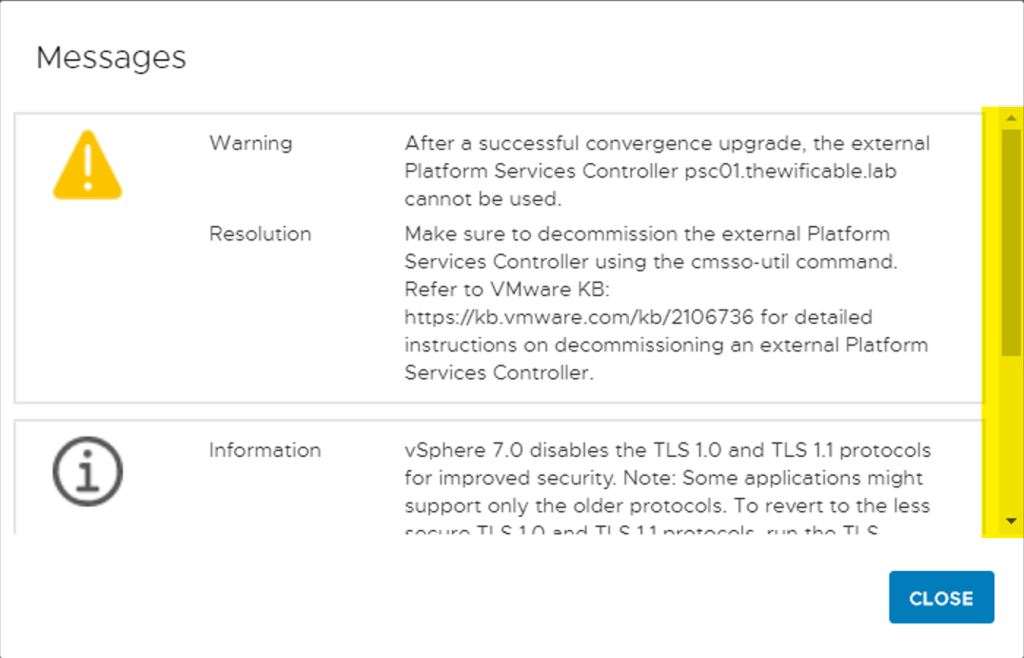
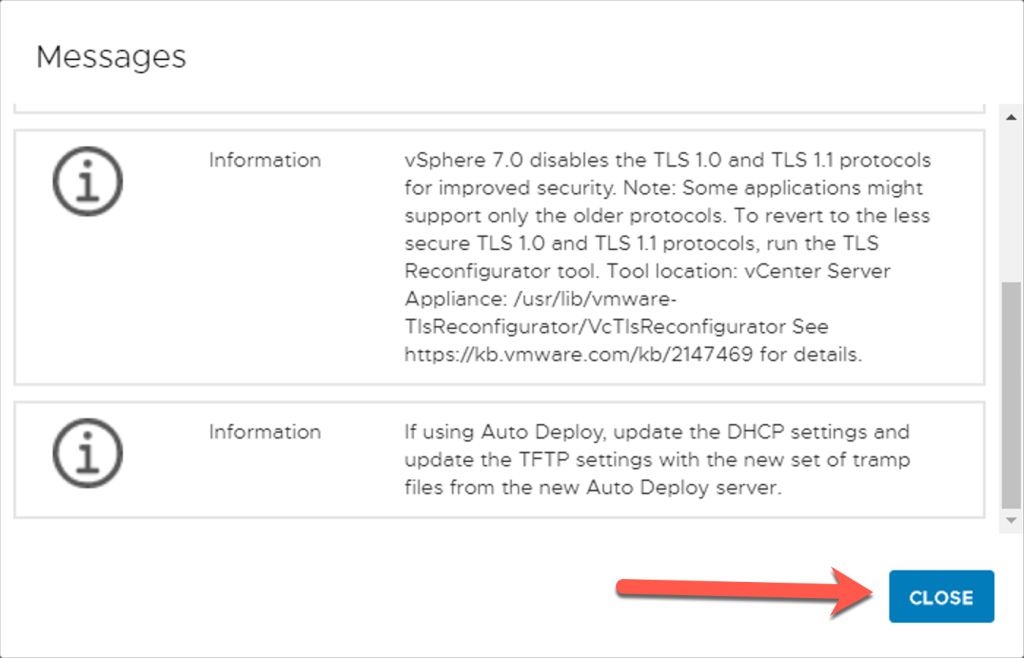
9. Phase 2 will proceed and then finalize. Monitor the process closely, watch for any error messages to potentially appear and when the process completes you will have a warning message as well as some information to review. Read and follow the instructions! When you are finished click Close and a web browser will open for you to authenticate with the newly upgraded appliance.


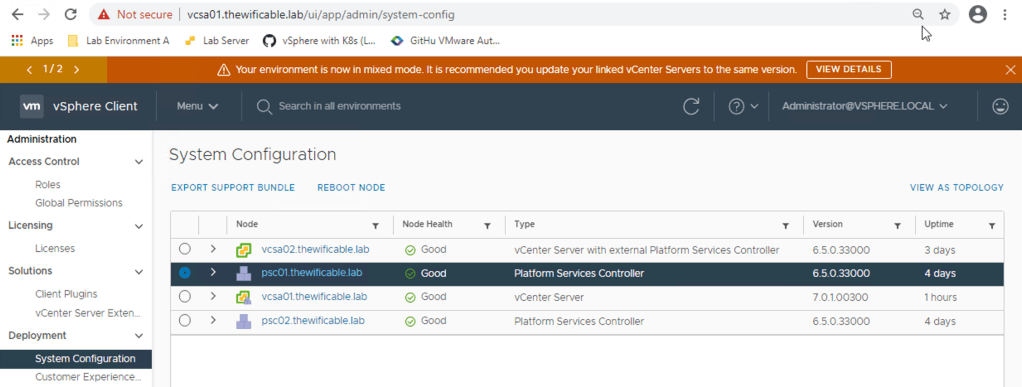
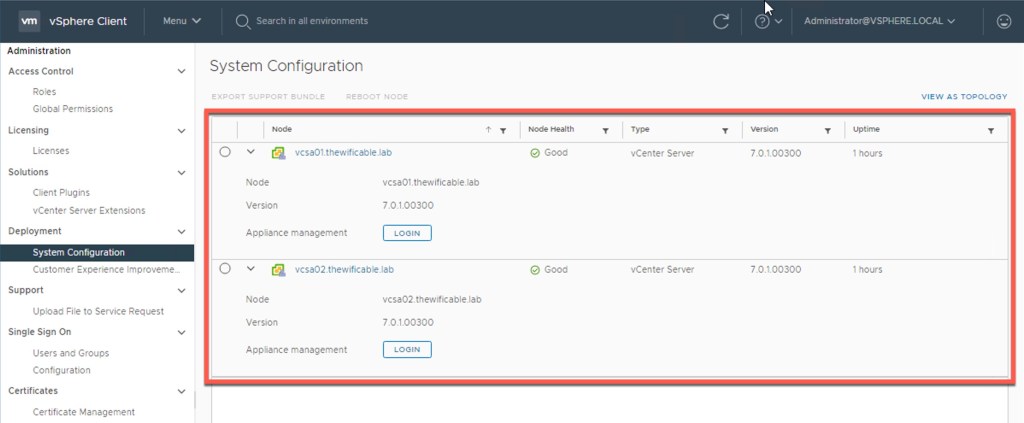
10. Log into the vSphere Client (HTML5) interface and browse your inventory. As you can see in my one screenshot below, VCSA01 is now running version 7.0.1 whereas everything else is still running 6.5.

11. Next I shift my focus to upgrading VCSA02 from 6.5 to 7.0 and I begin this procedure by following the same steps above for VCSA01 with some minor modifications. The biggest difference between VCSA02 and VCSA01 takes place during phase two of the upgrade. This is when I select the option ‘This is a subsequent vCenter Server’ when configuring replication.
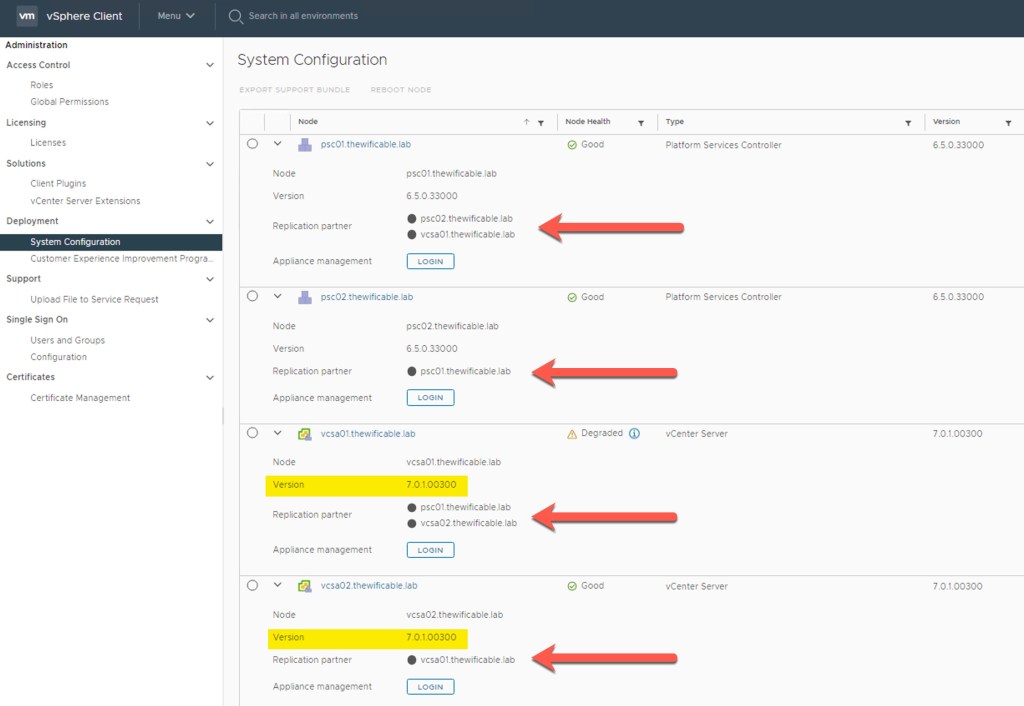
12. The upgrade of the second vCenter Server ‘VCSA02’ completes and now the new topology appears within the vSphere Client as seen below. If you reference the highlighted areas, the VCSA appliances are now running 7.0. In addition to this information, the arrows are pointing to the replication partners for each appliance. This is important to document or make note of as it will help us with the decommission procedure for the PSC’s running on 6.5 appliances.
Decommission of the External PSC
We are finally here at the decommission step of the upgrade procedure. Before executing the next steps I highly recommend reviewing the VMware KB article that I referenced above. Here is a quick link for you now:
Decommission of external PSC after successful converge upgrade/migration (75177)
We just completed the step of verifying that the new management nodes are upgrading to VCSA 7.0. Our next steps will include powering down ALL nodes in the SSO domain. This includes the legacy external PSC appliances as well as the new embedded PSC + vCenter Server appliances. Before you power them down make sure you document which ESXi host in your environment is running them so you can connect directly to those hosts to take the necessary snapshots. Remember, powering down is necessary to ensure the VMDIR (database) remains in sync and changes are not being made.
After the snaps are complete, only power on the NEW appliances with the embedded PSC’s running 7.0. Leave the external 6.5 PSC appliances powered off. Use SSH client (Putty) or console to the new embedded 7.0 appliances and enable the Bash shell. Next you will run the ‘cmsso-util unregister’ command as seen in the screenshot below.
Remember the replication partners above? That is important to remember here because we only need to execute this command once for each appliance that I want to remove from the replication topology. Now let’s assume for a moment that I had one external PSC instead of two. I would only have to run this command once from one of the newly upgraded appliances and it would replicate the change to the other notifying it that the former PSC is no longer available and removed from the topology.
shell.set --enabled true
cmsso-util unregister --node-pnid psc01.thewificable.lab --username administrator@vsphere.local --passwd VMware1!VMware1!

Running this command from my new ‘vcsa01.thewificable.lab’ (new 7.0 appliance) will remove ‘psc01.thewificable.lab’ from the replication topology and notify vcsa02 that psc01 is no longer available. I executed this specific command here because if you reference the diagram above where the arrows were pointing at the replication partners, you will see psc01 is a partner with vcsa01. I want to remove that specific connection.
I do not have to run this against ‘psc02.thewificable.lab’ because again, reference the replication partners in screenshot above, and you will notice psc02 was only a replication partner with psc01. I’ve already severed the relationship with psc01 and therefore psc02 is gone with it.
Had psc02 between the replication partner with one of my new appliances and psc01 then I would’ve only had to run the command against psc02 to remove it.
Upgrade to vCenter Server 7.0 and PSC convergence is complete!
Conclusion
That is all there is to it for upgrading vCenter Server 6.5 topology with external PSC’s to vCenter Server 7.0 converged appliances with embedded PSC’s. Just remember to follow the directions in the documentation, run your backups, test the process in a test environment if possible and don’t skip any steps.
Downtime for the vCenter Server’s is required for this procedure to complete. It will take time depending on how much data is on the source vCenter Server being copied to the new target. So plan accordingly and make sure you update any external components that rely on the external PSC’s to be repointed to the new appliances before you decommission the old ones. This will ensure a seamless and less interrupted transition.
Useful Links
vCenter Server 7.0 Upgrade Guide

This is an excellent article. Clear and detailed. Thank you.
LikeLike
Hi John. Question re the decommission of the PSCs: Can they be decommissioned separately at a later date? There are a few components in my environment that are referencing the old PSCs for SSO lookup e.g. NSX-V, VROPS, HCX and vSphere Replication. Reviewing these components will take some time hence the need to split in to two separate activities.
LikeLike
Indeed , very well described….thx
just wodered wether SRM will be break in this process…(It should be upgrade 1st according to the update sequence chart…)
LikeLike