I’ve been looking forward to the next release of NSX for some time now and very excited that it is finally here. Some great new features and enhancements in the 6.4 release. What are some of the things I’m excited about? I will probably say the the Distributed Firewall (DFW) enhancements which enables admins to create a more “cohesive and manageable” micro-segmentation strategy. I love that word cohesive. Adding the Layer-7 functionality enables NSX to now inspect inside the traffic flows. Very powerful! Just be aware that you need NSX Enterprise licensing to use this feature.
The enhanced Identity Firewall (IDFW) support for user sessions on RDP and application servers (RDSH); NSX can now apply firewall rules based on users that are sharing the same machine. This brings micro-segmentation to another level for customers using solutions such as VMware Horizon, Citrix and Microsoft RDSH.
Of course the user interface! This version introduces a new HTML5 plugin that supports the new vSphere HTML5 Client. Really looking forward to seeing this progress as we move towards a complete HTML5 user interface. The new features are limited still but VMware is making some headway which is good.
Then we have System Scale (part of the NSX Dashboard in both client interfaces) which provides administrators visibility into NSX capacity. Admins can see how close they are to a possible “limit” and can create warnings and alerts for when a limit is approaching.
Then we have the Upgrade Coordinator! Which we will see here during this step-by-step procedure. This wizard driven upgrade tool for NSX enables admins to choose the type of upgrade and then guide them through the proper planning procedures. This greatly reduces errors during the upgrade procedure of each NSX component (Controlllers, ESGs, DLRs, etc.).
For a complete guide of the What’s New features in NSX 6.4 please review the official release notes from VMware.
Prior to upgrading to NSX 6.4 you must read the official NSX 6.4 Upgrade Guide. Yes I said “must read” and not should read as if it’s optional. Do not skip reading this document or do a quick scan of it. Read it! Make sure you are fully prepared to upgrade before actually proceeding with the process. You must complete a few things such as…
- Perform a complete compatibility check for vSphere, ESXi and any other VMware solutions that you currently use. Get familiar with the VMware Interoperability Matrix!
- If you are using Guest Introspection or other Network Extensibility partner service make sure it is still compatible with your target version of NSX. Consult your partner documentation and support team to ensure compatibility before proceeding.
- If you have Data Security deployed in an earlier version of NSX you must uninstall it before upgrading to NSX 6.4. Data Security is no longer supported in NSX 6.3 or later.
- Perform a general infrastructure review. Do not assume everything is on the “up and up” and you can simply proceed. So…
-
- Verify the working state of your NSX environment. This is a really fun part that starts on Page 19 of the NSX 6.4 Upgrade Guide in the link I provided above.
- Verify forward and reverse DNS name resolution is functioning. This includes making sure NSX Manager can resolve the hostnames (FQDNs) of the vCenter Server(s) and PSC(s) in your environment. Verify this from vCenter, PSC, NSX Manager, your ESXi hosts, etc.
- Verify all of your NTP settings.
- Backups complete for vCenter? NSX Manager? Distributed Switches? Snapshots don’t count. Perform a full backup.
- If you use VUM in your current environment then you need to ensure the ‘bypassVumEnabled’ flag is set to TRUE in vCenter. Reference the following KB Article to accomplish this: https://kb.vmware.com/s/article/2053782
NSX Manager has a few pre-upgrade requirements that you need to be aware of as well.
- If you have a multi-site deployment NSX (aka Cross-vCenter NSX) you must upgrade the primary and all secondary NSX Manager appliances in the same maintenance window. All NSX Manager appliance have to be upgraded in the same maintenance window so do not plan to stagger them across multiple windows. You must plan your upgrade to have the same supported version at the end of your maintenance window. There are two (2) possible supported scenarios:
-
- All NSX Managers using the same version of NSX is supported.
- NSX Managers using different versions as long as there is one (1) NSX Manager running 6.4 and the other NSX Managers are using 6.3.3 or later.
- NSX Manager file system usage; perform cleanup if it is 100 percent.
- Verify NSX Manager system requirements are met.
The NSX upgrade process will proceed in the following order:
- NSX Manager(s)
- NSX Controller Cluster
- NSX Host Clusters
- Distributed (Logical) Routers
- Guest Introspection
The Edge Services Gateways (ESGs) can be upgrade “any time” after the NSX Manager upgrade.
IMPORTANT: VMware also recommends upgrading the NSX Controller Cluster in the same maintenance window as your NSX Manager appliance(s).
NSX Manager Upgrade
During this first step in the upgrade process to NSX 6.4 we will upgrade the NSX Manager appliance. I have a single NSX Manager appliance in the environment that I am working with here but again, if you deploy a cross-vCenter NSX environment then make sure you upgrade your Primary NSX Manager first and then upgrade all of your secondary NSX Managers during the same maintenance window. Can’t repeat this enough because it can be time consuming and you need to be well prepared.
During the NSX Manager upgrade it is important to make note of the following:
- VM communication will continue to function normally.
- Any new VM provisioning continues to work in Sphere but the VMs cannot be connected or disconnected from NSX logical switches. So avoid trying to provision or reconfigure VMs during this procedure.
- NSX Manager configuration via vSphere Web Client or the API is blocked.
- In a cross-vCenter deployment, avoid making changes to any Universal Objects until all of the primary and secondary appliances are upgraded.
Upon a successful upgrade of the NSX Manager appliance:
- NSX config changes will be allowed.
- NSX Controllers will remain intact with their previous version until the Controller Cluster is 100% upgraded.
- New logical switches, routers, gateways can be deployed; changes to config will be allowed.
- For the DFW, new features will be introduced after the upgrade of the hosts. New options will remain greyed out until that process is complete.
- Communication Channel Health Status will display as ‘Unknown’ for the Control Plane. This is NORMAL behavior so do not panic. The controllers and hosts must all complete their upgrades before this reports a status of UP. Makes sense because they are all part of the NSX control plane.
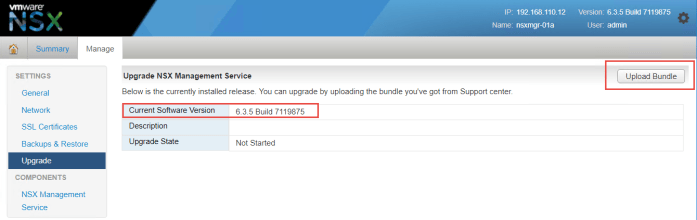
Let’s begin upgrading the NSX Manager appliance. In this step-by-step procedure I will be upgrading my 6.3.5 (Build 7119875) appliance to 6.4. Prior to beginning the upgrade I completed a backup of the appliance from the ‘Backups & Restore’ option on the NSX Manager Management UI. I have my NSX 6.4…tar.gz upgrade downloaded and I am ready to go.
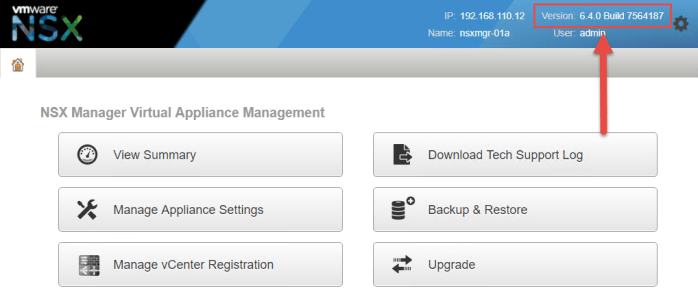
- Log into the NSX Manager appliance and navigate to Manage > Upgrade. Note the current build of the appliance in the upper right hand corner. Select Upload Bundle.
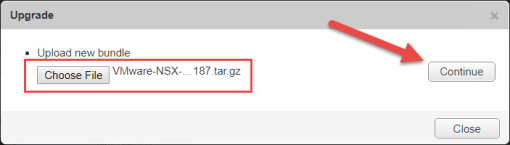
- A new dialog window will open. Select the Choose File option, browse to the upgrade ‘tar.gz’ file and then select Continue when ready. The file will begin uploading.
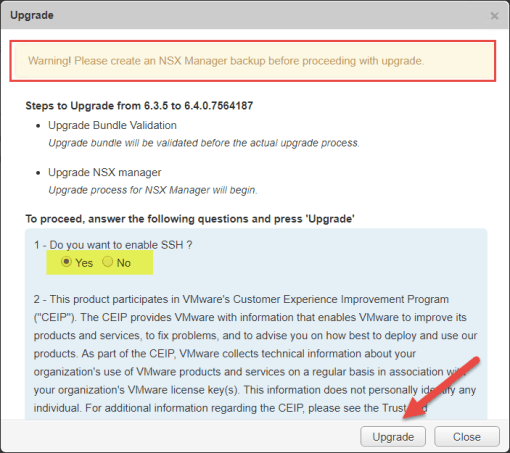
- An Upgrade ‘Warning’ window will appear. Review the information and select Upgrade when ready. I have selected the option to enabled SSH.
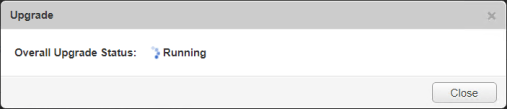
- The upgrade process will begin. During this time the NSX Manager appliance will reboot.
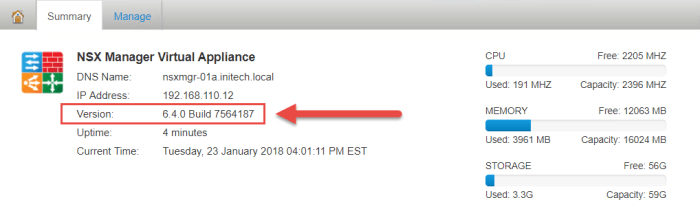
- The upgrade will complete, the NSX Manager appliance boots and you can then log into the Management UI. A successful upgrade will indicate the new version in the upper right-hand corner as well as on the Summary page of the appliance.
- Log into the vSphere Web Client and verify the new version for the NSX Manager appliance. Select Networking & Security and then select Installation and Upgrade. Notice the NSX Manager is running 6.4 and the ‘Controller Cluster Status’ column now states ‘Upgrade Available.’

That completes the NSX Manager appliance upgrade. Your next step should be running an immediate backup!
NSX One Click Upgrade
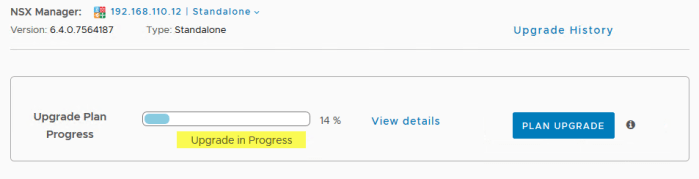
I’m going to upgrade my entire NSX 6.3 environment to 6.4 using a single click! Yes this is now possible! Thank you VMware! One of the great new features of NSX 6.4 is the ability to orchestrate an entire upgrade in a very simple manner using the Upgrade Coordinator. Now that the NSX Manager is upgraded, everything is ready to go in the remaining order:
- Controllers
- Clusters (Hosts)
- NSX Edges
- Service VMs
There is a ‘Plan Your Upgrade’ option available where you can customize your upgrade process to meet your needs. Use this option if your plan is only to upgrade the NSX Manager appliance(s) and the NSX Controller cluster during the same maintenance window. The hosts, edges and service VMs can all be upgraded during a separate maintenance window.
The ‘Plan’ option also has other customization capabilities to allow you to choose upgrade order, upgrade components in ‘serial’ or ‘parallel’ fashion and so on.
You can perform this procedure from either supported client. I’m going to use the HTML5-based client for the most part. I will flip over to the Web Client a few times and you will understand why when I do.
LAB CONFIG RECOMMENDATION: Important thing to make note of for any of you running NSX in a lab environment. Make sure the ESXi hosts are configured with at least 8 Gb of memory (8192 MB) before you do this.
DRS enabled clusters can have an impact here, especially if you are using custom DRS rules. For example, I have a DRS anti-affinity rule for my two ‘tps-web’ virtual machines but I only have two ESXi hosts for this single cluster. Hmmm…impact? Yes, definitely. When one host is being placed into Maintenance Mode the one web VM will remain on the host and prevent it from going into Maintenance Mode because of the rule.
Could the same thing happen if I had five hosts and five web VMs and the same DRS anti-affinity rule? Certainly. The DRS anti-affinity rule would prevent that one VM from being evacuated from a host going into Maintenance Mode. So be careful with any strictly defined DRS anti-affinity rules. Temporarily disable them until the upgrade is complete to give yourself some wiggle room. A five (5) host cluster with four (4) web VMs with the anti-affinity rule wouldn’t have a problem because I have some wiggle room for my VMs to migrate.
Rule of thumb from VMware is have at least three (3) hosts in a cluster to ensure a successful NSX upgrade. It is still possible to run into a hiccup with DRS anti-affinity rules with more than 3 hosts as I mentioned above so be aware of what is configured in your environment and what that impact may be.
NOTE: After the NSX Manager appliance is upgraded and you log into the the HTML5 client, you may have to log out one more time after the new plugins are loaded before officially accessing NSX in the HTML5 client.
- Log into the vSphere Client (HTML5) and then select Networking & Security.

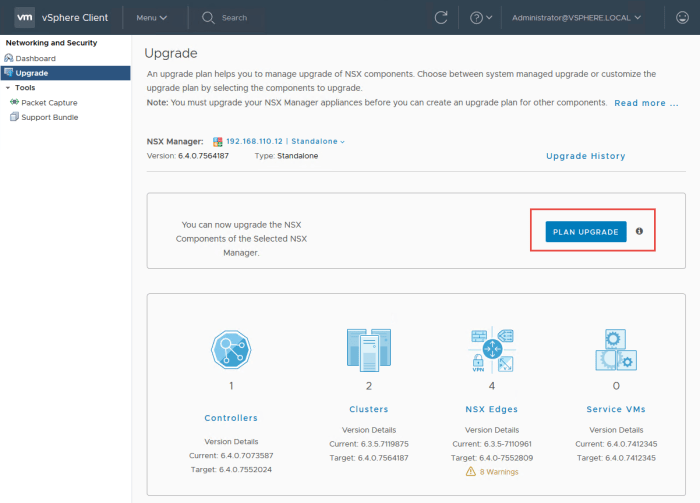
- Select the Upgrade option and the new Upgrade Manager will appear. Select Read More to find more information about the upgrade tool. Select the Plan Upgrade option when ready. Notice the order in which your NSX components will be upgraded from left to right…controllers, clusters (hosts), NSX Edges and Service VMs. These four areas are referred to as the “upgrade units” of your plan. If you using Universal Logical Switches and Routers you will see a 5th upgrade unit. I don’t have universal components at this time. Also, I mentioned previously (as in the release notes) that the ESGs can be upgraded any time after the NSX Manager. During the one-click procedure they will be upgraded along with the Distributed Logical Routers (DLRs).
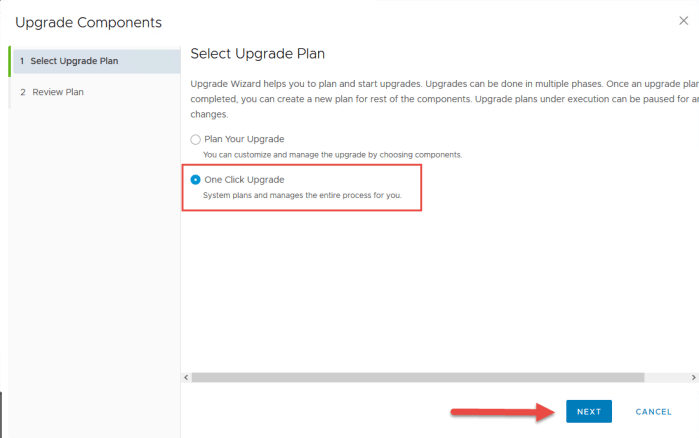
- The Upgrade Components window will open. Select the One Click Upgrade option and click Next when ready.
- On the Review Plan page you can simply review the options. As you can see the summaries for each component being upgraded. As you can see I have two (2) clusters and four (4) NSX Edges. I got a little ahead of myself in excitement to use NSX 6.4 and upgraded my NSX Controller Cluster before taking my screenshots here. So please forgive me. Click Start Upgrade when you are ready.

- The upgrade process will begin. Click on View Details and specific upgrade details will appear. Click Details again for any of the components to view up-to-date information on the upgrade process in greater detail.


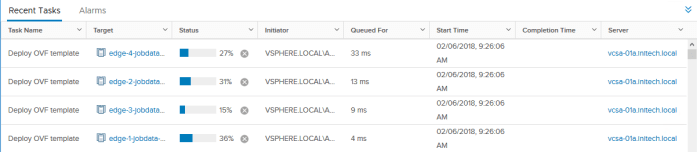
- You can also monitor the progress by going back into the vSphere Web Client and view the upgrade process if you want more of a visual as you see below for the hosts being upgraded in my Edge Cluster. The view below is not available in the HTML5 client…yet.
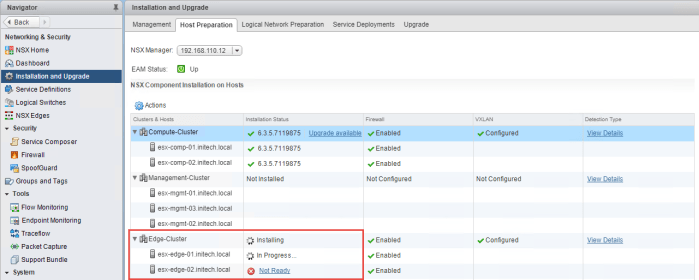
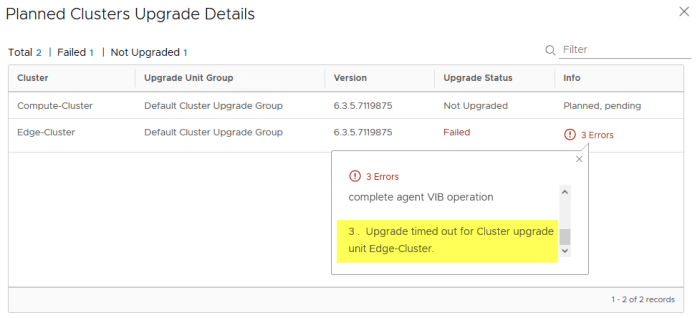
- I purposely configured two things on my Edge Cluster to cause a failure so you can see what happens in the event you come across an issue. I disabled DRS on my Edge Cluster; I also configured the two ESXi hosts in that cluster with 6Gb of memory. Eventually the upgrade process will “time out” and fail. The errors I received were a failure to put host into maintenance (x2 – one per host) which ultimately causes the 3rd error being the timeout.
- So I remediate the two issues that I purposely created by re-enabling DRS (Fully Automated) on my Edge Cluster and increased the memory on my hosts to 8Gb. I return to my Upgrade dashboard and select Resume.

- The upgrade will pick up where it left off when the failure occurred. One at a time the hosts will be placed into Maintenance Mode and the agent will be upgraded. Select ‘View Details’ to see more information about the upgrade process. Give it some time to complete.
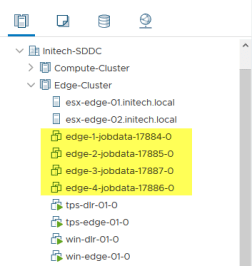
- When it comes time to upgrade the NSX Edge appliances, new OVF templates will be deployed. You will see their deployment take place in your recent tasks menu and also see the new appliances in the inventory. When the procedure completes the old VMs will be powered off and deleted and the new appliances will be quickly renamed to the original Edge VM names. The task goes really fast so if you blink you’ll miss it.
- I do not have any service VMs running so my upgrade process is officially complete! Each of the upgrade units should be GREEN which indicates a successful upgrade. Another thing I did purposely for you to see was I do not have HA enabled on my NSX Edges. Therefore I have the ‘Warning’ message below NSX Edges. If you do not have HA enabled and execute any type of upgrade plan then you will have a network outage (interruption) when the Edge appliance(s) are upgraded. So make sure you are using HA on your Edges before you begin. Click the Upgrade History link.
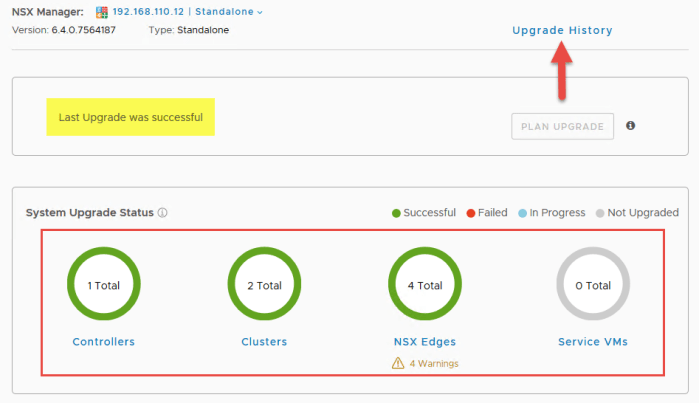
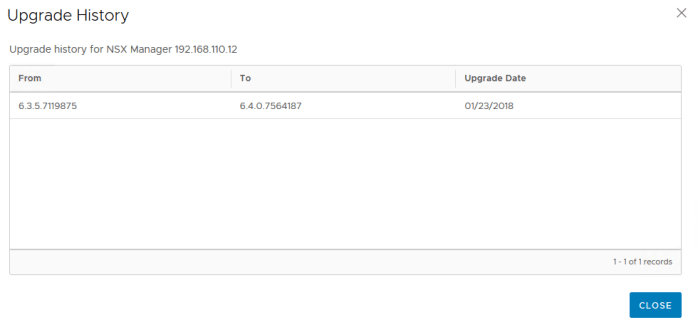
- The Upgrade History will simply display the source and target versions of the NSX Upgrade as well as an upgrade date. Good for keeping track of your changes. Click Close.
- Upgrade Complete!
VMware NSX – UI Plugin for vSphere Client (HTML5)
The NSX UI plugin for the new HTML5 client is beginning to make some headway but there is still very limited functionality. This information is outlined in detail in the ‘Functionality Updates for VMware NSX for vSphere – UI Plugin for vSphere Client’ release notes web page.
There are four (4) functions available in the HTML 5 client as of this release:
- Dashboard
-
- Overview
- System Scale
- Upgrade
- Tools: Packet Capture
- Tools: Support Bundle
All of the the other NSX functionality that you are accustomed to remain in the flash-based vSphere Web Client for now.

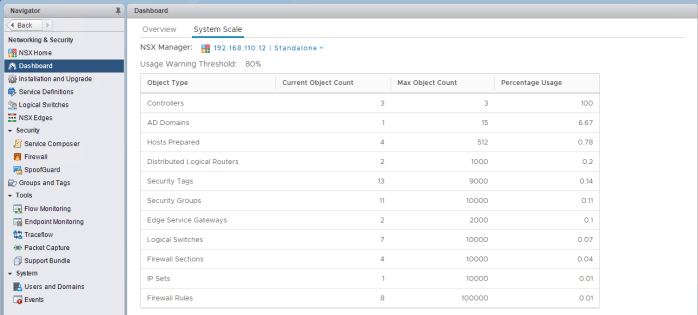
System Scale
Browse around interface a bit and take a look at some of the new dashboard functionality. One thing you will find the new System Scale feature on the Dashboard menu. Below are screenshots from both vSphere Clients.
This new feature will help administrators have a clearer idea as to how much resources based on ‘object count’ are currently in use. You will see a Current Object Count, Max Object Count and Percentage Usage for various NSX components. As you can see my percentages are very low in my lab environment but these numbers will look much different for large enterprise scale deployments.

Conclusion
The upgrade procedure for NSX 6.4 is much simpler compared to previous versions thanks to the new Upgrade tool available in 6.4. Take advantage of the tool as it does all of the heavy lifting for you and orchestrates the entire process from start to finish. Just be extra careful and diligent with your planning.
- Read the Release Notes…multiple times!
- Read the NSX 6.4 Upgrade Guide…multiple times!
- Review the VMware Product Interoperability Matrix specific to your environment.
- Document your current NSX environment thoroughly prior to the upgrade. Create an upgrade run-book that will help you remain organized from start to finish and tracks all your changes.
- Plan for larger maintenance windows when upgrading your NSX Manager and Controllers. They have to be completed during the same outage window. This is critical for those who have cross-vCenter deployments as all NSX Managers must be upgraded during the window. The hosts and edges can be upgraded in separate maintenance windows so don’t sweat trying to fit everything into one night.
- If you have 3rd part service integration, consult their support teams before upgrading.
The Release Notes and Upgrade Guide should nearly be imprinted in your mind before starting your upgrade. Read them over and over and reference sections in your custom run-book.
Lastly for any of you who use FIPS mode (introduced in NSX 6.3). It is extremely important to understand when you upgrade from a version earlier than NSX 6.3 to 6.3 or later you should not enable FIPS mode before the upgrade is complete. Enable it later when everything is upgraded. The reason is enabling FIPS mode before the completion of the upgrade will interrupt communication between components that are upgraded and not upgraded.
So you FIPS mode people out there it is very simple…enable AFTER the upgrade is 100% complete!
Now comes the fun part of verifying functionality. Some of your post-upgrade tasks will include (but not limited to):
- Repeat the ‘Verify the Working State of NSX’ tasks again (page 19 of upgrade guide).
- Test DNS functionality.
- Verify NTP settings.
- Ensure DRS is enabled and verify vMotion functions properly.
- Verify VUM functionality.
- Redeploy Guest Introspection (after ESXi upgrade).
- Test interoperability with other VMware Solutions (or 3rd party service extensions).
I recommend working with your team members on creating a post-upgrade run-book and an agreed upon set of tasks that must be completed.
Useful Links
Here is a summary of some useful links that you can use.
NSX Design Guide (ver 3.0) – PDF
Upgrade Coordinator by Angel Villar Garea (YouTube video)
REMEMBER…BE SOCIALABLE and SHARE 🙂
