In this article I’m going to talk about and demonstrate how to configure and manage DNS in a VMware NSX-T 3.0 environment. The information I am going to cover here can also be referenced in the NSX-T Data Center Administration Guide. It is available both online and can be downloaded to PDF. It is a lengthy document if you do decide to download it (990 pages). The DNS aspects that I going to cover is found in ‘Chapter 11- IP Address Management (IPAM)’ which begins on page 203.
The only assumption before we get started is you have a deep understanding of DNS.
Introduction
IP address management in NSX-T can be configured using DNS and DHCP. Keep in mind NSX-T is not functioning as an DNS server. It is configured to function as a ‘forwarder’ whereby it sends DNS queries to an upstream DNS server in your environment such as Microsoft Windows DNS Server or other Enterprise IPAM solution.
Some additional need to know information about DNS forwarders:
- DNS forwarders cache results from prior requests.
- The local cache is checked first when a DNS forwarder receives a DNS request.
- If the request is not found in the local cache the forwarder then sends the query to a DNS server outside the network (upstream DNS server).
- Cached DNS records are ‘good for performance’ because they reduce the load on these upstream DNS servers.
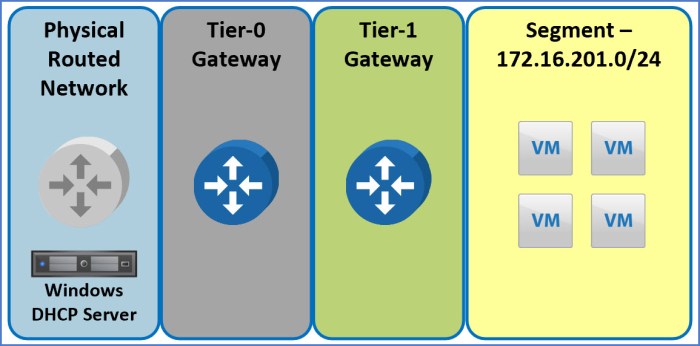
This lab is going to build off of my previous blog article for Configuring DHCP in NSX-T. I will be specifically configuring DNS for the segments outlined in Scenario 2 of that blog article; the image below references the scenario we will be using here for DNS.
A ‘source IP’ will be specified for the DNS forwarder to use; this source IP is needed if the listener IP address is internal and not reachable from an external (upstream) DNS server. A dedicated source IP is required to ensure DNS response packets are routed back to the forwarder. There is one instance where a source IP is not needed and that is configuring SNAT (Source NAT) on the logical router to translate listener IP to a public IP.
Scenario Overview
Let’s put a little scenario around this configuration and assume we need to spin up a segment for an application development team to perform some quick testing. The team doing the testing provided us with some requirements. After several discussions, it is determined the segment does not need to rely on any internal resources, does not need to join the domain and at a very basic level they require Internet access to download software packages and any additional updates. The segment must be isolated from the rest of the in-place infrastructure.
The logical steps we are going to take will be:
- Create the Default DNS Zone.
- Create DNS Service.
- Configure T0/T1 advertisement.
- (Optional Step) Configure DNS FQDN Zone for Conditional Forwarding.
- Verify Functionality.
The segment above is will be referred to as ‘Group 201’ and is already configured to receive TCP/IP parameters from the NSX DHCP service (covered steps in previous blog article). The next logical step for the configuration will be setting up DNS in NSX where it will function as a forwarder and communicate with an upstream DNS Server.
Step 1 – Default DNS Zone
First thing we are going to do is configure a ‘Default DNS Zone’ in NSX-T. This DNS zone is a specific portion of the namespace in DNS.
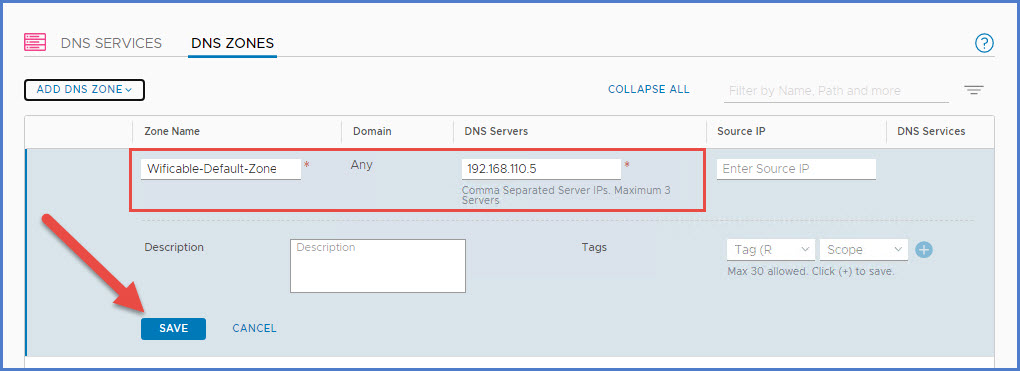
From NSX-T Manager, navigate to ‘Networking -> IP Managment -> DNS -> DNS Zones tab‘ and then select the drop-down menu and choose ‘Add Default Zone‘.

Next provide a ‘Zone Name‘ and the IP address(es) of the upstream DNS servers (maximum of 3 DNS servers, comma separated). Click Save.
Step 2 – DNS Service
Next we will create a DNS Service. The IP address you will enter here will be the address clients use to reference the DNS forwarder versus using the IP address of the upstream DNS server. We will then use the ‘Default DNS Zone’ that was just created previously.
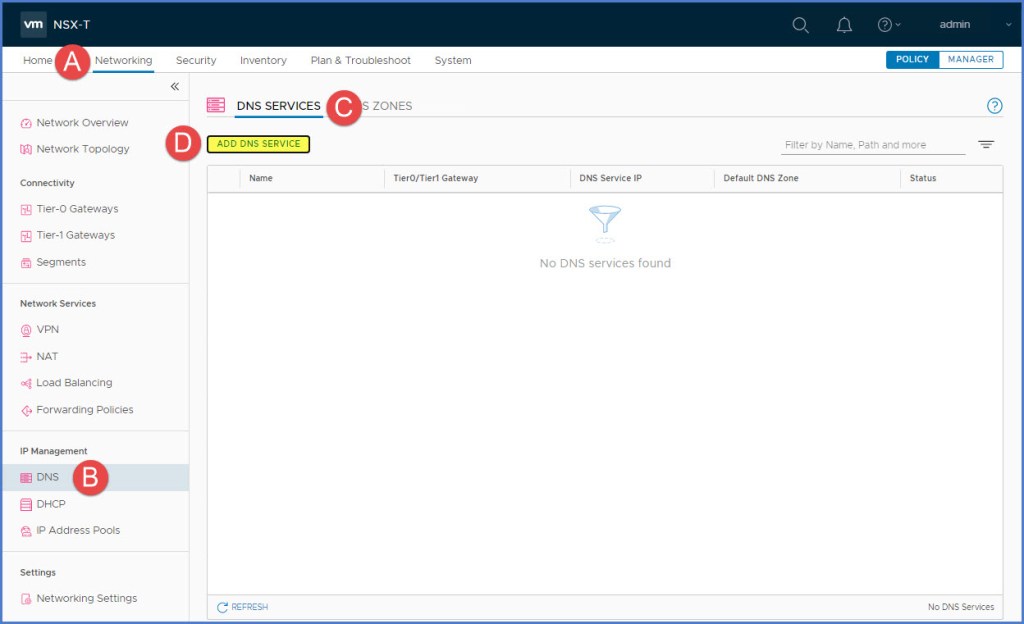
From NSX-T Manager navigate to ‘Networking -> IP Managment -> DNS -> DNS Services tab‘ and then click on ‘Add DNS Service‘ button.
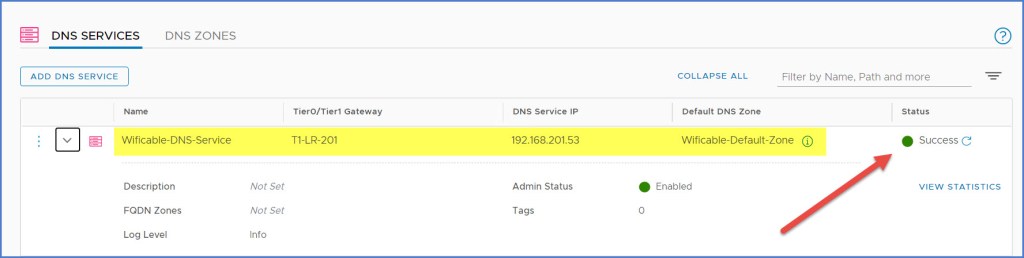
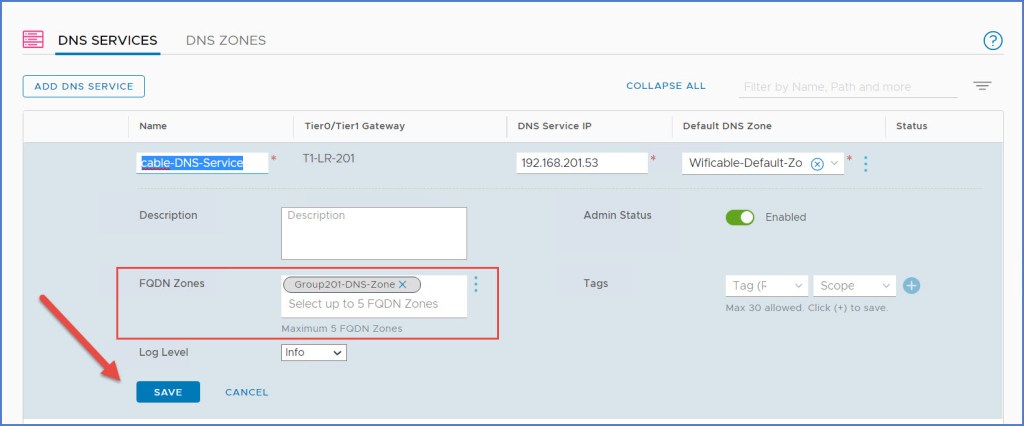
The new DNS Service information will appear. Enter a ‘Name‘ for the DNS Service, select a ‘Tier0/Tier1‘ gateway, enter a ‘Service IP‘ for the clients to use and then from drop-down menu select the ‘Default DNS Zone‘ that was previously created. Click Save. In this case I selected my Tier-1 GW that is associated with my ‘Group 201’ segment. Notice for the DNS Service IP address I am not using an IP address from my segment subnet range of 172.17.201.0 /24. I used an entirely different IP address for my DNS Service to respond; also separate from my external management network of 192.168.110.x /24.
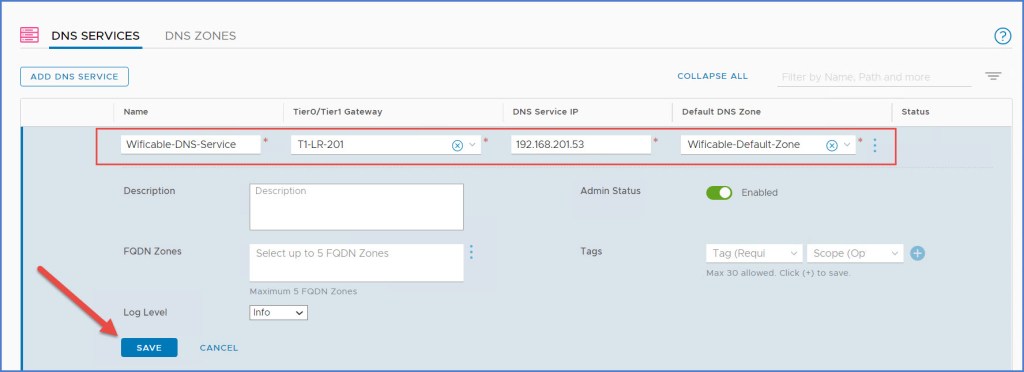
Lastly verify that the newly created DNS Service status indicated ‘Success‘ as seen below.
Step 3 – Configure the Gateway Route Advertisement
Next we are going to configure the route advertisement on the Tier-1 Router. Just as you would advertise connected segments & service ports, static routes and others on the Tier-1 GW, you will do the same for DNS Forwarder Routes. This is part of ‘Route Re-distribution’ settings in NSX-T which is configured on the T0/T1 gateways.
From my Tier-1 Gateway, I click ‘Edit’ and then expand ‘Route Advertisement’ as seen below. Enable ‘All DNS Forwarder Routes’ and then click Save and Close Editing.

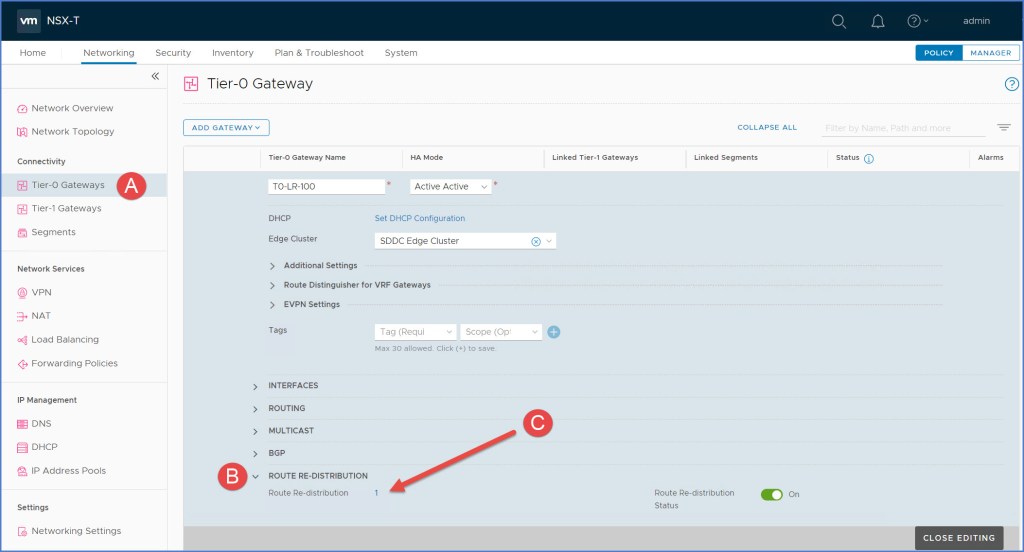
Next navigate to the T0 gateway and click Edit. Expand ‘Route Re-Distribution’ and then click on the link next to Route Re-distribution. In this case I click on the ‘1’ as pictured below.
The ‘Set Route Re-distribution’ dialog box will appear. Click ‘Edit’ next to the distribution name (not pictured). Enable ‘DNS Forwarder IP’ under the ‘Advertised Tier-1 Subnets’ section and click Apply.
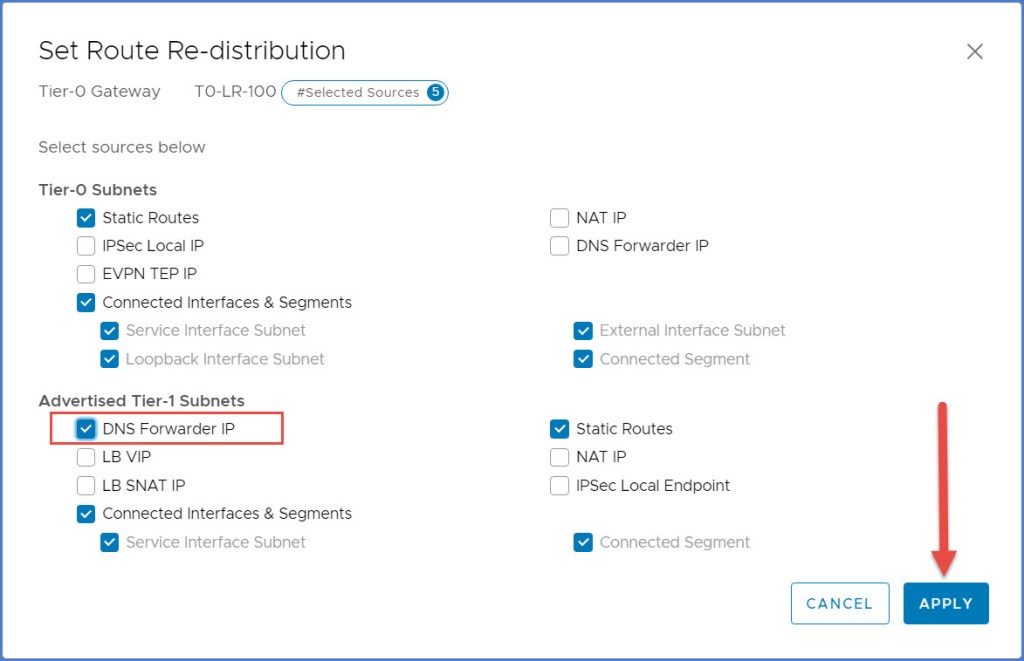
Save an Apply the redistribution window and lastly Save the settings for the T0 gateway and Close Editing (not pictured).
Step 4 – DNS Forwarder Configuration Changes w/ Source IP (Optional)
This step is an optional step but I am going to demonstrate this in the event you want to perform ‘conditional’ forwarding for any additional namespaces. The ‘Group 201’ that I am using can be similar to a scenario such as a ‘tenant’ or some other completely separated or isolated group uses it’s own DNS namespace. In this example, my parent DNS namespace is ‘thewificable.lab’ but I also have ‘group201.thewificable.lab’ which this specific subnet will use for DNS name resolution.
Just as we created the ‘Default DNS Zone’ earlier, we are going to create a separate FQDN zone for this scenario. We are also going to configure a ‘Source IP’ for both the Default Zone and the FQDN zone as this parameter will provide greater control over the Source IP of the DNS forwarder request. If the Source IP is left blank, the request comes from the DNS Service IP which was configured in my scenario as ‘192.168.201.53’. Simply edit the DNS Zones and add the source IP to the configuration.
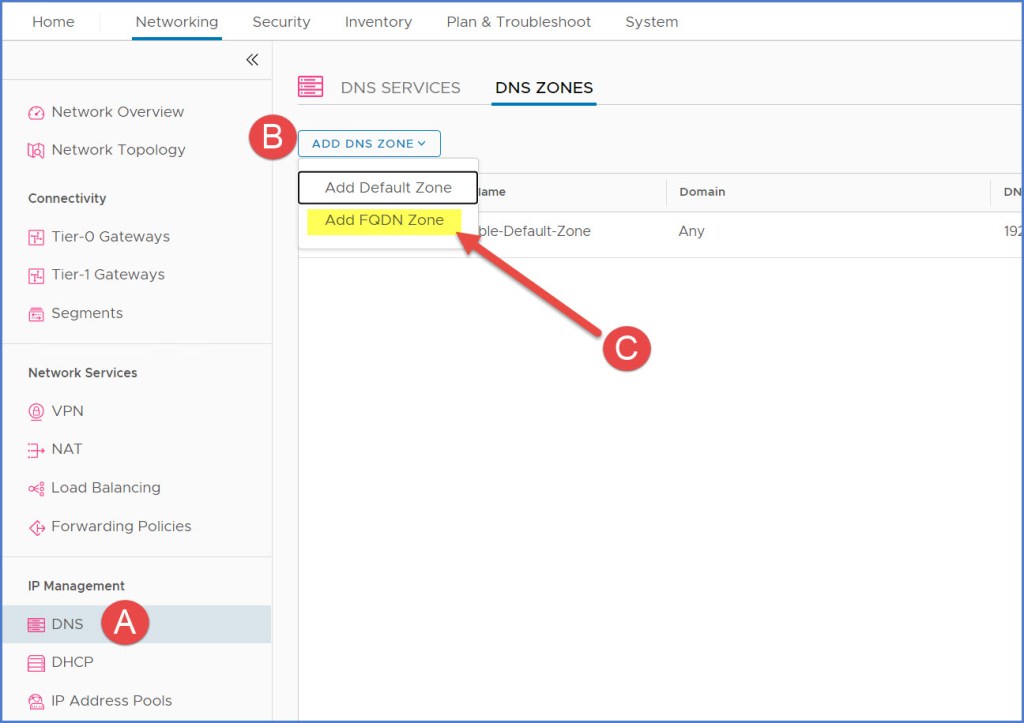
To create the FQDN zone for the ‘group201.thewificable.lab’ DNS zone, I navigate to ‘DNS Zones’ in NSX Manager and click ‘Add DNS Zone’ drop-down menu and choose the ‘Add FQDN Zone’ option.
Enter the DNS FQDN zone name, the FQDN of the zone, the IP address of the DNS Server that manages the Zone and then the Source IP. Click Save.

Next update the DNS service with the FQDN Zone. You can add up to five (5) zones here. Click Save when ready.
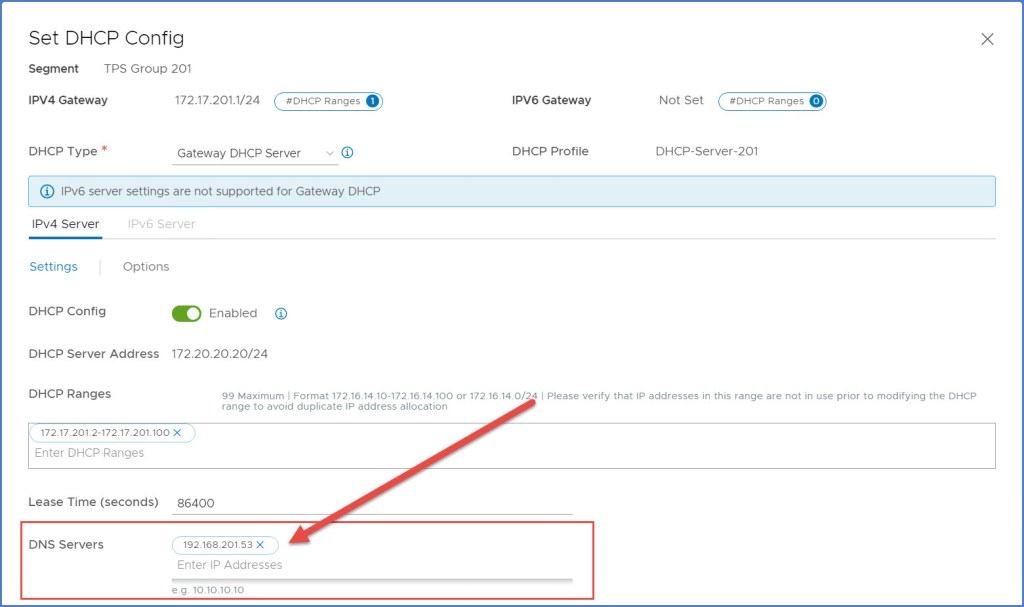
Now if we rewind a bit to the DHCP blog article where I configured DHCP for the Group 201 segment, the DHCP configuration allowed me to provide DNS Server(s) IP address(es). In Scenario 2, Step 8 of that article I configured my DHCP settings to use my external ‘192.168.110.5’ DNS server. I am going to REMOVE that entry and replace it with the ‘192.168.201.53’ DNS server IP address that was configured in previous steps above (pictured below). The DHCP clients on my segment will now use this DNS Forwarder which is configured in NSX versus communicating directly with the external DNS server in my management network.
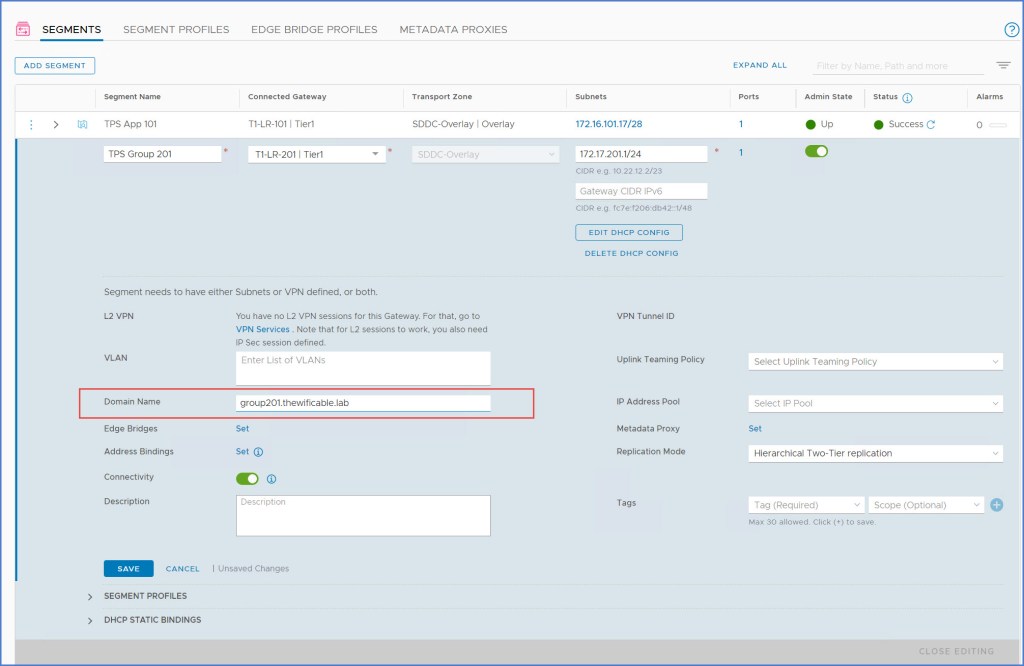
I also add the FQDN to the segment configuration (below).
Step 5 – Verify Functionality
Now that everything is configured for my segment, I am going to begin verifying functionality. I have several VMs deployed; four (4) of the VMs are running CentOS 8 configured in a 3-tier application fashion (web, app, db) and then I have single Windows Server running. I have Linux and Windows both deployed so you can see the difference in behavior between the two operating systems because there are some differences when it comes to dynamic DNS hostname registration. Linux requires some massaging to get get things to work with a Windows DNS server.
I start validation with one of my four CentOS 8 virtual machines and a lone Windows Server 2016 virtual machine for testing. So I start by generating some DNS traffic using ‘nslookup’ commands.

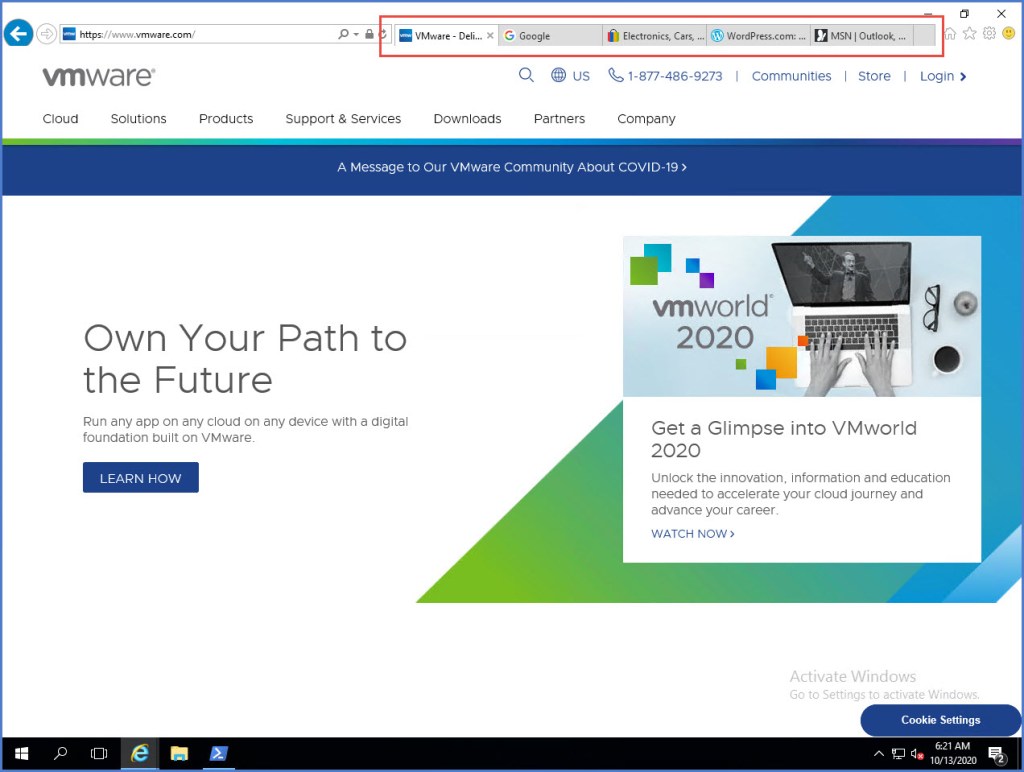
From my Windows Server I can also execute a few ‘nslookup’ commands or simply open the web browser to a few web pages.
Next I am going examine some statistics from NSX Manager. Navigate to the DNS Service that was created in the first steps of the exercise. Expand the service and click the ‘View Statistics’ link (below).

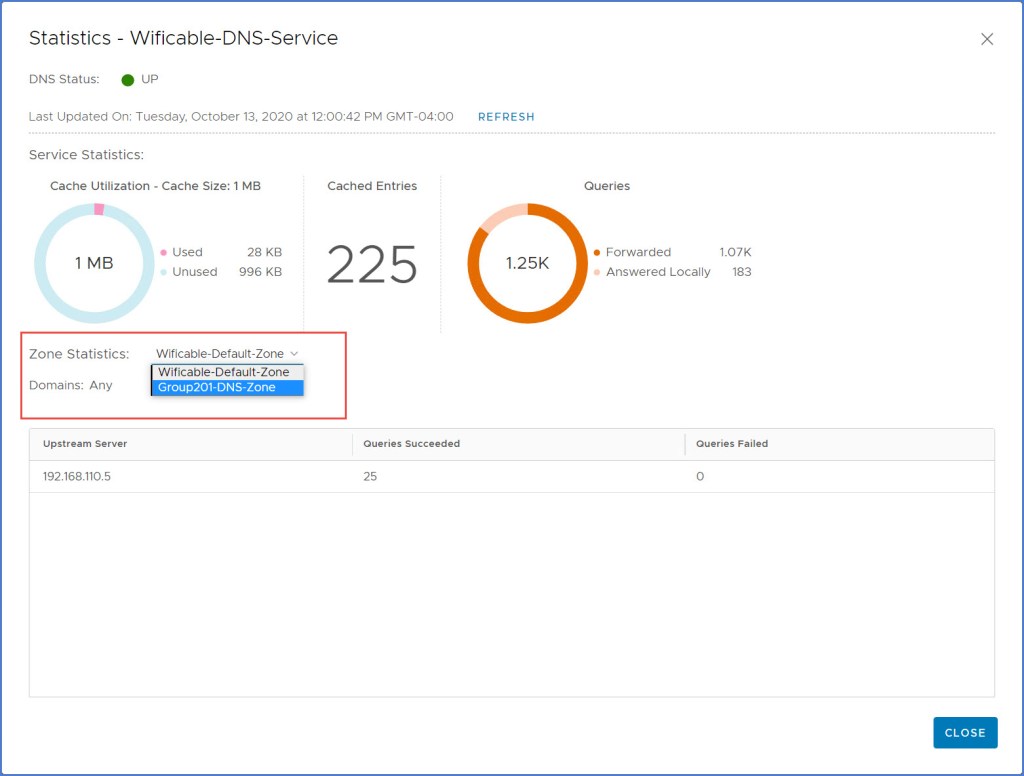
The ‘Statistics’ dialog box for your DNS Service will appear and you will see that statistics for the DNS queries. The number of ‘Cached Entries’ along with the total number of Queries that were either forwarded or answered locally. I only have 1 upstream server at this time but if there were multiple you would see them below.

Click drop-down menu next to ‘Zone Statistics’ to see the FQDN Zone status and queries as seen below.
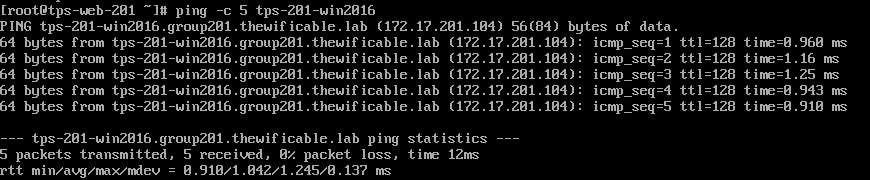
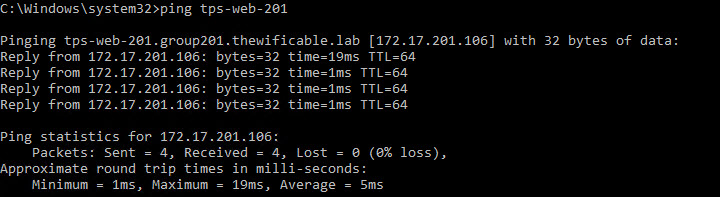
I also test some DNS name resolution using ‘ping’ from both my Linux and Windows VMs. From my Windows VM you can see I can ping the one web server by hostname; and vice versa from the Linux web server back to the Windows VM.
Command-line Validation from the NSX Edge Appliances
Next we will execute some command-line’s from the NSX Edge Appliances to view what is in the DNS forwarder config, cache, stats and so on. So open an SSH (PuTTy) session with your NSX Edge appliances and let’s take a look at the DNS Forwarder.
Execute the following command on each Edge node for the STATUS:
get dns-forwarder status


As you can see one of my edge nodes is ACTIVE and the other is STANDBY.
Execute the following command on each Edge node for the CONFIG:
get dns-forwarder config
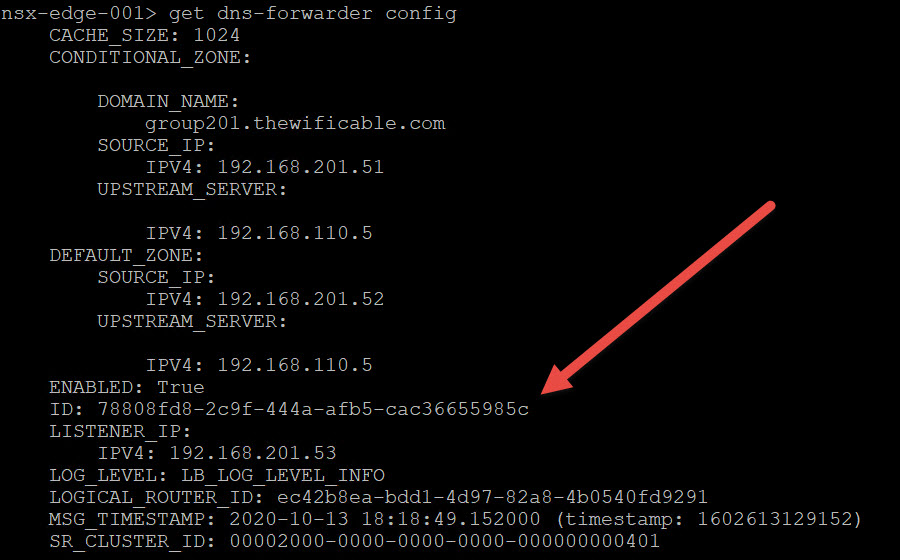

Here you will see the unique ID for the DNS forwarder. Notice they are exactly the SAME. Make note of this ID as you will need it for the next commands. From PuTTy simply highlight the ID and it will copy the ID for you.
Execute the following command on each Edge node for the <uuid> CACHE:
get dns-forwarder <uuid-from-previous-step> cache
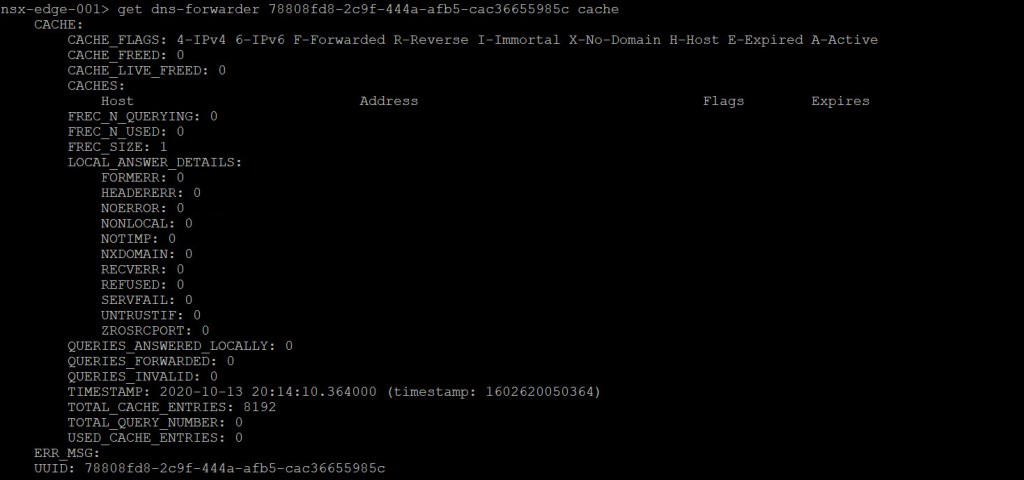

Notice because my ‘nsx-edge-001’ node is the STANDBY DNS forwarder, it does not have anything in the cache. Whereas my ‘nsx-edge-002’ is the ACTIVE DNS forwarder and therefore has a much longer cache list.
Next lets execute a command to see the <uuid> STATS:
get dns-forwarder <uuid> stats
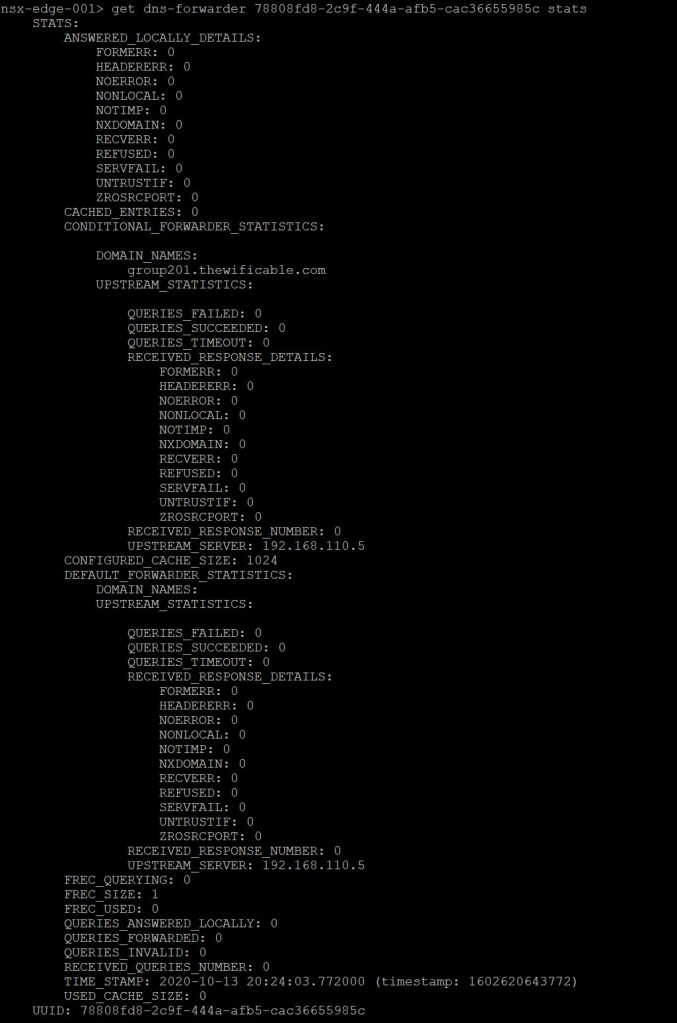

I highlighted a few significant areas of the output from the ‘active’ DNS Forwarder which is providing some statistical data. Very useful information in this output including the number of errors, successful queries, response details, as well as any queries that were forwarded or answered locally.
Then the last command we are going to execute to view the TABLE:
get dns-forwarder <uuid> table
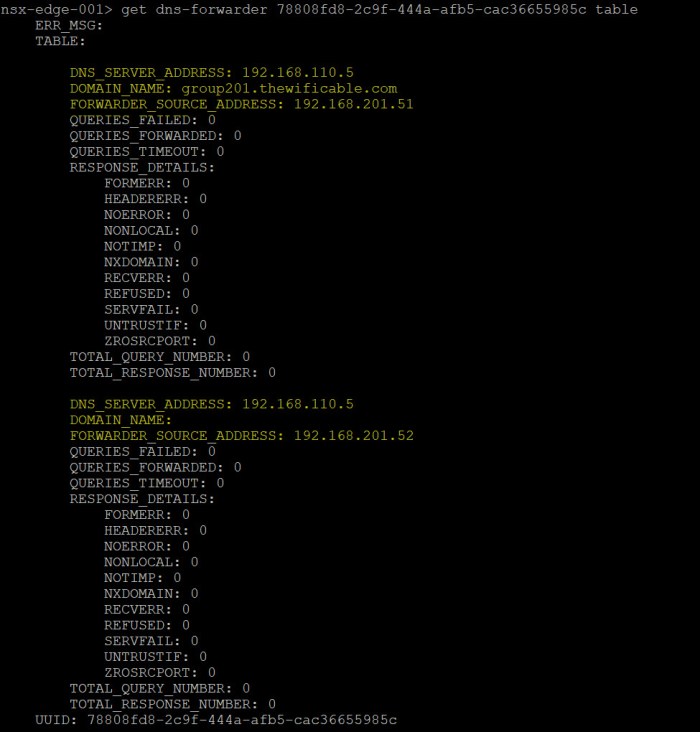
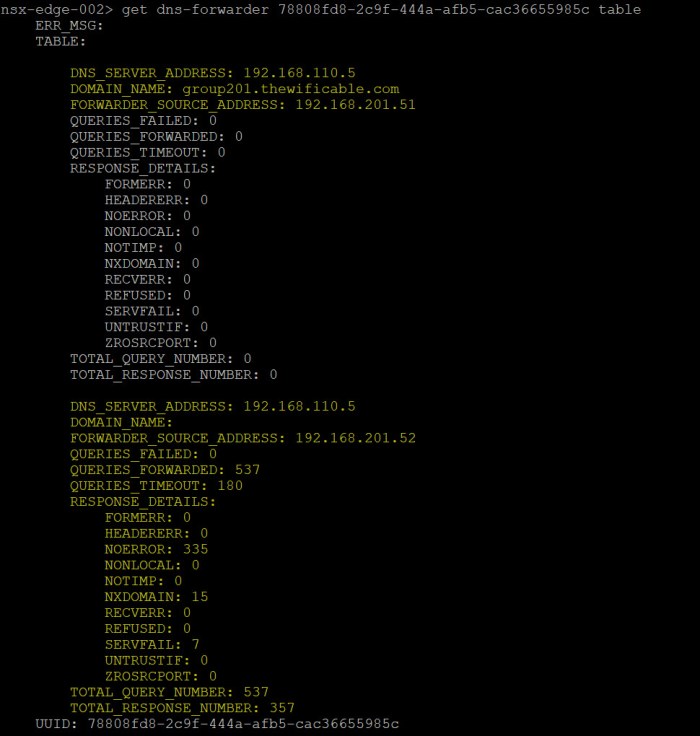
Here we see the numbers in the local DNS Forwarder table on each node. As you can see we can view the number of queries failed (none), queries forwarded, queries timeout, errors, total query and response numbers.
Conclusion & Recommendations
So that is how you configure DNS within NSX-T. Keep in mind that DNS functions as a forwarder and not an actual DNS server. Configuring services such as DNS and DHCP in NSX are ideal for situations where you are planning for a segment to be isolated and not have any reliance on your upstream/internal enterprise IPAM solution.
If I’m designing this for production use and plan on integrating it with my Microsoft IPAM or other IPAM such as InfoBlox, then I would use the DHCP Relay method. This would put me in a position where I can leverage all the benefits of my centralized Enterprise IPAM for TCP/IP parameters and secure DNS name resolution.
As you can see from the scenario above, maintaining DNS name resolution between the virtual workloads in an isolated segment is an option that requires careful planning. Another method to tackle this would be deploying a localized DHCP and DNS server within the same segment and then rely on those services to provide them with what they need.
Another method they can accomplish local name resolution within the segment configured with DHCP is by configuring the local hosts file on each workload and leverage DHCP reservations to ensure IP addresses do not change. It’s a little extra overhead for them but remember this is a temporary environment for some quick application testing.
Can you rely on NSX to do this for you just as I have demonstrated? Yes, the capabilities are there should you need them for what I call a “quick fix” which is why I painted the scenario in the beginning where an internal application team need to perform some quick testing. Bottom line is make sure you consider the PROS and CONS before proceeding with a plan. There are several ways to attack this, just think through which one will work best with what you are trying to accomplish.
Useful Links
NSX-T Design Guide: Designing Environments with NSX-T (online guide and printable to PDF)
VMware NSX-T Data Center Documentation (primary documentation homepage)
VMware NSX-T Reference Design Guide 2.0 (PDF)
Next-Generation Reference Design Guide for NSX-T
Installing and Configuring NSX-T Data Center v3.0 for Tanzu Kubernetes Grid Integrated Edition

One thought on “How to Configure DNS in NSX-T”