So I have upgraded most of my environment to the latest and greatest and now it is time to upgrade the final pieces….ESXi & VSAN. All of my ESXi hosts are running ESX 6.0 U2 and need to be upgraded in order to take advantage of the latest vSphere 6.5 features. In my previous post I upgraded my vCenter Server (appliance) to version 6.5. I am going to leverage the newly integrated version of VUM to update all of my hosts. Once the hosts are upgraded I will then upgrade VSAN.
First some specifics about the environment. There are 3 clusters….a single Compute Cluster, an Edge Cluster (NSX control VMs) and a separate Management Cluster. The Compute Cluster is the only one backed by VSAN at the moment. The Edge and Management clusters are utilizing iSCSI-based shared storage. I am going to upgrade one cluster at a time but for this blog article I am going to focus primarily on the Compute Cluster because of VSAN. The VMs running on the VSAN cluster that we are upgrading are connected to NSX logical switches.
The latest vSphere 6.5 ISO image has been uploaded to ESXi Images. I will use this ISO to update each one of my hosts using a customized Host Baseline and Baseline Group that I have created in Update Manager. So the VUM is configured and ready! If you are not very familiar with VUM and baseline management there are three (3) types of Host Baselines:
- Host Patch – used to apply critical and non-critical patches to ESXi hosts.
- Host Extension – used to deploy additional software (extensions) to ESXi hosts.
- Host Upgrade – used to upgrade ESXi using an image.
You can create a baseline for each but you cannot create a single baseline to contain all three. What you can do is create a custom Baseline Group and attach any of your custom baselines to this group which will allow you to remediate a single host or multiple hosts using the custom Baseline Group.
I am going to continue assuming you already have a general understanding of VUM. If you need a refresher, please reference the following links for more information:
vSphere Update Manager Documentation Homepage
vSphere Update Manager 6.5 (Release Notes)
Upgrade ESXi using VUM
Some of you may have upgraded ESXi in the past using VUM. It is very easy to do, but how many of you have upgraded ESXi hosts in a VSAN-enabled cluster? It can be a little trickier if you are not aware of a few things. If you ignore them assuming everything “should just work” then your upgrade will likely get messy and probably end up on a support call.
First lets take a look at the specific Advanced Setting on each of the ESXi hosts in the VSAN cluster. If you recall the logical procedure and sequence whenever remediating a cluster using VUM…an ESXi host is placed into Maintenance Mode, patched, rebooted and then exits Maintenance Mode (one at a time or in parallel depending on your settings).
In a VSAN-enabled cluster this process is a bit different. First, only one host can be placed into maintenance mode at any time during the VUM remediation procedure. This is by design and not something that can be altered. If parallel remediation is enabled in VUM…it will be ignored. There are two options available to you when remediating a host.
- Manually place a single host into Maintenance Mode and then remediate that host using VUM.
- Utilize VUM at the cluster-level and remediate the entire cluster. VUM will update each host sequentially.
Next..anytime a host enters Maintenance Mode in a VSAN cluster you also must choose a VSAN data migration method. There are 1 of 3 options available:
- Ensure Accessibility
- Full Data Migration
- No Data Migration
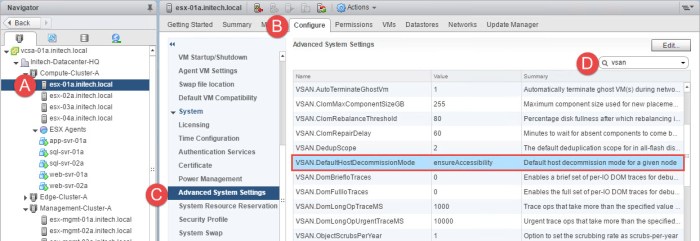
The ‘Ensure Accessibility’ option is the default setting for VSAN host decommission mode. If you want to modify this option you must change this advanced setting on each host. This can be accomplished in one of two ways…one-by-one on each ESXi host in the vSphere Web Client or via PowerCLI. I prefer PowerCLI because I can view and change this setting across all of my hosts in my VSAN cluster very quickly and remain consistent. If you are using ESXi Host Profiles you should also ensure this setting is configured in your profile.
To verify (or change) the default host decommission mode from the vSphere Web Client, select an ESXi host from the host inventory and then select the Configure tab. Next browse to System > Advanced System Settings and then in the search box type ‘vsan’ and press ENTER. Next locate the advanced option and verify (or change) the setting:
VSAN.DefaultHostDecommissionMode
If you have a large VSAN cluster with many hosts this may take some time to complete in the Web Client.
I prefer the PowerCLI route for modifying this setting. First I create a variable ($vmhost) that references only the hosts in my ‘Compute-Cluster-A’ vSphere cluster. Once I have my variable I then execute one of the following PowerCLI commands to view the advanced setting on the hosts in my VSAN cluster.
$vmhost | Get-AdvancedSetting -Name VSAN.DefaultHostDecommissionMode
$vmhost | Get-AdvancedSetting -Name VSAN.DefaultHostDecommissionMode | Select-Object Name,Value
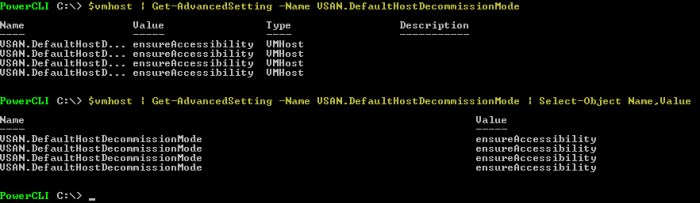
The three options available for this specific advanced setting is:
ensureAccessibility
evacuateAllData
noAction
For example, if I want to modify the default setting and use the ‘evacuateAllData’ option then the command I would use to accomplish this would be:
$vmhost | Get-AdvancedSetting -Name VSAN.DefaultHostDecommissionMode | Set-AdvancedSetting -Value evacuateAllData -Confirm:$false

Once you decide on which setting to use across ALL of your hosts in your VSAN cluster you can proceed with upgrading the ESXi hosts via VUM.
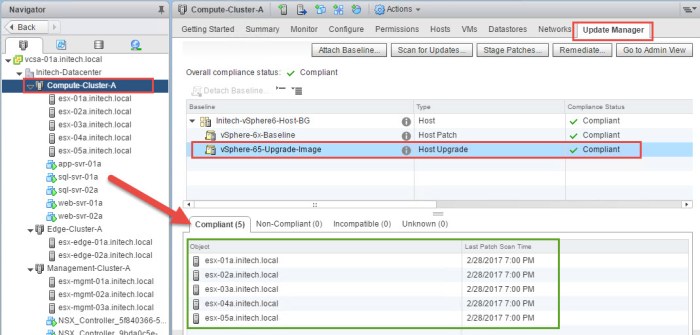
I have my Upgrade Baseline ready and now I want to upgrade my ESXi hosts from 6.0 U2 to 6.5. I simply select the Update Manager tab for my cluster and then click on Remediate. The Remediate wizard will then open where I choose my Upgrade Baseline and click Next.

I then choose ALL of my ESXi hosts in my VSAN cluster for target objects, accept the license agreement, advanced options, host & cluster remediation options and then click Finish. Don’t forget to run the ‘Pre-check Remediation’ to generate a report prior to executing the upgrade. A ‘Remediate entity’ task will appear and the upgrade will begin on one host at a time. The amount of time for the upgrade to complete will depend on the number of hosts in the cluster, the amount of data on your VSAN and which VSAN decommission mode you chose. If you chose the ‘evacuateAllData’ option…this could take a considerable amount of time; full data migration must take place on each host individually as it proceeds through each hosts’ individual upgrade. Nothing wrong with using this option, I just want to make sure you are aware of the time needed in the event you have a time constraint to complete the procedure. Regardless of which option you use I recommend opening a console session with each host as it upgrades to monitor the progress.
Upon completing the wizard to apply the upgrade baseline the contains my vSphere 6.5 image, a ‘Remediate Entity’ task will appear in Recent Tasks. If your DRS cluster is Fully Automated like mine is then the hosts will automatically be placed into Maintenance Mode during this process and VMs will be migrated.
Upon completion of the upgrade managed by VUM the ‘Compliance Status’ for the cluster for the ‘Host Upgrade’ baseline should be compliant as seen below.
That’s really all there is to it when utilizing VUM to upgrade the ESXi hosts in your VSAN cluster. The logical steps that you would use in a VUM remediation procedure applies but with VSAN you have to be aware of a few more things. In addition to that…make sure you have the TIME allotted to complete this procedure. It can be lengthy depending on the # of hosts and the # of VMs running in your VSAN cluster.
What about NSX?
As I mentioned earlier my VSAN cluster is also part of an NSX enabled virtual data center. How did the upgrade of the ESXi hosts impact things from that standpoint? The cluster will continue to function but the NSX VIBs need to be upgraded. Simply open Networking & Security from the Web Client, select the cluster and then click on Actions. In the drop down menu select ‘Resolve’ and the VIBs on the hosts will be upgraded. During the process the hosts are placed into Maintenance Mode (one at a time). Here is screenshot at the midway point of upgrading the VIBs on each host in the VSAN enabled cluster.
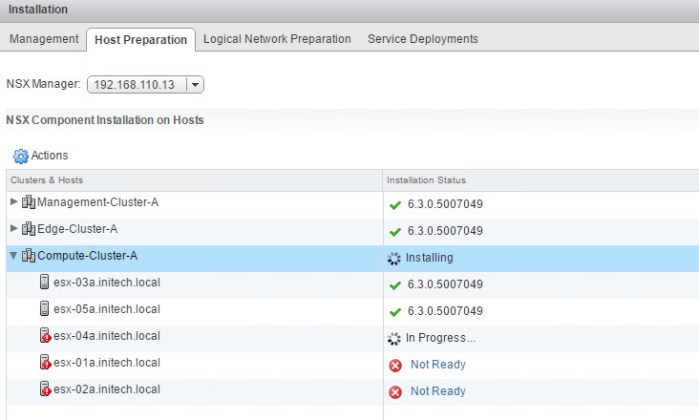
As each host is placed into Maintenance Mode the VMs will obviously migrate off so I would recommend performing this procedure during off hours. It does not take very long to complete.
Bottom line is if you are leveraging VUM to upgrade a VSAN enabled cluster that also participates in an NSX data center the procedure will require each host to be placed into Maintenance Mode and rebooted on two separate occasions. Once during the ESXi / VSAN upgrade and once during the NSX VIB upgrade. So make sure you account for these outages during your planned downtime.
Other Useful Links
VMware vSphere 6.5 Documentation Center
VMware VSAN Documentation Homepage
BE SOCIALABLE….SHARE! 🙂
