I have been looking forward to doing this for some time now. I could not perform this upgrade because my INITECH lab environment was running NSX 6.2.4 which is not compatible with vSphere 6.5…but I upgraded to NSX 6.3 in my previous blog article. I am very happy how that upgrade turned out. So the next step is to upgrade my vCenter Server 6.0 U2 appliance to vCenter Server 6.5 and later my hosts to vSphere 6.5!
So what’s NEW in vSphere 6.5?
- Improved Management Experience
- The fully supported HTML5 version of the vSphere Web Client!
- The flash version is still there but it runs much better than before.
- vCenter High Availability (HA)
- HA is no longer achieved only at the PSC-level of your management topology. You can now make vCenter highly available. In fact, I have a 5-part mini-series on how to do it starting here.
- Improved appliance management for VCSA including vCenter DB management capabilities.
- vSphere Update Manager (VUM) is now fully integrated with the VCSA and completely integrated with the web client. No more Windows Server for VUM! There is a migration procedure available for this too.
- Proactive HA! Degraded hardware components can be detected and evacuate the VMs from the host before an HA event occurs. NOTE: This integration is accomplished through select hardware vendors.
- Many other features and enhancements including…
- vSphere Integrated Containers (VIC)
- Automated UNMAP
- NFS 4.1 Support
- Various Security Enhancements
That is only some of the new features. Read more about What’s New in vSphere 6.5 by downloading the following Technical White Paper from VMware.
What’s New in VMware vSphere 6.5 (PDF)
Upgrade Preparation
Several things need to completed before beginning the upgrade procedure. First and foremost create a spreadsheet to use as a runbook/checklist for the entire upgrade. It should include procedures before, during and after the upgrade.
The first pre-upgrade procedure would be verifying you have a recent backup. If not…run a backup of the vCenter Server appliance and don’t forget to run a backup for your PSC (assuming it is external and not embedded). Could you perform a snapshot too? Sure. Nothing wrong with taking extra precautions and having both a snapshot and backup readily available.
Next you want to verify DNS and NTP. I repeat this in just about every blog article and I don’t care how long winded it gets. vSphere relies heavily on these two critical infrastructure services. You will have a very stable environment provided these two services are operating and managed correctly! So save yourself the heartache and double/triple check DNS and NTP. Never assume that either of these services are working correctly before making any changes to your vSphere environment. If you identify any issues you must fix them before the upgrade.
After you are finished checking DNS and NTP you want to verify your certificates are backed up. Yes they will be part of your snapshot or backup but take this extra step to protect them. Simply copy them off of the appliances onto a network file share and keep them there until the upgrade is complete. Allow the environment remains stable for at least a few days or a week before removing them from the file share.
If you are using customized certificates you must review the steps outlined on page 58 of the Upgrade Guide. In a nutshell, you are going to change the Certificate Mode to Custom to ensure they’re not replaced during the upgrade procedure.
If your current vCenter Server is using an external vSphere Update Manager (VUM) server you must run the Migration Assistant from the source VUM server. The Migration Assistant will assist you with migrating the VUM server and DB to the newly upgraded appliance. Remember, VUM is now integrated with vCenter Server 6.5 so you no longer need that external VUM server. You can review this procedure on page 61 of the Upgrade Guide.
There some additional requirements that you should be aware of prior to starting the upgrade. Two areas that stick out the most in my opinion…
- If the target host is in a Fully Automated DRS cluster, change the cluster to Partially Automated or disable DRS entirely. The reason behind this is simple. You don’t want DRS to vMotion your new appliance onto another ESXi host midway through the upgrade.
- Verify that you have enough free space on the target datastore for the new appliance VM. Why? This is not an in-place upgrade. A new VM will be deployed during Stage 1 of the procedure and use a temporary IP address. During Stage 2 the source vCenter Server settings are transferred to the new target vCenter Server. Once everything is complete the source vCenter Server VM is powered down.
For more information review the prerequisites starting on Page 62 of the Upgrade Guide.
My topology includes a single external PSC appliance and a single vCenter Server appliance. Prior to upgrading to the latest version of NSX in my previous blog article I upgraded my PSC appliance from 6.0 U2 to 6.5. Therefore that portion of my upgrade is complete. If you wish to review that process click here.
Upgrade vCenter Server
All of the prerequisites have checked out and your pre-upgrade checklist is complete. You are now ready to begin upgrading the vCenter Server appliance to version 6.5. The PSC is running version 6.5 so the vCenter Server appliance is next in-line to be upgraded. I mounted the installation media (ISO image) for the VCSA and will now proceed with the upgrade using the UI installer.
Prior to running the installer I made note of which ESXi host is currently running my vCenter Server 6.0 appliance (source appliance) and verified I have an available temporary IP address to use on my management network segment. I will need this information during the upgrade.
- Execute the ‘Installer.exe’ located in the ‘vcsa-ui-installer\win32\’ directory of the installation media. Select Upgrade.

- On the ‘Introduction’ page of the installer for Stage 1 click Next.
- Accept the licensing agreement and click Next.
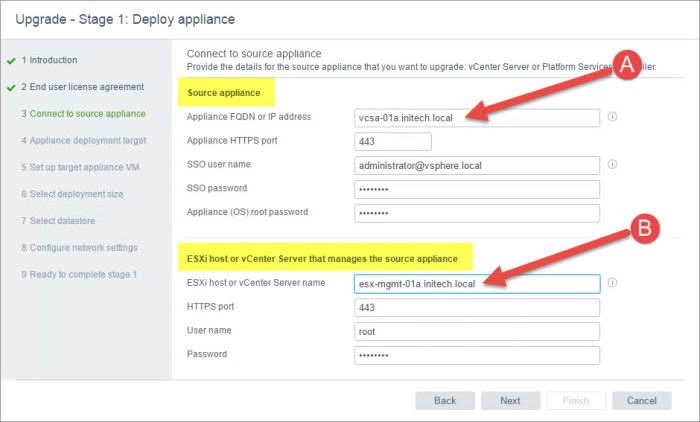
- On the ‘Connect to source appliance’ page enter the FQDN of the source vCenter appliance first (A); then enter the ESXi host that currently manages the source vCenter appliance (B). Click Next and confirm the certificate when prompted.
- On the ‘Appliance deployment target’ page specify an ESXi host for the new appliance. Click Next and confirm the certificate when prompted.

- On the ‘Set up target appliance VM’ page I specify the same VM appliance name. Prior to this step I renamed my original vCenter 6.0 appliance in the VM inventory and added the ‘-OLD’ in the VM name. I will deal with the folder inconsistency on the datastore later. My main goal here is that I want to keep the same ‘vcsa-01a’ name in my inventory during the upgrade. Click Next.

- On the ‘Select Deployment Size’ page choose a vCenter Server size and click Next.
- On the ‘Select daastore’ page choose the VMFS datastore (NFS or VSAN could be an option in your environment too) and click Next. You also have the option of choosing ‘Enable Thin Disk Mode’ here if you wish.
- On the ‘Configure network settings’ page you will enter the temporary IP address information for the new appliance. Also select your VM network from the drop-down menu at the top. I’m leaving the default network now for a reason and you will find out why shortly. Click Next.

- Review the information on the ‘Ready to complete stage 1’ page and click Finish. Stage 1 of the deployment process will begin. Your source vCenter Server appliance will continue to function normally during during Stage 1. Your source vCenter won’t become unavailable until Stage 2.

- The Stage 1 deployment process may take some time to complete. Now I did something on purpose here to demonstrate that you can continue the deployment if Stage 2 FAILS to initiate for whatever reason. The deployment is not a lost cause and waste of time. In Step 9 above, I purposely did not choose my Management vDS port group and left the default network. The reason why this failed is because the VM network PG resides on a vSS that has no physical uplinks. Therefore the deployment is interrupted at the midway point….interrupted, not failed. Simply edit the new VM and connect it to the correct distributed port group on the Management vDS. I can accomplish this from the vSphere Web Client because my source vCenter has not been powered down yet.
- Once the new appliance is connected to the correct port group I test connectivity by initiating a PING to the temporary IP address. You should have a successful PING. Don’t proceed until you do.
- Once I verify communication with the new appliance I can now re-initiate Stage 2 by connecting to the following URL and select Upgrade a vCenter Appliance.
https://192.168.110.8:5480/

- Click Next on the ‘Introduction’ page.
- On the ‘Connect to source vCenter Server’ page enter the same information you entered in Step 4 (above). Click Next and wait for the ‘Pre-upgrade checks…’ to complete.
- During the ‘Pre-upgrade check’ process the installer will also check External Extensions on the source. You immediately notice the installer picked up on NSX Manager in the screenshot below. This is a very useful warning to remind me to upgrade NSX prior to this procedure….which I did previously so I can ignore this message. The other warning is for the DRS cluster not being set to Fully Automated. I verified this in my upgrade workbook and I’m good to go. I can proceed by clicking Close.

- On the ‘Select upgrade data’ page you will choose which data you want to have copied from the source vCenter Server to your new target vCenter Server. The amount of data will impact the length of time to complete this procedure. I don’t have much data in my POC so I’m going to copy everything. Click Next.

- Finally we reach the ‘Ready to complete’ page. Review the information provided here. Notice the ‘post-upgrade’ IP address is also mentioned here. Check the box ensuring you have a backup of your source vCenter Server and click Finish. A warning message will appear that the source vCenter will be shut down upon completion. Click OK. The upgrade will initiate.

- The upgrade will begin and start with copying the data from the source to the target. Next the target vCenter Server will receive its new network configuration and start services. The process is finalized when the copied data is then imported to the new vCenter Server. This will take some time to complete.
- Once the upgrade is complete allow the vSphere Web Client some time to initialize. Use one of the following URLs to access the Web Client.vSphere Web Client (Flash)
https://<vcenter-fqdn>/vsphere-client/
vSphere Web Client (HTML5 w/ partial functionality)
https://<vcenter-fqdn/ui
- Verify that you can access the vSphere Web Client using multiple accounts, especially if your environment is integrated with Microsoft Active Directory or OpenLDAP. You may also come across a few alarms that may have been triggered during the upgrade. Review the alarms one-by-one. Probably get away with clearing most of them but verify just to be safe. Last but not least…remember to re-enable DRS on your cluster where vCenter resides.
Conclusion
The vSphere 6.5 process is a fairly easy process provided you are thorough before, during and after the upgrade. The checklist will be a very useful tool and ultimately help you mitigate risks from start to finish. Remember to read the documentation provided by VMware including the Release Notes.
My next goal is to upgrade my ESXi hosts now that vCenter Server has been upgraded. I can start this immediately if I want to in my lab but if this were a production environment I would probably let this run for a week or two. I don’t want to rush anything because God forbid something happens with the vCenter Server and I need to revert to vCenter 6.0. I can’t if my hosts are running ESXi 6.5. That would paint me into a bit of a corner. So my recommendation would be to wait it out for at least a week or longer. Once everything seems stable you can proceed.
In my next blog article I will leverage VUM on my newly upgraded vCenter Server 6.5 appliance to upgrade my hosts for me. My environment includes VSAN and NSX so this should be an interesting procedure.
REMEMBER…BE SOCIALABLE, SHARE! 🙂
Useful Links
VMware vCenter Server 6.5.0a Release Notes
vSphere Upgrade Guide (ESXi 6.5 / vCenter Server 6.5)
Platform Services Controller Admin Guide for 6.5

One thought on “Upgrade to vCenter 6.5”