This is a really quick fun and easy procedure to do accomplish in the work lab environment or a home lab to build your own skills. I really enjoy using this Fling and applaud this six contributors for creating this one. Keep in mind, the Easy Deploy for NSX Advanced Load Balancing appliance is a Fling designed to deploy virtual appliances in just a few clicks. I like it because it does not require extensive understanding to deliver a demo, proof-of-concept, or if you are simply using it for training purposes.
If you are new to the NSX Advanced Load Balancer (aka AVI), the Easy Deploy is a great place to start. It is a feature rich software-defined load balancer and multi-cloud application services platform. It delivers application consistency very easily through the use of load balancers, WAF (web application firewall), and container ingress for any app whether it is in your data center or cloud.
I have downloaded the latest available from the VMware Flings website, version 3.1.0 released on January 4, 2022. You can find it HERE along with a bunch of other information including a summary, requirements, instructions, and more. The ‘fling_instructions’ PDF that is available covers the deployment for VMC and vSphere separately. I am focusing on the vSphere Deployment which begins on Page 7. This is one of the easiest things to deploy and use and I just wanted to share how I did this in my home lab so you can do it too!
Quick and easy, let’s get started…
requirements
The Easy Deploy virtual appliance only requires 2 vCPU, 4 GB of memory and 20GB of disk space. Once it is online you can use it to deployed the NSX Advanced LB. From there you will need three (3) network segments (port groups) which I will get into more detail during the deployment.
Summary of the required networks:
- Management Network for the AVI controllers and Service Engines (SE).
- VIP network that will contain the SE’s.
- Backend network which will contain the backend servers if the app is ready and enabled.
The segments require a DHCP pool with available IP’s and the number needed depends on the number of SE’s you plan on deploying.
- Two (2) management IPs excluding the number of SE’s; in addition each SE requires a single free IP in the network.
- Two (2) IPs in the backend network assuming you have selected the basic application to be deployed.
And one other thing you may want to do ahead of time before starting is create a Content Library for AVI. The wizard will give you an option to create a new one but I typically like to get ahead of things when necessary. I created a new Content Library named ‘AVI-CL’.
Step by step
Log into vSphere or directly to a standalone ESXi host and begin deploying an OVF appliance.
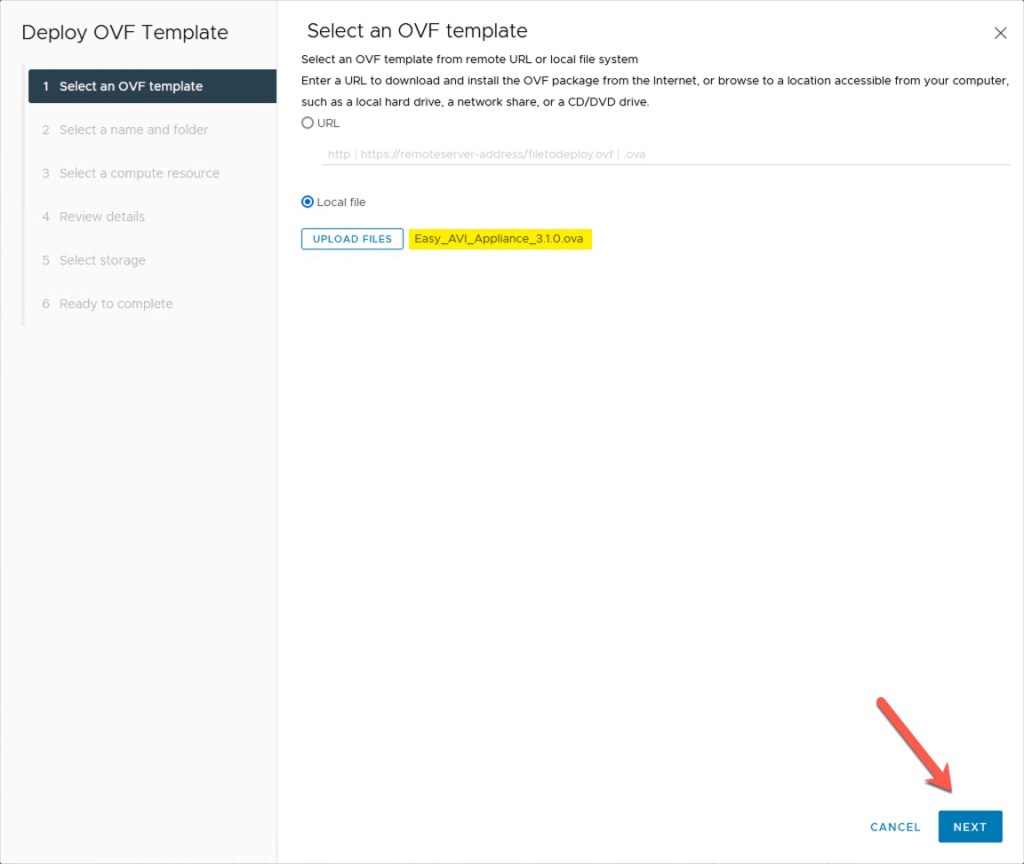
- Upload from local file and click Next.
2. Provide a name for the VM and select a folder, click Next.

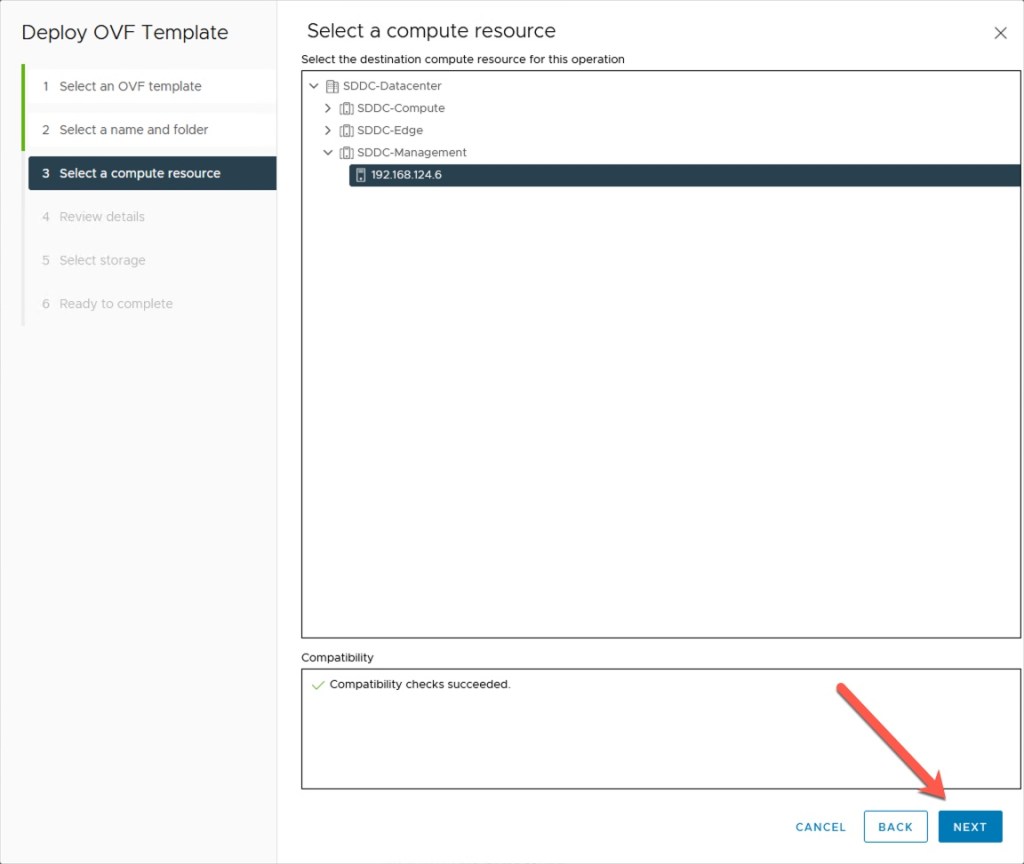
3. Select a Compute resource, click Next.
4. Review the details of the OVA template, notice the size on disk (thin versus thick), click Next.

5. Select the storage location for the appliance (choose virtual disk format if you wish to change it) and click Next.

6. Choose the destination Management network and click Next.

7. On the Customize Template page, enter the hostname and IP parameters that you plan to use, provide a strong password and click Next.

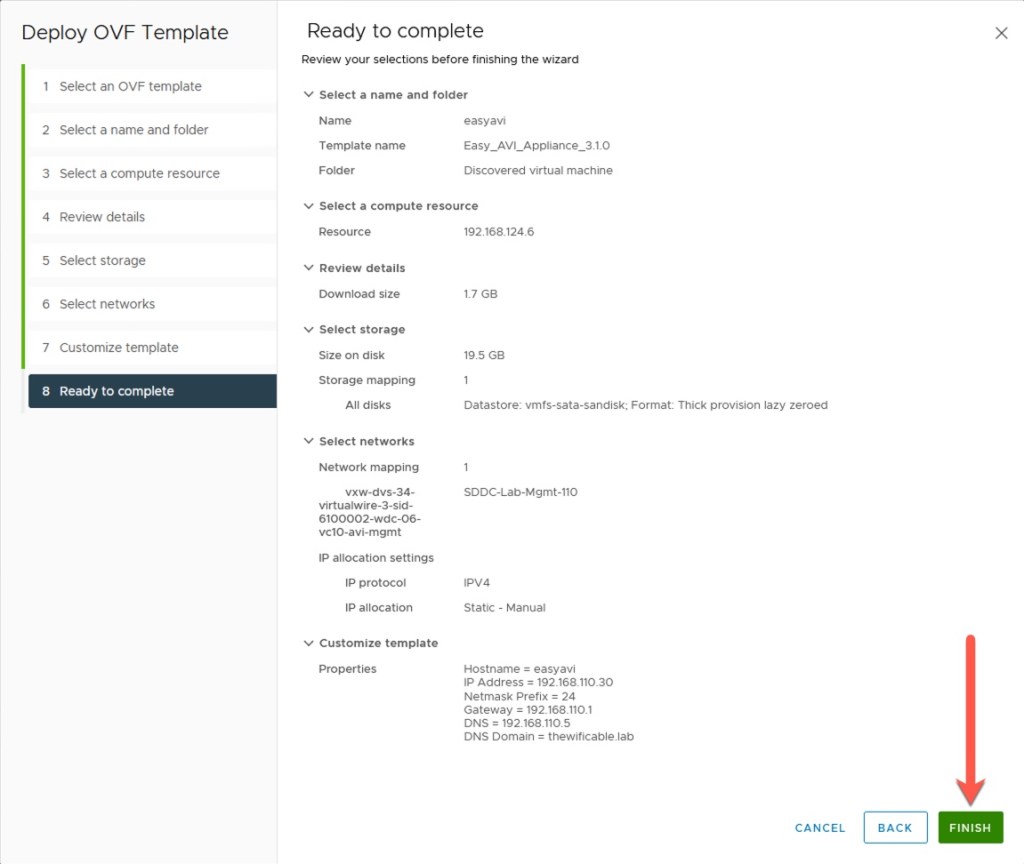
8. On the ‘Ready to complete’ review the settings you have provided and click Finish.
Now comes the ‘hurry up and wait part’ for the appliance to be deployed. Does not take very long at all, most likely 3-5 minutes depending on your environment. Once it is deployed, manually Power On the new VM.
deploy avi into vsphere
Now that the VM is deployed and online, we can begin the process of configuring AVI using the instructions outlined in the PDF provided for the Fling. Access the Easy AVI appliance through ‘https’ and accept the default certificate.

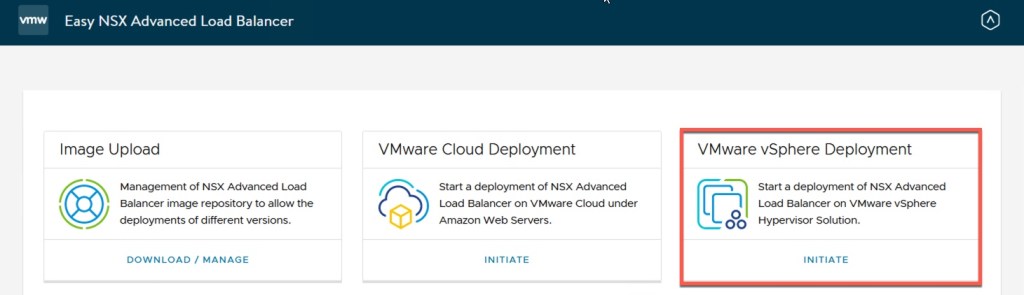
Before we can jump into deploying AVI into vSphere, we need to upload the AVI image and select a version.
NOTE: Currently five (5) of the nine (9) options are useable at this time, a small handful are ‘coming soon’ as they indicate.
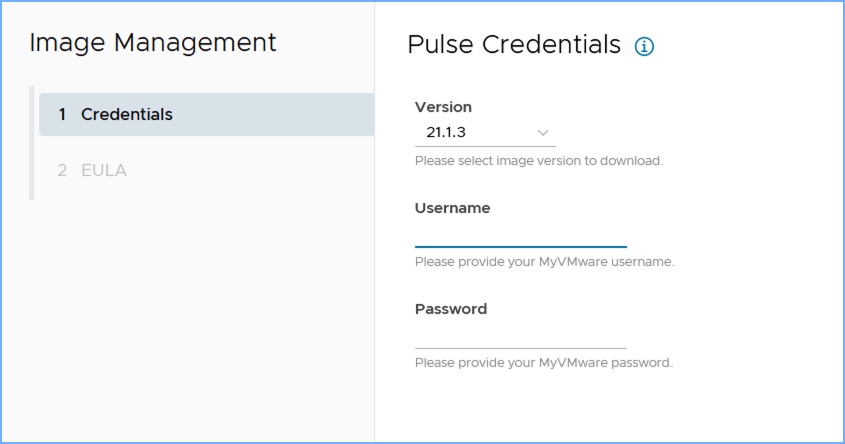
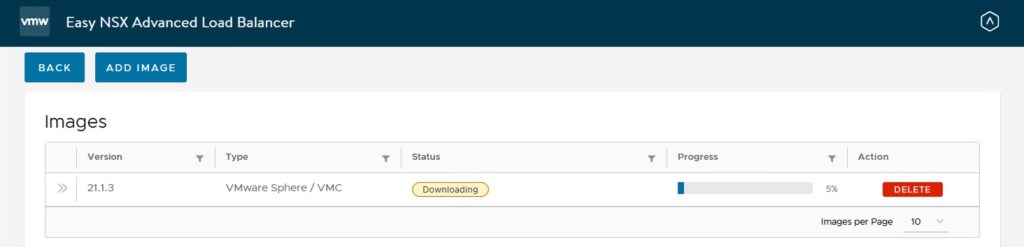
On the Image Upload page, click the ‘ADD IMAGE’ button, choose the version of AVI you wish to download and deploy along with the username and password for the ‘My VMware’ website. Accept the EULA on the next page (not pictured) and click SUBMIT.
It’ll take a few minutes to download the AVI image depending on your connection to the Internet. If you want to download more than one version, you can do so by going through the process again.
Now are going to start the process of using Easy AVI to deploy AVI into my vSphere lab environment.
- Back on the Easy NSX Advanced Load Balancer web page, click on ‘INITIATVE’ under VMware vSphere Deployment. Click the large START button on the next page (not pictured) and a wizard window will appear.
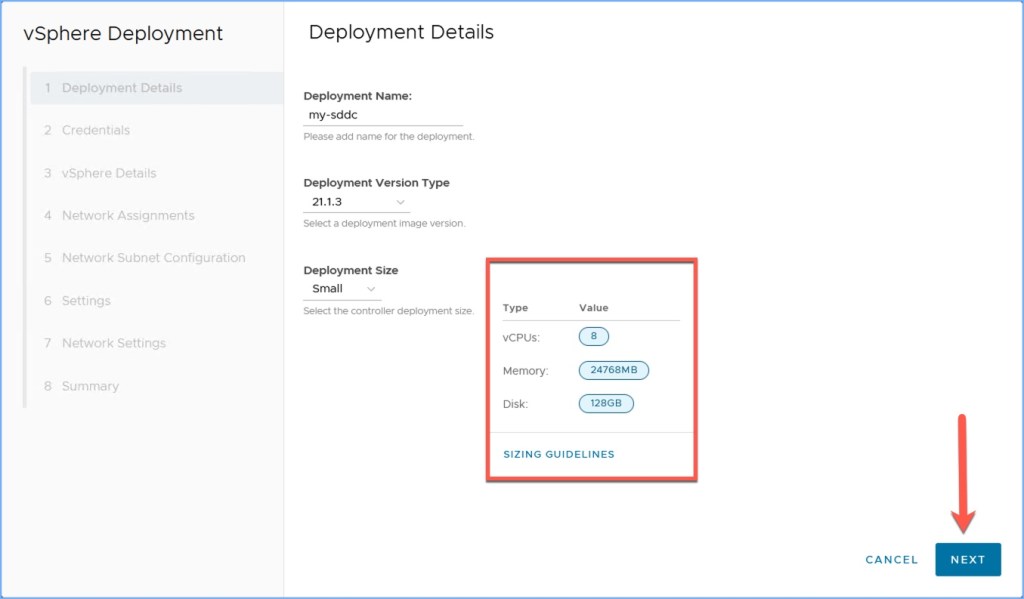
2. Provide a deployment name, select version (if you downloaded more than one) and lastly a deployment size. Note the size of the AVI Controller deployment for each size. I am choosing SMALL. Click Next.
3. Next provide the vCenter Server information including FQDN (or IP address) and the credentials to access vCenter. Click Next.

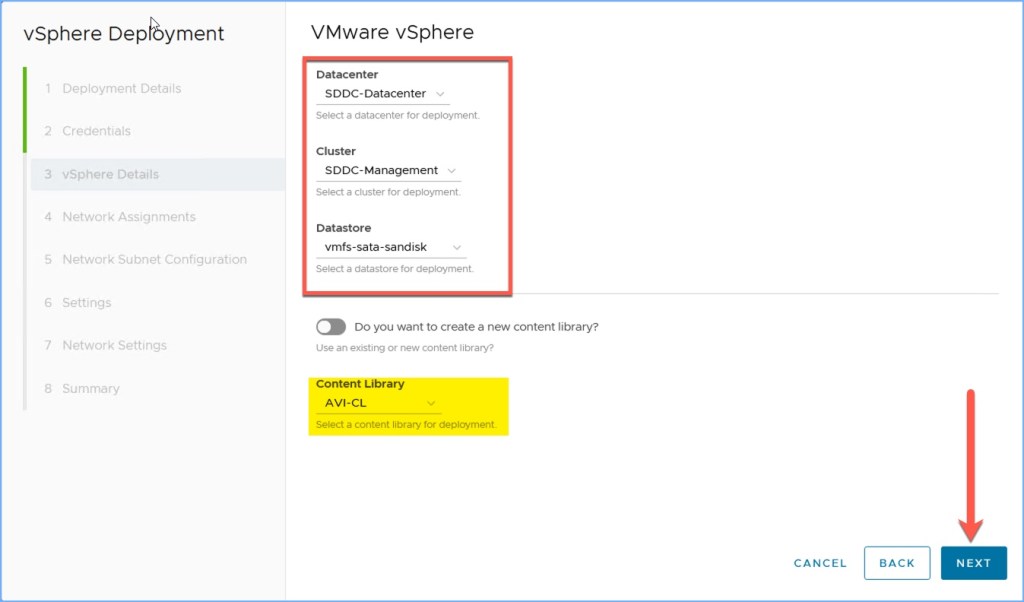
4. On the vSphere Details page select the vSphere data center, cluster and datastore for the deployment. Then choose the Content Library that will be used for the SE’s. I created my Content Library ahead of time. You can select the option to create a new one here if you haven’t previously. Click Next.
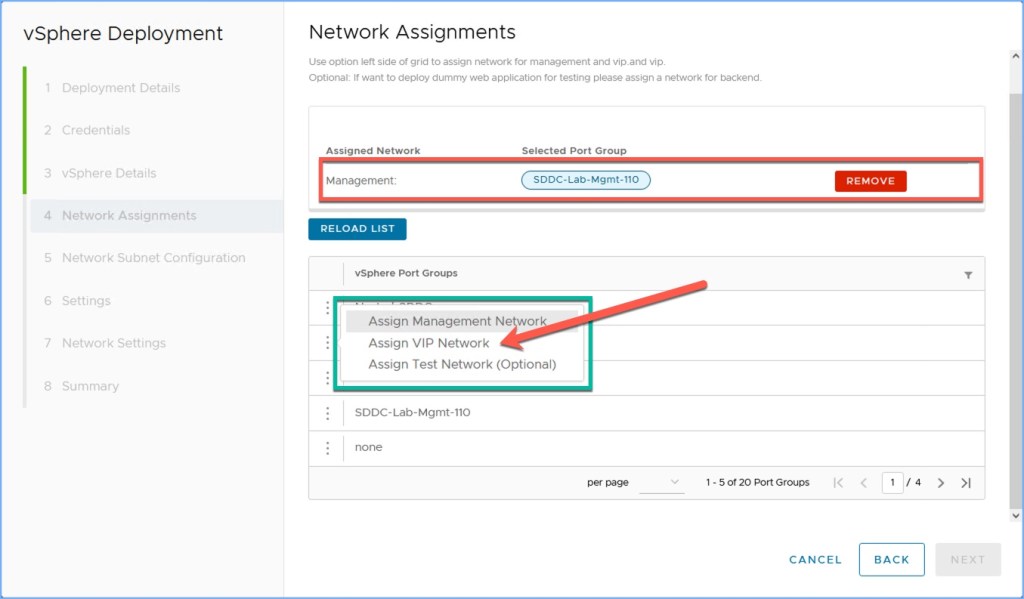
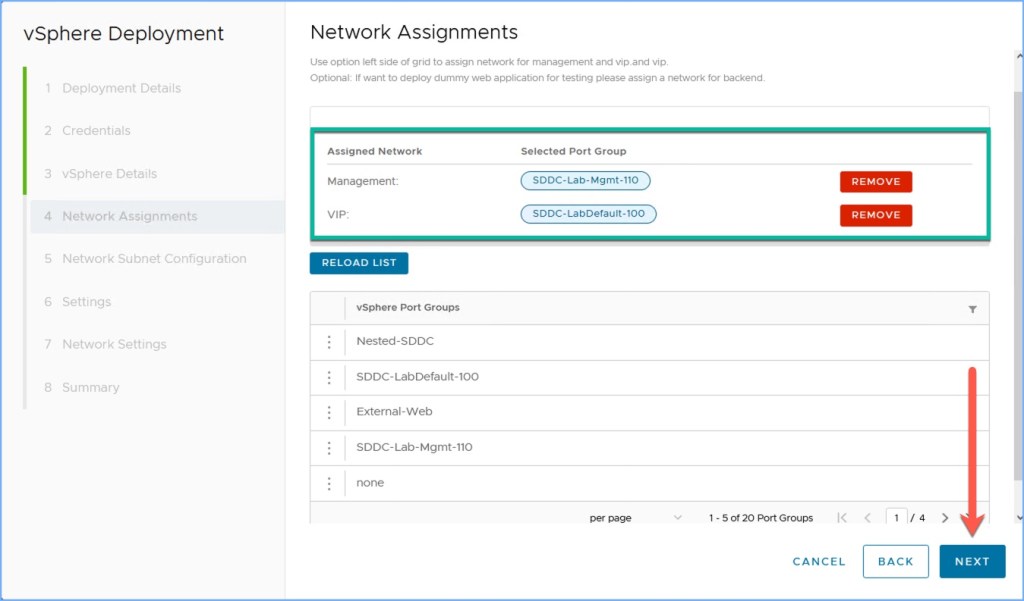
5. Next is the Network Assignments. Click the three dots to the left of the intended Management Network and a window will appear listing three options; Management, VIP and Test (Optional). The VIP and backend networks must be on a different network whereas the Management and VIP networks can be on different or the same networks. Don’t forget, DHCP should be enabled (requirements above). I’m only going to assign my Management and VIP Networks for now. Click Next.

6. Next we come to the subnet configuration. By default, the DHCP option is enabled for the Management Network. If you disable it you will have to provide the network CIDR and default gateway for that segment (2nd image below). I will leave mine set to DHCP. I then enter the network CIDR for my VIP network and click Next.


7. Next we come to the Settings for the Controller(s) as well as the Service Engine Groups. Here you can choose to immediately deploy a 3-node Cluster for your controllers; I’m only deploying one for now in my lab. Enter the DNS server IP address which is required. Then you will see several drop down menu options for the Service Engines. HA mode has 3 options…N+M, Active/Active or Active/Standby (N+M and A/A are known as Elastic HA in AVI where as A/S is Legacy HA). Read more about the SE HA modes HERE.
I’m choosing the default N+M mode for now and leaving the defaults for my vCPU, memory and disk capacity. Click Next.

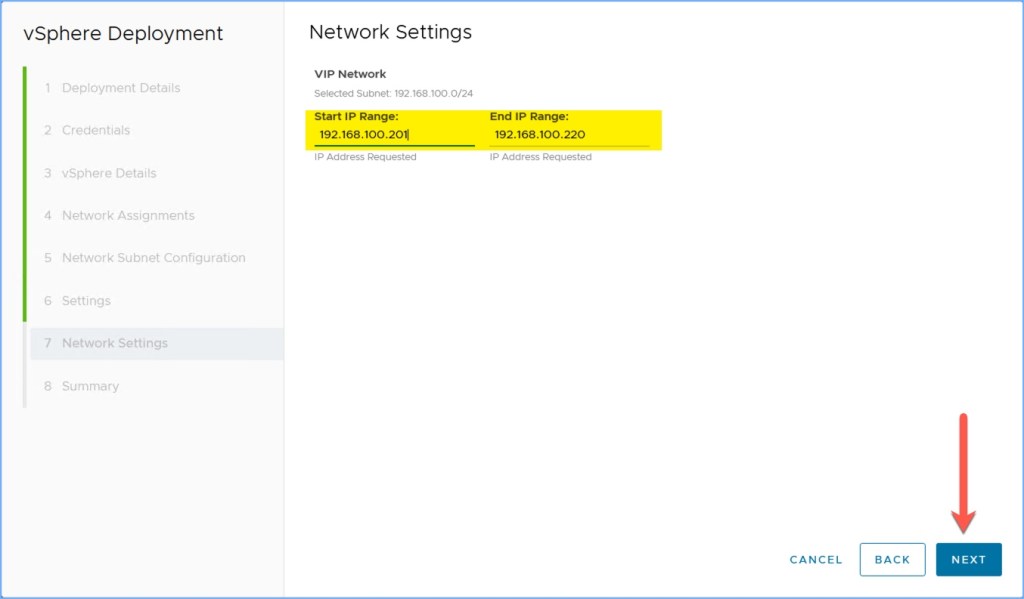
8. Then we come to the Network Settings for the VIP network. Here I specify a small start and end range inside my lab and click Next.
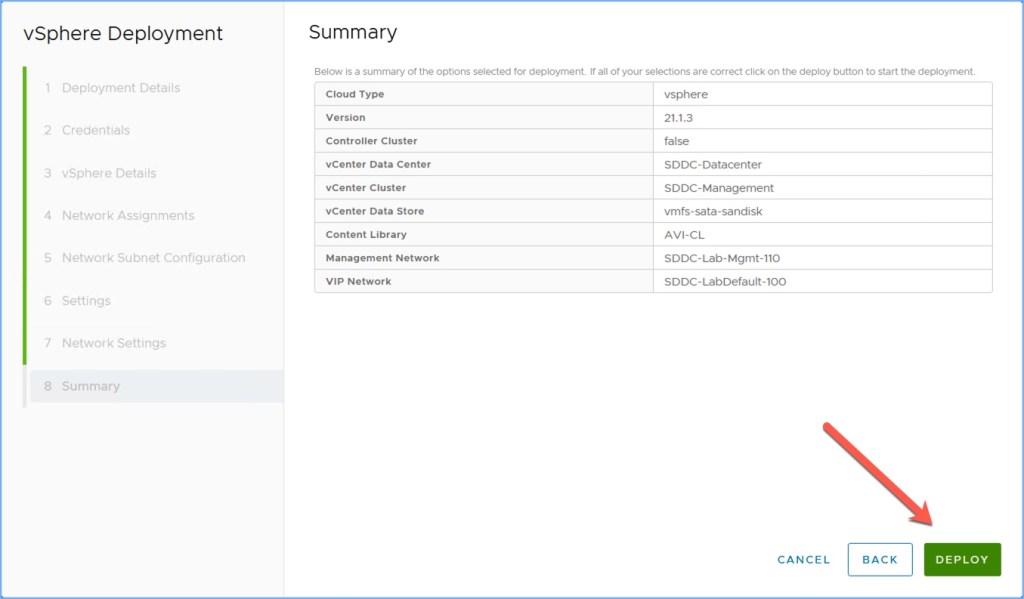
9. Lastly, we review the settings on the Summary page and click DEPLOY when ready.
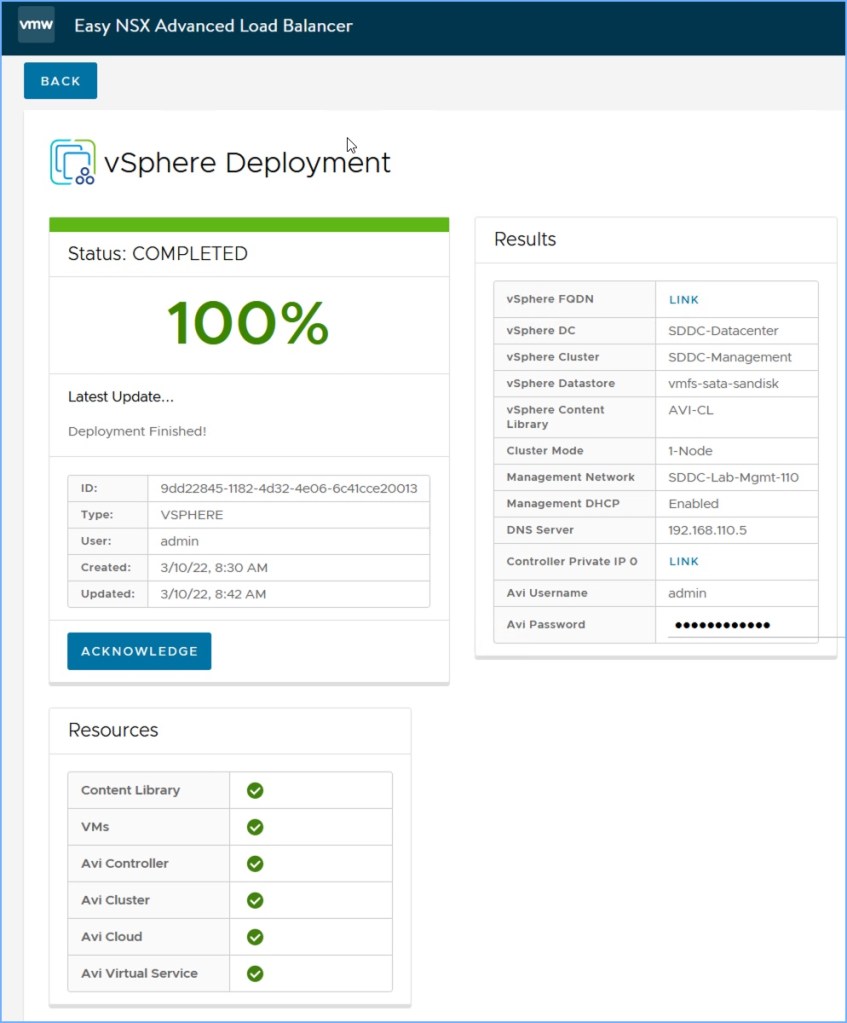
10. After clicking DEPLOY the screen will refresh and provide you a status of the deployment. Then in a separate tab in your browser, jump over to your vCenter Server and monitor the progress from within the vSphere Client. One of the tasks that you should see in progress is files being uploaded to the Content Library that was specified during the setup wizard. Once the files are uploaded a Deploy OVF template task will begin. When that begins you should see your controller being deployed and the powered on.
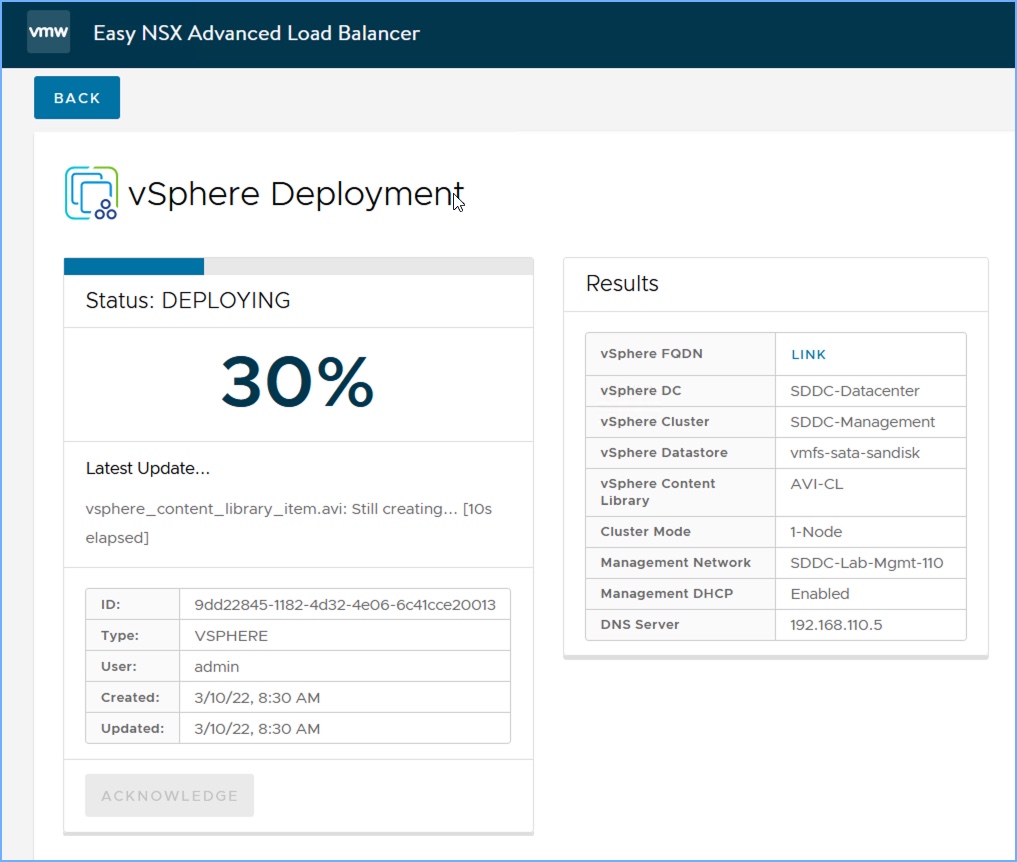
11. The deploy process took approximately 10 minutes to complete. You may experience something faster or slower depending on your environment. Click the ACKNOWLEDGE button and you will be prompted with another pop-up window to Acknowledge the deployment which wipes it from the Easy AVI appliance. It will not remove the VMs you just deployed into vSphere.
wrap up
Now that your AVI controller is deployed you can access it directly in the browser using ‘https’ using the IP or FQDN of the appliance, and start using the NSX Advanced Load Balancer (AVI). You will also notice in vSphere that the SE appliances and backend appliances will all be auto deployed and powered on.
My plan is to continue using it in my lab to sharpen my knowledge and skills so I can help my customers that are quickly adopting the NSX Advanced Load Balancer. Their existing load balancers are EOL and not being renewed for multiple reasons whereas AVI provides them with a software-defined distributed fabric that responds quickly to demand.
I also would like to take a moment to recognize the six (6) Contributors who developed the Easy Deploy appliance. Fantastic work everyone, well done! Looking forward to the future updates and seeing this Fling evolve.

Image taken from the Flings website
useful links
Here are a few additional links to help you on your NSX Advanced Load Balancer (AVI) Journey!
Easy Deploy for NSX Advanced Load Balancing (aka Easy AVI) – Flings Homepage
AVI Documentation Homepage starting with the Architectural Overview
AVI Installation Guide for VMware vCenter Server
