The long awaited release of NSX 6.3 is finally here! Ever since vSphere 6.5 was released I think we all have been “clamoring patiently” for a compatible version of NSX. In addition there are numerous enhancements that I am excited to get my hands on. Some of these new features include…
- Automation
- Application Continuity
- ROBO Edition
- Security
- Application Rule Manager (NSX Advanced & Enterprise Editions)
- Endpoint Monitoring (NSX Enterprise Edition only)
- vSphere Integrated Container Support
If you want to learn more about these features take a good at this Network Virtualization Blog Article.
I am going to walk you through the upgrade procedure to NSX 6.3. Prior to upgrading you should read the RELEASE NOTES and lastly make sure you are using the correct upgrade sequence. The vSphere environment I will be working with is running version 6.0 Update 2 which I will be also upgrading later to vSphere 6.5 but not during this procedure. This one is solely dedicated to NSX 6.3. Update sequences are very critical. I need to reference VMware KB Article 2147289 to verify my update sequence for my entire environment…vSphere, NSX…everything!
Remember downgrades are NOT supported so it is very important that you have a backup of the NSX Manager, vCenter Server and other NSX components prior to touching anything. I recommend creating a checklist in a spreadsheet and use it as an Upgrade Workbook. Follow it to the “T” without omitting a single step. You can find a list of those pre-upgrade steps on pages 9-10 of the NSX 6.3 Upgrade Guide.
Once you are finished with verifying everything during the “pre-upgrade phase” you must then verify the current state of NSX. VMware recommends this so you can determine if post-upgrade issues were caused by the upgrade or if they pre-existed. Trust me, this helps tremendously during troubleshooting procedures. As part of my Upgrade Workbook I include the procedure outlined in the NSX 6.3 Upgrade Guide starting on page 13. If you were using NSX Data Security it will need to be removed before upgrading. This feature was deprecated in NSX 6.2.3 and no longer available.
Here is a list of the VMware products (components) that I am using in my Initech.local vSphere 6.0 U2 environment including the build # for each component. My PSC and vCenter Server are both VCSA appliances and not on a Windows Server.
- External Platform Services Controller – 6.0.0.20100
- vCenter Server – 6.0.0.20100
- NSX Manager – 6.2.4 Build 4292526
- ESXi Hosts – 6.0.0 3620759
NOTE: My ‘Compute Cluster’ contains six (6) ESXi hosts that are running VSAN 6.2. I can’t wait to upgrade this to VSAN 6.5 later!
The upgrade sequence for my environment will be the following:
- Upgrade PSC (SSO) to 6.5 (I’m using an external PSC so I must do this first!)
- Upgrade NSX Environment to 6.3
- Upgrade vCenter Server to 6.5
- Upgrade ESXi hosts to 6.5
- Upgrade VSAN to 6.5
In this blog article I am going to walk you through the process of upgrading everything for NSX 6.3. I will cover the NSX Manager, Controllers, NSX Host Clusters, my ESG and lastly my DLR. The external PSC must be upgraded from 6.0 to 6.5 before touching my NSX environment. Some of you might be saying…”I can use an upgraded 6.5 PSC and still utilize my 6.0 vCenter Server?” Answer is YES!
Later I will provide a follow-up article for upgrading vCenter, ESXi and VSAN to vSphere 6.5.
Let’s begin…….
First off preparation is key! I’ve read the Upgrade Guide multiple times, reviewed my Upgrade Workbook and as well as my planned upgrade procedure. As always, I have my checklist ready. My recommendation for you….any time you are preparing for an upgrade or migration…make sure you are completely thorough. Review the current environment, understand the dependencies, the impacts and I can’t say it enough…read the documentation! If you do not prepare you are going to be putting out a fire somewhere along the way.

Upgrade the External PSC
The procedure to upgrade the PSC from 6.0 to 6.5 is fairly easy BUT you should still review the procedure from vSphere Upgrade Guide (ESXi 6.5 / vCenter 6.5) starting on page 43. READ IT, READ IT….READ IT! Several things need to be verified prior to the upgrade. First, verify that DNS is working properly for both forward and reverse lookup. Then verify your clocks are synchronized with your NTP source. These two simple things will probably save you heartache more often than not. So don’t assume they are working correctly. Take the time and do the work now versus doing the troubleshooting work later.
I mounted the VCSA 6.5 installation ISO from my management control station and ready to begin the upgrade. I successfully upgraded my External PSC from 6.0 to 6.5. Here are a few screenshots from the procedure below.
Upon completion you want to begin verification of the upgrade by logging into the Platform Services Controller client UI. The URL for your appliance is provided on the Completed page of the wizard. Once the PSC is upgraded to 6.5 you can proceed with upgrading NSX. Besides logging into the appliance successfully, start checking everything else associated with the PSC because remember….AUTHENTICATION is managed by the PSC. For example, if its integrated with your Microsoft AD infrastructure you better make sure that is working correctly before proceeding.
https:///psc/
NOTE: After the PSC is upgraded you will have to upgrade the VMware Enhanced Authentication Plug-in for your web browser(s).
NSX Upgrade Procedure
I am now ready to upgrade NSX 6.2.4 to NSX 6.3. This process has to potential to take up some serious time. The ESXi hosts will require a reboot and depending on the size of the vSphere cluster(s) and the # of VMs running…this could take a considerable amount of time to complete.
In addition to the size of the environment impacting the “length of time” to complete this procedure, the planned outage window you have could also have an impact on how much you can actually accomplish in that given time period. You could upgrade a single NSX component during separate outage windows, thus useing a”phased approach” for the entire upgrade. In fact, I recommend a phased procedure versus upgrading everything all at once. Give you the opportunity to do some testing and if something goes haywire you only have to restore and/or investigate that one component.
The NSX upgrade process will be completed in the following order…
- NSX Manager
- NSX Controller Cluster
- NSX Host Clusters (the most time consuming)
- NSX ESG(s)*
- NSX DLR(s)
- NSX Guest Introspection
The NSX ESG (Edge Service Gateways) can be upgraded at any point in time after the NSX Manager upgrade. The DLRs can upgraded after the NSX Controller upgrade. You can find more information regarding the Operational Impacts associated with the entire NSX upgrade procedure starting on Page 11 of the NSX 6.3 Upgrade Guide.
Upgrade NSX Manager
There are a few pre-upgrade tasks that need to be done prior to upgrading the NSX Manager. First, verify a successful backup has been completed. Second, ensure that there is enough free space on the local filesystem. Simply log into the NSX Manager via SSH (Putty) and execute the following command to view the local filesystem usage of your NSX Manager appliance.
show filesystems

Last, verify the appliance is using reserved memory. The NSX Manager appliance in my environment is configured with 16GB of memory and configured with a maximum memory reservation for better performance.
You also must uninstall NSX Data Security as it has been completely removed from NSX 6.3. It is no more so say goodbye to it.
Here is the step-by-step procedure for upgrading the NSX Manager appliance.
- Log into the NSX Manager virtual appliance from your web browser.
https://<nsx-manager-fqdn/
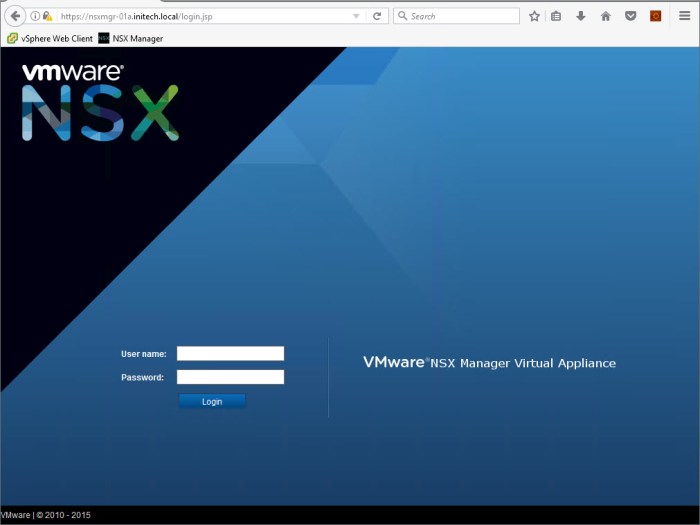
NSX Manager Login - Click the Upgrade option on the homepage.
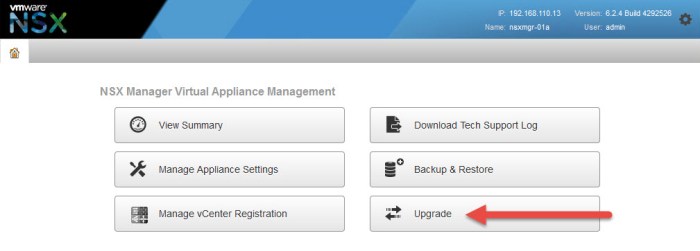
Upgrade Option - On the Upgrade page of NSX Manager, verify your current version one more time versus what you have in your Upgrade Workbook and then click the Upgrade button.

Upgrade NSX Management Service - A small window will open prompting you for the NSX upgrade bundle (tar.gz file) that you should have downloaded by now. Browse to this file and then click Continue. The file will be uploaded to the appliance. The file is slightly over 2GB is size so it will take a little time to upload.


- Once the file is uploaded you will see a new window with a WARNING message displayed across the top. Your backup should be complete prior to this. Double-check with your backup admin one last time before proceeding. Certainly won’t hurt. Next, choose whether or you you wish to enable SSH or participate in CEIP and then click Upgrade.

WARNING Message & Upgrade - The upgrade will proceed. It will take some time here so be patient.

- During the upgrade process the NSX Manager appliance will reboot. When the procedure is complete you will return to the login homepage.

Login Page (Post Upgrade) - On the homepage you will immediate notice the new version and build number in the upper right-hand corner. Select Summary.

- From the Summary page, again we will see that the version and build # have been updated. Also, wait for the NSX Management Service to have a status of RUNNING.

- Return to the NSX Manager homepage and then select Manage vCenter Registration.

- Verify that the status of Connected is present for both the ‘Lookup Service URL’ and the ‘vCenter Server’. The Lookup Service URL should be pointing to your External PSC (SSO).

- Last, refresh the vSphere Web Client. Connect to the vCenter Server appliance shell (via SSH) with your ‘root’ account and execute the following commands:
service-control --stop vsphere-client
service-control --start vsphere-client
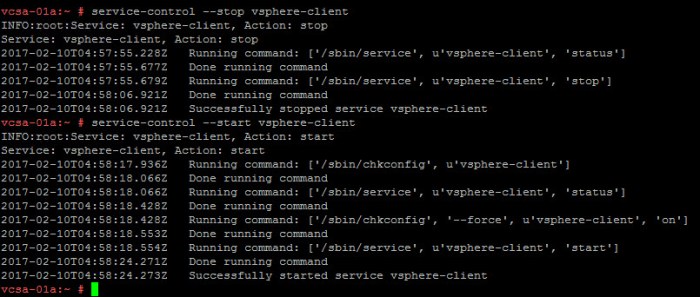
It will take a few minutes for the Web Client to re-initialize after executing the two commands above. Before proceeding to the next NSX component you should verify everything is working correctly from the vSphere Web Client. Once you are finished perform a post-upgrade backup of the NSX Manager appliance.
Upgrade NSX Controller Cluster
Next we are going to upgrade the NSX Controllers (x3). During the controller upgrade a file is downloaded to each controller and then each is upgraded one at a time. Don’t forget the controllers must be all running the same version in order to join a controller cluster.
From the vSphere Web Client, open Networking & Security and then select Installation. In the ‘NSX Controller Nodes’ section verify the status of each controller. Each one should have a status of Connected. Then verify the ‘Peer Connectivity Status’ on each controller by hovering or clicking the green boxes in the ‘Peers’ column.

Open a Putty (SSH) session with each of your controllers and then type the following command:
show control-cluster status

Verify everything that is highlighted above. The ‘Join Status’ should be complete and have a Majority Status indicated that is connected. The ‘Configured Status’ should be enabled and the ‘Active Status’ should be activated on each node. Don’t assume anything and repeat this command on each controller. The Cluster ID should be identical on each but the Node UUID should be different.
We are now ready to begin the Controller Upgrade procedure.
- Log into the vSphere Web Client UI and open Networking & Security. Select Installation on the left-side of the window. The Controller Cluster Status column will have an Upgrade Available link available. Click the link.
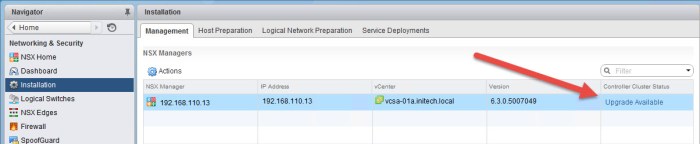
Upgrade Available - An ‘Upgrade Controller’ message will appear. Click Yes to proceed with the controller upgrade. The NSX Controller process will proceed.

Upgrade Controller - The first controller will begin its upgrade by downloading the upgrade file from the NSX Manager. The Status indicators will change during this procedure. Each controller will download the file one at a time. Once all three controllers have downloaded the upgrade file the status indicator will indicate ‘Upgrade in Progress’ on the controller and then reboot.

Upgrade Progress - The status of the controllers during this process will change multiple times. At some point the controller will indicate that it is Disconnected. The Peer relationships between the controllers will also be affected at this point. Do not be alarmed by this as this is all NORMAL. It’ll look like the entire world is coming apart. Just relax. The upgrade will take a little time to complete.

- Open a console (VMRC) with each controller and monitor the progress as it moves forward through the upgrade. When a controller has completed its upgrade you will quickly notice the Build # has changed.

- The NSX controller status will change yet again. At one point they will all indicate a ‘Disconnected’ status. Again this is NORMAL because remember the rule of thumb is every controller must be running the same version in order to join the controller cluster.
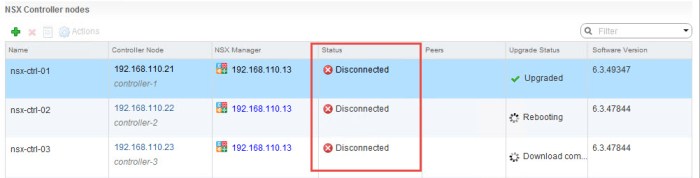
- When the upgrade is entirely finished for each controller everything should return to normal with a status of ‘Connected’ and the ‘Peers’ should be happy and green again.

Upgrade Complete - Log into each controller again via SSH (Putty) and execute the following command again:
show cluster-control status

Post-upgrade Cluster Control Status
This concludes the NSX Controller Cluster upgrade. We will now upgrade the VIBs on the ESXi hosts in each cluster.
Upgrade NSX Host Clusters
Next we have the NSX host clusters. Prior to starting this procedure, verify everything is configured and running correctly from the previous procedure. Also verify all of your hosts. Double and triple check DNS, NTP and ensure the NSX VIBs are loaded on each of the ESXi hosts.
During the upgrade procedure the hosts will download the VXLAN.zip file from the newly upgraded NSX Manager. If you are using small boot drives such as microSD for your ESXi hosts, make sure you have enough local free disk space prior to performing the upgrade. Review the local disk space on your hosts using one of the following commands:
vdf -h
df -h
If you don’t have enough space you will need to do some cleaning up before proceeding.
Next you want to verify that the ‘esx-vsip’ and ‘esx-vxlan’ modules are loaded on each host. Execute the following command to verify these modules are loaded:
esxcli software vib list | grep esx

You will repeat this command later. Perform a “before and after” comparison at the conclusion of this procedure. The modules will have an updated version number.
I have Fully Automated DRS clusters for each of my NSX host clusters. Therefore the host upgrades will roll through one at a time; each host will be placed into Maintenance Mode prior to it being upgraded and then rebooted. In some instances I had to manually reboot the host.
My Compute Cluster running my 3-Tier Application VMs are running on VSAN. So DRS will not run through this automatically. That update file will be copied to the hosts and upgraded but that is it. I had to manually place each of these VSAN hosts into Maintenance Mode, select a ‘VSAN Data Migration Method’ when prompted and proceed through the process. You will see that during this procedure. So YES…the procedure is more complicated on a VSAN Cluster than a regular cluster connected to an external storage solution. Requires much more manual intervention.
In the next release of NSX, perhaps a feature can be added for VSAN clusters to prompt admins to select a VSAN Data Migration Method during NSX upgrades for the hosts as they enter Maintenance Mode during this operation. 🙂
Here is the step-by-step procedure.
- Log into the vSphere Web Client UI and open Networking & Security. Select Installation and then select the Host Preparation tab. You will quickly notice that the ‘Installation Status’ column says Not Ready. This is okay and easy to fix. Select each cluster one at a time and from the Actions menu select Resolve. It’ll take a few moments but once everything is fixed you will see green check marks and you can proceed. If you are not experiencing the Not Ready status you can proceed to Step 2.

- Everything is back to normal and Upgrade Available now appears. I’m going to begin with my Compute-Cluster-A. Click the Upgrade Available link.

- A message will appear asking you to confirm. Click Yes to proceed.

- The installation will proceed on the cluster. Keep a close eye on your hosts and virtual machines during this step.

- Now here’s the fun part because my Compute cluster is configured with VSAN. So at some point during this procedure the process will come to a halt and everything will have an installation status of Not Ready. Remember when placing a VSAN host into Maintenance Mode you must specify what to do with the data. So VSAN certainly threw a small curveball at me here.

- So in this case I am going to manually, one-by-one, place my VSAN ESXi hosts into Maintenance Mode and reboot. As soon as I go into Hosts & Clusters and expand my ‘Compute-Cluster-A’ I can immediately see my hosts specifying Reboot Required.

- One at a time I place each host into Maintenance Mode, choose Ensure Accessibility during the reboot and continue. Once the host is in Maintenance Mode I manually reboot it from the vSphere Web Client. I repeat this step on each of my VSAN hosts. NOTE: If your compute cluster is using traditional shared storage you can obviously IGNORE this step which is unique for VSAN clusters.

- Once every host in my VSAN cluster has been rebooted I can then return to the Networking & Security > Installation > Host Preparation tab and view my cluster installation status.

- I then repeat this procedure for my remaining clusters; in this case my Edge Cluster and Management Cluster. In the end I upgraded 11 ESXi hosts.
This completes the upgrade process of my NSX Host Clusters across my three vSphere HA/DRS clusters including a VSAN enabled compute cluster. This process took the longest out of all the steps in my NSX 6.3 upgrade as each host will need to be placed into Maintenance Mode and rebooted.
Upgrade NSX ESG
The upgrade of the Edge Services Gateway(s) (ESG) can be completed anytime after the NSX Manager upgrade. Review the prerequisites starting on Page 27 of the NSX 6.3 Upgrade Guide before proceeding with the ESG upgrade. One important thing to point out here is if an L2 VPN connection is present on one of the NSX Edge routers you must delete this configuration before you upgrade. When the upgrade is complete you can reconfigure your L2 VPN connection.
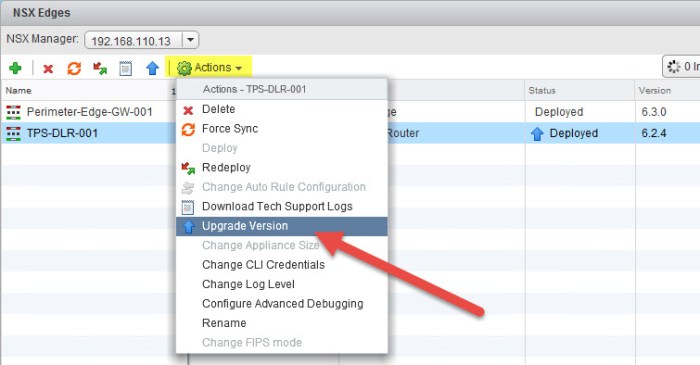
- Log into the vSphere Web Client UI and open Networking & Security. Select NSX Edges and in the right-hand side of your screen select the Edge router you want to upgrade. Notice the version in my screenshot indicates version 6.2.4. Select the Actions drop down menu and choose Upgrade Version.

Upgrade Version - You will receive a WARNING message that the operation may result in temporary service disruption .Click Yes to continue.

- A task will appear in the Recent Tasks menu of the vSphere Web Client. A status of Busy will now appear in the Status column of your ESG. Allow the process a little time to complete. Should not take as long as the other previous procedures.

- When the upgrade is complete the version and status columns will be updated. The Status will change to Deployed and the version will now be 6.3.0.

- You can also Putty (SSH) into your ESG and execute the following command to verify it has been upgraded to Version 6.3.0:
show version

- Repeat this procedure on each of your ESGs.
Upgrade NSX DLR
Upgrading your NSX Distributed Logical Routers (DLRs) is going to be performed from the same location as we upgraded our ESGs in the vSphere Web Client. Unlike the ESGs, the DLRs cannot be upgraded until you have the NSX Controllers upgraded.
- Log into the vSphere Web Client UI and open Networking & Security. Select NSX Edges and in the right-hand side of your screen select the Logical Router you intend on upgrading. Select the DLR and from the Actions drop-down menu select Upgrade Version. Same process used to upgrade your ESG.
Upgrade Version - You will receive a WARNING message that the operation may result in temporary service disruption .Click Yes to continue.

- A task will appear in the Recent Tasks menu of the vSphere Web Client. A status of Busy will now appear in the Status column of your DLR.

- When the upgrade is complete the version and status columns will be updated. The Status will change to Deployed and the version will now be 6.3.0.

- You can also Putty (SSH) into your DLR and execute the following command to verify it has been upgraded to Version 6.3.0:
show version

- Repeat this process for each DLR instance.
Conclusion
This concludes the upgrade procedure for NSX 6.3. After my NSX Manager, NSX Controllers, ESGs and DLRs are upgraded I can proceed with upgrading Guest Introspection. I did not have that installed in my NSX 6.2.4 lab but the procedure for upgrading Guest Introspection is straightforward. You can find this process on pages 28-29 of the NSX 6.3 Upgrade Guide.
Once everything is upgraded I began tested connectivity between my virtual machines. Everything was back to normal, zero post-upgrade service disruptions. I would recommend going through the NSX Validation Process again in my previous blog article to ensure everything is working as expected.
And that’s it for now. Check back later for my next blog articles where I will continue upgrading this environment to vSphere 6.5 and VSAN 6.5!
Useful Links
VMware NSX for vSphere Documentation Homepage
NSX Upgrade Guide (NSX for vSphere 6.3)
NSX for vSphere 6.3.0 Release Notes
VMware Product Interoperability Matrixes
Update Sequence for vSphere 6.5
Update Sequence for vSphere 6.0
Update Sequence for vSphere 5.5
BE SOCIALABLE….PLEASE SHARE! 🙂

Hi,
Im interested to know why you did the external PSC 1st when the vmware site states it should be done after the NSX upgrade? I only ask as we are planning an upgrade in the near future.
Thanks
LikeLike
I was working with vSphere and vCenter 6.0, not 6.5. The update sequence for 6.0 and compatible products is different. You just gave me a great idea for a blog article!
Here is the link for the upgrade sequence for 6.0 and compatible products:
https://kb.vmware.com/s/article/2109760
LikeLike