Here in Part 2 of the multi-part series for vCenter Server 6.5 HA we will deploy the two external Platform Services Controller (PSC) appliances. The PSCs will be serviced (load balanced) by a 3rd party load balancer. In a real world deployment the load balancer could be a virtual or physical appliance. Which type should you use? Well it all depends. First you need to understand the risk(s) and/or impact(s) of each type. You may already have a physical load balancer (as most of my customers have) in the data center and simply need to configure it for the PSCs.
If you are deploying a virtual load balancer on the same cluster as the vCenter HA components (the PSCs, active node, passive node and witness node) then you should have a vSphere DRS anti-affinity rule(s) ready to go. I’m only using the virtual load balancer in my lab because I don’t have a physical load balancer and my ultimate goal is to demonstrate vCenter HA. I’m using the virtual version for demonstration purposes only. Just do whatever it takes to avoid running these workloads on the same host…if possible.
There are a total of three (3) ESXi hosts in my lab and I’m deploying five (5) VCSA appliances and a load balancer. That is a total of 6 virtual appliances to be deployed. So we will have at least 2 VMs per host.
During this phase of the vCenter HA configuration we will focus on the two PSCs that will be serviced by the load balancer.

From my Windows workstation I’m going to mount the VMware VCSA installation media (downloadable ISO image). I am going to use the UI installer (installer.exe) found in the “\vcsa-ui-installer\win32\” directory on the installation media.
Step 1 – Installation of the Primary PSC
The following procedure summarizes the steps taken to deploy the Primary PSC (Platform Services Controller) for my new vSphere 6.5 deployment. A brand new SSO domain and site will be configured for this Greenfield deployment. In addition to my three (3) ESXi 6.5 hosts (nested ESXi) I also have a virtualized back-end storage appliance, a single DNS server and a router.
IMPORTANT: Make sure DNS name resolution is working properly (forward and reverse lookup) and NTP is configured consistently before starting anything. A majority of your nightmares can be avoided by simply paying close attention to your DNS and NTP.
- Once you mounted the installation media and launched the installer (\vcsa-ui-installer\win32\installer.exe), click Install to proceed. There are two stages during the deployment.

- The Install – Stage 1 : Deploy Appliance wizard will appear. Click Next on the Introduction page.
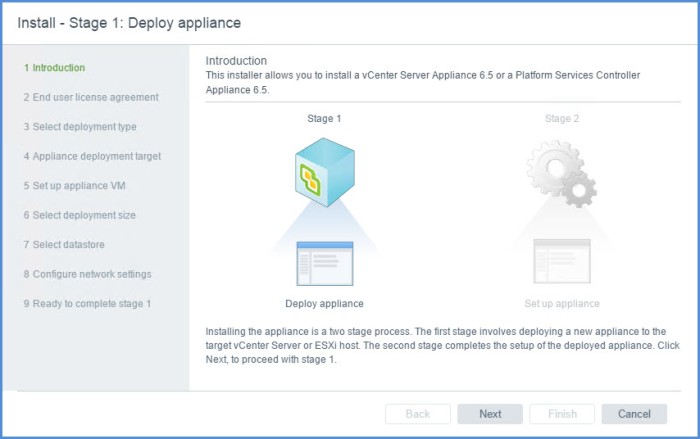
Introduction - Accept the terms of the end user license agreement and click Next.

End user license agreement - Under ‘External Platform Services Controller’ option, select Platform Services Controller and then click Next.

Select deployment type - Enter the name of the target ESXi host and its credentials where you wish to deploy your External PSC. Click Next. (A certificate warning will appear, click Yes.)

Appliance deployment target - On the ‘Set up appliance VM’ section of the wizard enter the name of the PSC VM as you want it to appear in the VM inventory. Apply a complex root password and click Next.

Set up appliance VM - On the ‘Select Datastore’ page choose your target datastore and click Next. I am operating in a small lab environment so I have chosen the option to enable ‘Thin Disk Mode’ for my PSC. You probably will not use this option in a production environment.

Select datastore - On the ‘Configure network settings’ page select the virtual network (port group), specify the FQDN, static IP address, mask, gateway and DNS servers and click Next.

Configure network settings - On the ‘Ready to complete stage 1’ page review the details about your deployment and click Finish when ready.

Ready to complete stage 1 NOTE: As you can see I’m deploying only the PSC role. I highlighted the PSC FQDN because I want ensure this is 100% accurate before deployment. Do a quick NSLOOKUP from a command prompt if you have to.
- The deployment of the Primary PSC will proceed and then complete. Click Continue to proceed to Install – Stage 2.


Deployment complete - The Install – Stage 2 : Set Up Platform Services Controller Appliance wizard will appear. Click Next.

Introduction - On the ‘Appliance Configuration’ page select the time synchronization mode from the drop-down menu. Here I have decided to synchronize my PSC with the same NTP servers used by my ESXi hosts. I also ‘Enabled’ SSH access. Click Next.

Appliance configuration - On the ‘SSO Configuration’ page select the option to Create a new SSO domain and then specify your SSO domain name, SSO admin password and the SSO site name. Click Next.

SSO configuration - Choose whether or not to participate in VMware’s CEIP (Customer Experience Improvement Program) and click Next.

Configure CEIP - Review the information on the ‘Ready to complete’ page and click Finish. A Warning will appear, click OK.

Ready to complete 
Warning - The configuration of the PSC appliance will continue and then complete. There will be two (2) important URLs for accessing the PSC. Click each URL and bookmark them. Click Close. Here are the URLs for my newly deployed PSC. You do not have to specify Port 443 in the URL as ‘https’ will take care of that for you.
https://psc-01a.initech.local:443/psc/
https://psc-01a.initech.local:443


Stage 2 complete
Step 2 – Installation of the Secondary PSC
In a nutshell we are going to basically repeat a majority of the steps above in Step 1. The only differences here is we are going to deploy the second PSC onto a different ESXi host. Secondly, we are going to specify during the configuration (Install – Stage 2 phase) to JOIN an existing SSO domain and Site. We are not going to create a new one.
Repeat the Steps above with a few exceptions which are outlined below.
Step 5
Specify a different target ESXi host to deploy the second PSC as seen below. Click Next.

Step 6
On the ‘Set up appliance VM’ section of the wizard enter the name of the secondary PSC appliance as you want it to appear in the VM inventory. I used ‘psc-01a’ for my primary and ‘psc-02a’ for my secondary. Apply a complex root password and click Next.

Continue through the deployment wizard. Configure the secondary PSC with a different FQDN and static IP address (obviously 🙂 ). Remember to check your DNS server(s) to ensure the Host and PTR records exist. Remember Stage 1 of the process is used to simply deploy the virtual appliance. Stage 2 is going to take us through the configuration of the appliance which will include the process of joining the PSC to an existing SSO domain and site.
Once the deployment completes the Install – Stage 2 process will begin. Continue with the same steps above and then continue the process above until you get to….
Step 13
On the ‘SSO Configuration’ page select the option to Join an existing SSO domain and then specify the FQDN or IP address of the primary PSC that was deployed. Click Next.

On the very next section of the Install – Stage 2 wizard you are going to specify Join an existing site and then select the Site Name that you configured previously. Click Next.

Proceed with the wizard until the end and wait for the configuration to complete. I now have URLs for my secondary appliance just as I did with my initial PSC appliance.
https://psc-02a.initech.local:443/psc
https://psc-02a.initech.local:443
There is also another URL you want to use to make changes to the two PSCs when necessary. I’m going to access the management URL for my PSC using the following address:
https://psc-01a.initech.local:5480/

https://psc-02a.initech.local:5480/
The login page will look like something like this. Log into the appliance with the root account that you specified during deployment. We are not going to use this interface for the moment but take a look at it sometime. It has been updated in vCenter 6.5. Double-check your NTP and other appliance settings before proceeding.

Step 3 – Configure Certificates for PSC HA
Here comes the fun part of configuring the certificates for the Platform Services Controllers that we just deployed. The security certificates must match before deploying the vCenter Server virtual appliance. Take a snapshot of your PSCs in the event this part does not work right or completely fails and you can then quickly revert back.
First thing we are going to do is open up a Text Editor and create the following configuration file. The procedure to create this certificate request file can be found in VMware KB Article 2147627.
I used Notepad++ on my system to create my certificate request file. The ‘subjectAltName’ should include the FQDNs of each PSC and the FQDN that you plan to use for the load balanced PSC. I have a static Host and PTR record created in my DNS for ‘psc-ha.initech.local’ and the IP address I plan to use is different than the IP’s currently in use on my PSCs. The static IP address that I will use for ‘psc-ha.initech.local’ will be created on the load balancer as a VIP. This FQDN resolves to 192.168.80.10 on my management network.
The ‘commonName’ should also reflect the load balanced FQDN.
I saved the file locally on my system as ‘psc_ha_csr_cfg.cfg’ but you can name it whatever you want.

Next we are going to copy this file to the primary PSC (psc-01a.initech.local). I used WinSCP to copy my files to a newly created /certs directory on my Primary PSC (part of procedure below). I also created this directory on my secondary PSC. I am going to walk you through all of that.
- Connect to the primary PSC via SSH (Putty) and execute the following command. This command is temporary and is only being executed to allow you to connect to your PSC using WinSCP thus allowing you to transfer your certificate configuration file above to the /certs directory.
# chsh -s "/bin/bash" root

- Next create a new directory on your PSC.
# mkdir certs

- Open WinSCP on your local system and copy the configuration file that you created above into the new /certs directory on the PSC. Click OK to transfer the file.

WinSCP file copy - Next execute the following OpenSSL command to create the follow CSR and KEY files.
# openssl req -new -nodes -out /certs/psc-ha-vip.csr -newkey rsa:2048 -keyout /certs/psc-ha-vip.key -config /certs/psc_ha_csr_cfg.cfg

- Next we are going to generate the certificates we need using the VMCA on our primary PSC (psc-01a.initech.local).
# openssl -req -days 3650 -in /certs/psc-ha-vip.csr -out /certs/psc-ha-vip.crt -CA /var/lib/vmware/vmca/root.cer -CAkey /var/lib/vmware/vmca/privatekey.pem -extensions v3_req -CAcreateserial -extfile /certs/psc_ha_csr_cfg.cfg

- The next command is used to copy the current VMCA root certificate and rename it to cachain.crt.
# cp /var/lib/vmware/vmca/root.cer /certs/cachain.crt

- The next command is used to create a new Machine SSL certificate that contains the two new certificates we created above. This command will create another certificate which we will use later. This will basically copy the thumbprints in each certificate into one certificate.
# cat /certs/psc-ha-vip.crt >> /certs/psc-ha-vip-chain.crt
# cat /certs/cachain.crt >> /certs/psc-ha-vip-chain.crt

- Next we are going to prepare the three (3) new certificates and then replace the certificates on both PSCs (psc-01a.initech.local and psc-02a.initech.local). If you left open your WinSCP connection, simply refresh it and you see the three certificates: cachain.crt, psc-ha-vip-chain.crt and psc-ha-vip.key. Create a /certs directory on your secondary PSC (if you haven’t already) and copy these three (3) certificates into the directory. You are going to need them shortly.

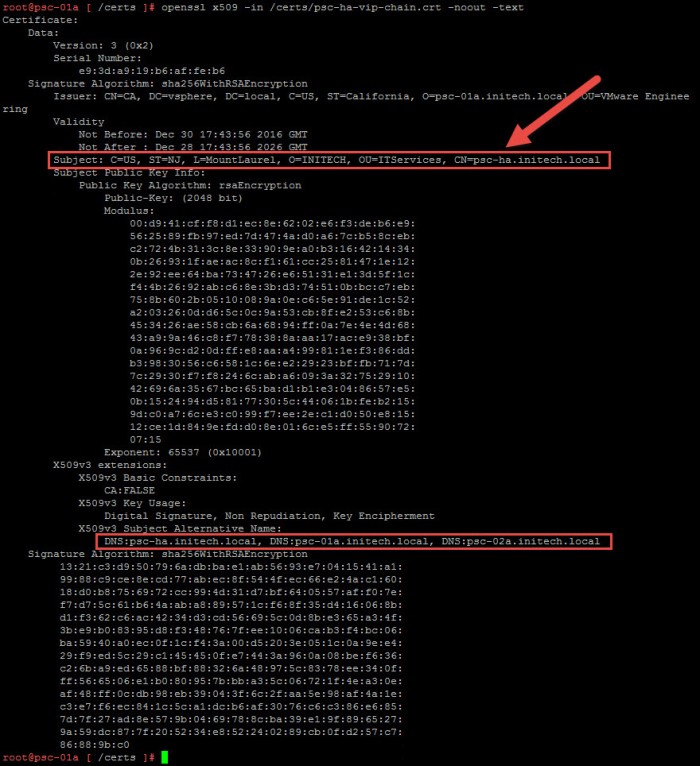
- Next we will verify our certificate to ensure the FQDNs are properly reflected in the certificate. The ‘Subject CN’ value should contain the FQDN of the load balancer that you plan to use. I will be using ‘psc-ha.initech.local’ as my load balanced FQDN. The DNS values should have the FQDN of all of the PSCs and the load balanced FQDN.
# openssl x509 -in /certs/psc-ha-vip-chain.crt -noout -text
- Next we are going to REPLACE the certificates on the two PSCs. First on the primary PSC and then on the secondary PSC. This is accomplished using the ‘Certificate-Manager’ utility on each PSC appliance. Execute the following command to launch the Certificate-Manager. Select Option 1, provide your SSO credentials when prompted and then select Option 2 to import the custom certificates.
# /usr/lib/vmware-vmca/bin/certificate-manager

Select Option 2 to Import the Custom Certificates - Provide the paths to the certificates when prompted. Press Y to proceed with the certificate replacement operation.
File : /certs/psc-ha-vip-chain.crt
File : /certs/psc-ha-vip.key
File : /certs/cachain.crt

- The certificate replacement procedure will take a little time and then complete.

- Assuming you have coped the three (3) certificates to your secondary PSC. You can now repeat Steps 9 through 12 above on the second PSC. In this case I will repeat these tasks on psc-02a.initech.local.
Certificate Verification using the PSC Web UI
Another method you can use to verify your new certificates on your PSC appliances is log into the SSO Management Web UI. I will access this UI on my new appliances using the following URLs:
https://psc-01a.initech.local/psc
https://psc-02a.initech.local/psc
Log into the Web UI using the SSO admin credentials that you specified during installation (Administrator@vsphere.local).

Once you are logged into each appliance. Under Certificates select the Certificate Store option. The store drop-down menu at the top should list MACHINE_SSL_CERT. Select the __MACHINE_CERT and then select Show Details.

The details of the certificate will appear. You will immediately notice at the top my certificate is for ‘psc-ha.initech.local’ which will be my load balanced FQDN for my PSC appliances. This FQDN resolves to 192.168.80.10 on my network and will be configured on my load balancer in the next phase. You will also see this listed in the Common Name section at the bottom. This should be consistent on both PSC appliances. Click OK to close the window.

Next Step – Load Balancer Deployment & Configuration
In Part 3 of this multi-series we will configure the network load balancer to provide PSC redundancy and high availability. This will include deployment of the NetScaler VPX Express virtual appliance and a few verification steps before deploying the vCenter Server appliance which will take place later in Step 4.
Once the load balancer is deployed and configured the psc-ha.initech.local address will resolve to 192.168.80.10 and respond to ping on my network.
Quick Links
vCenter 6.5 HA – Overview (Part 1)
vCenter 6.5 HA – Load Balancer Config (Part 3)

First off, fantastic article. However there is something that got me hung up that you may want to address. When creating the crt on the VMCA your command is missing an important piece to run successfully.
openssl x509
LikeLike
Some of my screenshots are hard to see. I actually have the ‘openssl x509’ in there.
LikeLike
Okay I see it now. In the screenshot yes, it’s there. Just not in the text box directly above it that spells out what you’re running.
Thanks
LikeLike
Hey John!
Did you run into any issues while generating the CSR file? Thanks!
LikeLike
The first few times that I executed the ‘openssl’ command-line to generate the CSR did give me some issues. It was a bit of a pain in the butt at first. The issue came down to the ‘config file’ for the CSR. If you look in my screen shot, I used ‘USA’ initially for Country and that was an incorrect country code. Have to use a valid two character country code. That resolved the issue I was initially having as well. Bottom line…review that CSR config file before running the openssl command.
LikeLike
Fantastic Article I would say.
Hi,
I am facing issue while generating CSR using OpenSSL req command. Below is the error:
error on line -1 of /certs/psc_ha_csr_cfg.cfg
140604006028952:error:02001002:system library:fopen:No such file or directory:bss_file.c:175:fopen(‘/certs/psc_ha_csr_cfg.cfg’,’rb’)
140604006028952:error:2006D080:BIO routines:BIO_new_file:no such file:bss_file.c:182:
140604006028952:error:0E078072:configuration file routines:DEF_LOAD:no such file:conf_def.c:201:
Any help on this would be much appreciated.
Thanks
LikeLike
It is saying ‘no such file’ because you have to manually create that file. I created my file and saved it to a manually created \CERTS directory on my PSC at the beginning of Step 3. If you look at the screenshot of my .cfg file you will see just above it where I mention this.
LikeLike
Just to be clear, the new certs are not signed by an internal or external CA. You are just generating the new certs so that both PSCs have the identical cert?
LikeLike
The CSR that I generated can be digitally signed by an internal CA server (i.e. Microsoft Certificate Services Server) or an external public CA. Once I have the newly signed certificate I replace the default certificate on both PSC’s with that new certificate. If you look at the CSR (.cfg file) you will see that I have the FQDN for both of my PSC’s and my VIP PSC FQDN as part of the request.
LikeLike
Correct. I’m self signing my cert request using OpenSSL. You could have the cert signed by an internal or external CA if you wanted to. For the purpose of my lab I used OpenSSL.
LikeLike
Hi sir,
I followed you to step 12 of part 3 and when I try to replace the certs, I bumped into a problem like this:
Get site nameCompleted [Replacing Machine SSL Cert…]
aces-firstsite
Lookup all services
Get service aces-firstsite:a4c998fb-66b8-450d-b6be-837934a44af7
Update service aces-firstsite:a4c998fb-66b8-450d-b6be-837934a44af7; spec: /tmp/s vcspec_zhvud_qs
Status : 0% Completed [Operation failed, performing automatic rollback]
Error while replacing Machine SSL Cert, please see /var/log/vmware/vmcad/certifi cate-manager.log for more information.
Performing rollback of Machine SSL Cert…
Get site nameus : 0% Completed [Rollback Machine SSL Cert…]
aces-firstsite
Lookup all services
Get service aces-firstsite:a4c998fb-66b8-450d-b6be-837934a44af7
Update service aces-firstsite:a4c998fb-66b8-450d-b6be-837934a44af7; spec: /tmp/svcspec_hf7s99lp
Error while reverting certificate for store : MACHINE_SSL_CERT
Rollback Status : 0% Completed [Rollback operation failed]
LikeLike
I have that problem as well
LikeLike