I am really excited about VSAN 6.5 and what it brings to the table and like some of you out there we all want to get our hands on it. So I decided to build a VSAN 6.5 cluster running on nested ESXi. Nested ESXi is not supported by VMware so make sure you are only using this for testing or educational purposes.
So what’s new in VSAN 6.5? One of the features I am looking forward to is its ability to function as an iSCSI Target! I can literally serve up storage to physical workloads not running in vSphere thus reducing my dependency on an expensive legacy storage array. All of the same VSAN functionality including dedupe, compression, erasure coding and so on are used by the iSCSI Target service and you can secure this data using CHAP and Mutual CHAP authentication. So your non-virtualized physical servers in the data center can take advantage of the same VSAN performance and availability benefits. Pretty awesome if you ask me!
DevOps is exploding all over place. Container based technology is everywhere and rightfully so in this era of mobility. VSAN is a fantastic storage option that enable developers to create next-gen cloud apps and provide them with all the performance and availability to accomplish just about anything.
vSphere Integrated Containers is perfect for developers who use Docker. These Docker containers can be deployed in the same vSphere cluster as your traditional VM workloads. vSphere Admins can manage them directly in the vSphere Web Client GUI. The Docker Volume Driver for vSphere allows Docker container volumes to use VSAN storage technology as well as VMFS and NFS.
The All-Flash version of VSAN allows customers to take advantage of features such as erasure coding, dedupe and compression which are not available in the hybrid deployment of VSAN. The cost of SSD continues to drop quickly allowing customers to take advantage of these solutions and features immediately! All-Flash VSAN requires the VSAN Advanced or Enterprise Licenses. So keep that in mind.
Okay….onto the All-Flash VSAN 6.5 cluster running my lab on Nested ESXi hosts!
Nested ESXi 6.5
So the first thing we want to do here is deploy the ESXi 6.5 hosts. At a minimum you need 3 hosts to stand up and enable a VSAN cluster but I am deploying 4 hosts so I can take advantage of dedupe, compression and erasure coding. You cannot enable these features on a 3 node cluster. Lastly, each host must have at least 6GB of memory. I have some additional CPU and memory resources so I’m going to add a little more than the minimum to my hosts.
Here is a summary of the virtual hardware for my nested ESXi hosts that I will use to create my All-Flash VSAN cluster.
- Processors: 4 vCPU
- Memory: 10 GB
- Local Hard Disks:
- 15 GB for ESXi
- 5 GB SSD for Cache Tier
- 25 GB SSD for Capacity Tier (x2)
- Network Adapter: VMXNET3 (x2)
I also have separate TCP/IP segments for management, vMotion, virtual machines and of course VSAN. Nothing super complex for this nested environment. You can create routing for these networks using a Windows Server or a virtual router appliance if you wish. I didn’t feel like deploying a bunch of VMs so the control station I’m using is also serving as a DNS server and router for these networks.
- Management: 192.168.80.0 /24
- vMotion: 192.168.81.0 /24
- VSAN: 192.168.82.0 /24
- VM Traffic: 192.168.83.0 /24
ESXi 6.5 is installed and ready to go! Console into the first ESXi host either by direct console or SSH and we will start things off with preparing the disks for VSAN storage. First command we are going to run on the ESXi host is:
vdq -q

The local disks that I am interested in are the ones with the ‘State’ Eligible for use by VSAN. The single disk above that is not eligible for VSAN is the local disk containing the ESXi installation. We are not touching that one. It provides a reason for the disk being ineligible as it states “Has partitions”.
Next thing we want to do is make note of the information next to ‘Name’ as this is the disk identifier that is going to come in handy very shortly here.
mpx.vmhba1:C0:T1:L0
mpx.vmhba1:C1:T2:L0
mpx.vmhba1:C1:T3:L0
Now we need to decide which of these disks above we want to use for the ‘Capacity Tier’ (specifically drive size) and ensure they are identified (tagged) as an SSD disk by the host. Everything should be SSD but I don’t like to assume anything. Execute the following command:
esxcli storage core device list | grep -iE '( Display Name: | Size: | Is SSD: )'
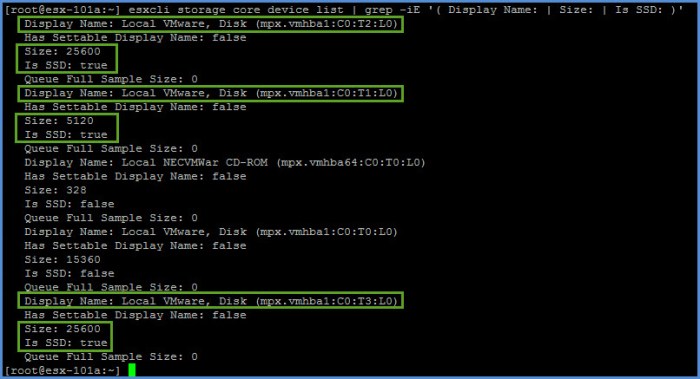
The three (3) device identifiers that we summarized above are identified in the output of the command we just executed. All three are local SSD drives; two of the three are of a different size (25600 MB = 25 GB). The larger SSD drives will be used for my capacity tier. The two local disks below are the ones I want to mark for capacity:
mpx.vmhba1:C0:T2:L0
mpx.vmhba1:C0:T3:L0
Next I am going to utilize the ‘esxcli vsan’ command on each host to tag each of these disks and enable them for capacity flash. (Two per host)
esxcli vsan storage tag add -d mpx.vmhba1:C0:T2:L0 -t capacityFlash
esxcli vsan storage tag add -d mpx.vmhba1:C0:T3:L0 -t capacityFlash
NOTE: There are two other command-line options available to enable the ‘capacity flash’ option on the disks. 1) You can create a ‘claim rule’ on your host or…2) use the RVC console to apply the tag.
Next we are going to repeat a command that we used earlier to verify that these two disks are now properly tagged and ready to serve as the Capacity Tier in my All-Flash VSAN configuration.
vdq -q

The “IsCapacityFlash” for the two disks are now marked with a “1”; they will now serve as my capacity tier on my VSAN host. Repeat these steps above on each of the remaining VSAN hosts; again, I have four (4) hosts in my cluster so I am repeating this procedure 3 more times.
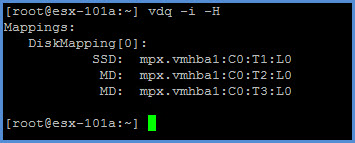
Here are a couple more useful commands that you can use to verify your disks. First we will view the SSD to capacity disk relationship on a particular host. NOTE: This specific command works only if VSAN has been configured on the cluster.
vdq -i -H
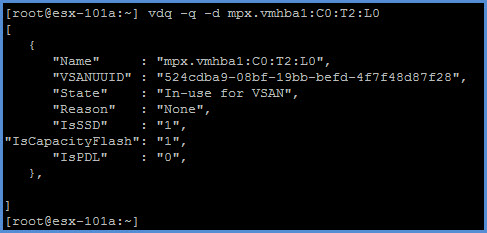
The next command is used to gather specific information about a particular disk. For example, lets have a more in-depth look using a device identifier (a single disk). Here I can view information such as the VSAN UUID, the state of the disk, SSD, Capacity Flash and PDL state. You can use this command during your VSAN configuration as well as during troubleshooting procedures.
vdq -q -d mpx.vmhba1:C0:T2:L0
My All-Flash VSAN Cluster
The next thing I am going to do is configure my VSAN Cluster from the vSphere Web Client. I have the vCenter Server 6.5 appliance installed and ready to go on another host in my infrastructure. I created a brand new vSphere HA/DRS cluster with my four ESXi hosts, created a vDS with distributed port groups for Management, vMotion, VSAN as well as VM-Data for my VM traffic. I have a total of three (3) VMkernel adapters per host (management, vMotion and VSAN).
vSphere HA and DRS are not enabled on my cluster when I enable VSAN. I will turn those two features on later. Also make sure you have your All-Flash VSAN license ready to go!
Just before enabling VSAN I verify my disks on each of my ESXi hosts.
ESXi Host > Configure > Storage > Storage Devices

Next thing I am going to do here is enable VSAN. Select your cluster the select Configure > Virtual SAN > General from the Web Client. Click the Configure button in the upper right-hand corner.
I want to utilize ‘Deduplication and Compression’ on my VSAN cluster so the only Disk Claiming option available will be the Manual option. It will automatically become greyed out once you choose Enable. I’m not going to configure Fault Domains or Stretched Cluster at this time so I’m leaving that option alone. Click Next.
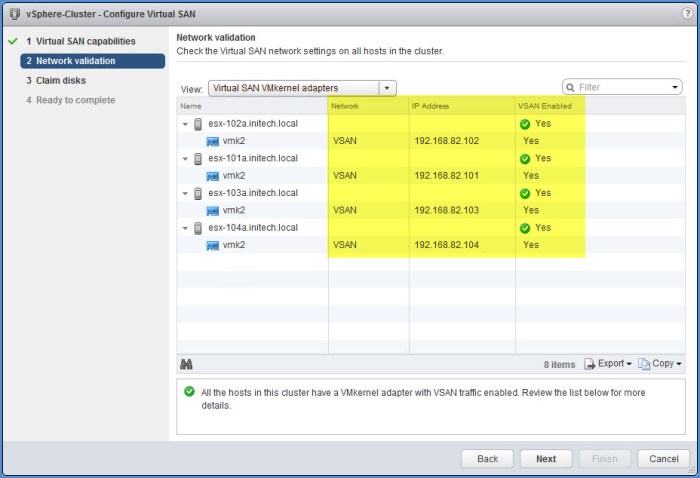
On the Network Validation portion of the wizard, verify that your VSAN vmkernel adapters are ready to go. They should ALL be on the same network segment with VSAN enabled as seen below. Click Next.
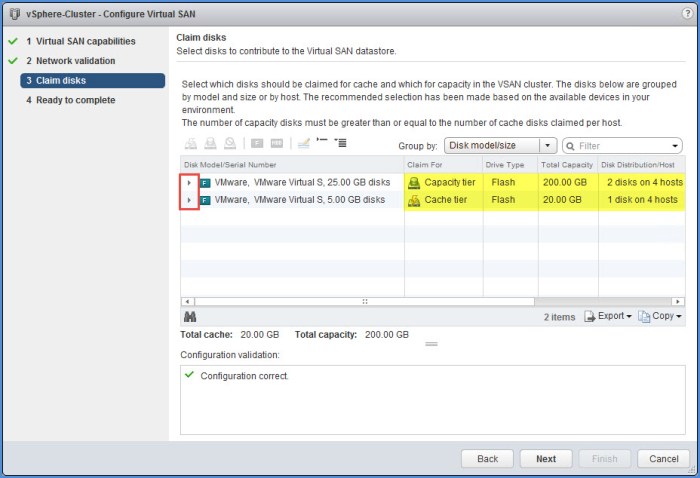
On the Claim Disks page of the wizard I will see all my disks; both my capacity tier and cache tier. Expand each tier and review the disks. Once you verified everything is ready to go click Next. One thing you will notice is the ‘Total Capacity’ for my Capacity Tier and Cache tier in the screenshot below. I have four (4) ESXi hosts; each host has a single 5GB SSD cache disk and two 25GB SSD capacity disks. Everything below adds up! 20GB of cache and 200GB of capacity.
Review everything for Ready to complete and click Finish.

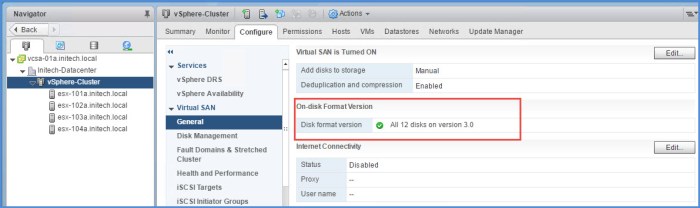
You will see several tasks kicked off below in the ‘Recent Tasks’ menu for each ESXi host in your VSAN-enabled cluster. It may take some time to complete. On Disk Format Version 3.0 will be used on all of the disks claimed by VSAN from the hosts. This number should be exactly the number of disks in your VSAN (cache + capacity). I have one (1) cache disk and two (2) capacity disks per host; four (4) hosts total so I have a total of twelve (12) disks in my All-Flash VSAN cluster.
The Health Service will be enabled by default. Due to my VSAN running on nested ESXi hosts I will get many alarms (~8 triggered alarms). I’ve made the decision to ‘disable’ the Health Service in my lab so I do not get bombarded with alerts. In a production environment using actual hardware…I would not do this. I would leave the Health Service enabled at all times.
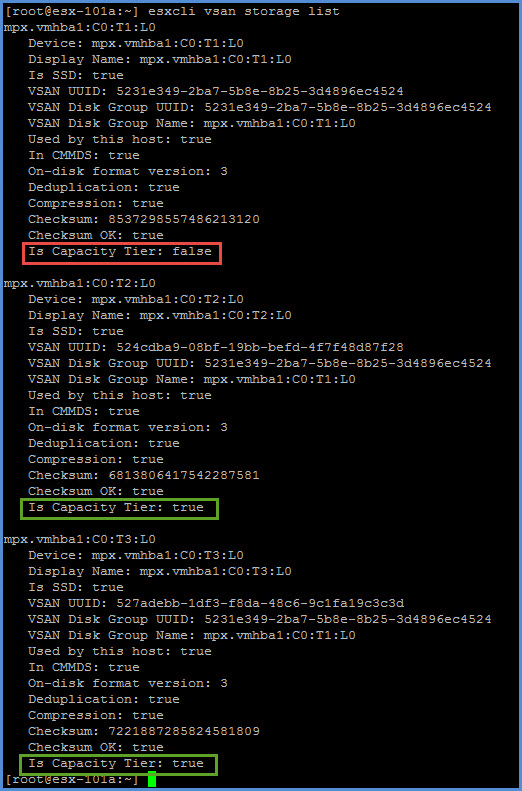
Execute a command from your ESXi hosts in the new VSAN cluster. Here in the output we can view whether or not the disk is in the Capacity Tier in addition to viewing the VSAN UUID, On-disk format version and determine if features such a dedupe or compression are enabled.
esxcli vsan storage list
Final step…assign your VSAN license to your cluster simply from the Licensing console in the Web Client and assign your VSAN license to your cluster. Last step…DEPLOY VMs!
Useful Links for VMware VSAN 6.5
Here are some links if you wish to find more information on Virtual SAN 6.5. One of my favorite bloggers William Lam (VirtuallyGhetto) has a blog post on a very similar procedure for VSAN 6.0 on nested ESXi below. Be sure to check his out too!
Virtual SAN 6.5 Administration Guide (PDF)
Virtual SAN 6.5 Licensing Guide (PDF)
Virtual SAN 6.2 Design & Sizing Guide (PDF)
What’s New for VSAN 6.5 (VMware)

Good post again.
Any special reason why you use 2×25 GB capacity disks on each host instead of 1x 50GB? on each host?
LikeLike
Nope. No special rhyme or reason, just demonstrating that more than one disk can be provisioned for capacity. In my opinion, a good exercise for someone learning vSAN in a nested environment would be multiple vSAN disk groups, each with a flash device and multiple capacity devices.
LikeLiked by 1 person
Ok I understand. Thank you for quick answer.
LikeLike