VMware NSX has been a driving force for many customers on their network transformation journey over the past few years. Enabling our customers to use a more programmatic approach to the network has put them in a position to no only respond to demand quickly but operate these software-based networks more efficiently. The evolution of NSX-T has been gradual and with this “milestone release” you will see the true power behind it’s innovation. Everyone that can and will consume these resources (DevOps teams, developers, IT administrators) can continue to evolve and meet the needs to support multi-hypervisor data centers, bare-metal workloads, CNA, public clouds and most importantly multiple clouds.
What I am going to cover in this blog article is the Day 0 Installation procedures, more specifically involving NSX Manager. Part 2 of this blog article will cover the procedures for setting up the NSX Edge, Transport Zones and the Host Transport Nodes. The recommended order of procedures for installation can be found on Page 11 of the NSX-T Data Center Installation Guide for NSX-T Data Center 2.4. I do not have KVM setup in my lab so I will be skipping those steps (for now).
This blog will cover…
- Review of the NSX Manager Installation Requirements
- Review the necessary ports and protocols.
- Installation of NSX Manager.
- Log into the NSX Manager deployment and deploy the additional NSX Manager nodes to form our cluster.
This is a rather easy blog and procedure to follow. It’ll get more complicated in Part 2 when we deploy/configure other NSX-T components.
NSX Manager Installation Requirements
The NSX Manager is a virtual appliance (OVA) that I am going to deploy into my vSphere 6.7 lab environment; specific version is NSX 2.4.1 – Build 13716579. The system requirements for this VM depends on the size that you wish to deploy. Disk space and hardware version is the same across each size and that is 200GB of disk space (3.8 GB disk space if thin provisioned) and hardware version 10 or later.
- Extra Small VM – 2 vCPU, 8 GB memory
- Small VM – 4 vCPU, 16 GB memory
- Medium VM – 6 vCPU, 24 GB memory
- Large VM – 12 vCPU, 48 GB memory
One thing to be aware of is the Extra Small VM only applies if you are deploying the Cloud Service Manager. The NSX Small VM is to be used for POC or lab deployments and not for production. If you have less than 64 hypervisors for NSX-T then deploy the Medium sized VM; if you have more than 64 hypervisors for your target deployment then deploy the Large VM.
The VM Tools are installed with the appliance and should not be removed or upgraded. Make sure the password requirements for the root, admin and audit accounts meet the complexity requirements. If you do not meet the requirements you will need to change the password after deployment before proceeding (reference page 26-27 for more info).
NSX Manager Network Requirements
- Static IP Address (cannot be changed after installation)
- Max latency between NSX Managers in the NSX Manager Cluster is 10ms.
- Max latency between NSX Managers and the transport nodes is 150ms.
- Hostname that does not have any invalid characters or underscore.
- Verify the forward and reverse lookup in DNS. If by any chance you deploy the appliance with an invalid character the appliance will default to ‘nsx-manager’ for the hostname.
- The NSX Managers can also be accessed via static IP. If you wish to configure the appliance for access via DNS you can read the additional details summarized on page 27-28 of the documentation.
- Decide ahead of time which VM network port group the appliance will connect to. I recommend deploying the appliance on the same network segment where vCenter Server resides. If for some reason you have multiple management networks make sure they are accessible (static routes can be added to the NSX manager appliance if needed). Plan ahead your IPv4 or IPv6 address scheme.
- TCP and UDP ports table used by NSX Manager can be found on pages 21-22 but I recommend being aware of all the ports required for the NSX Edges, ESXi, KVM and/or bare metal servers for planning because at some point you will be deploying these other components so its best to start working with your network team now and get ahead of it.
NSX Manager Storage Requirements
- Deploy the appliance on highly available shared storage to avoid any possible storage outage. A storage outage would result in the NSX Manager file systems to be placed into read-only mode. So make sure the storage technology that backs your environment is designed to be highly available. Consult your storage vendor prior to deployment if necessary.
- 200 GB of disk capacity (thick provisioned); max disk latency access should be under 10ms.
That is a quick summary of the requirements. Make sure you review everything in the documentation from page 14 -31. Don’t skip past anything and assume it doesn’t apply to you.
NSX Manager Installation Procedure
Let’s begin the step-by-step installation procedure for NSX Manager from the vSphere Client.
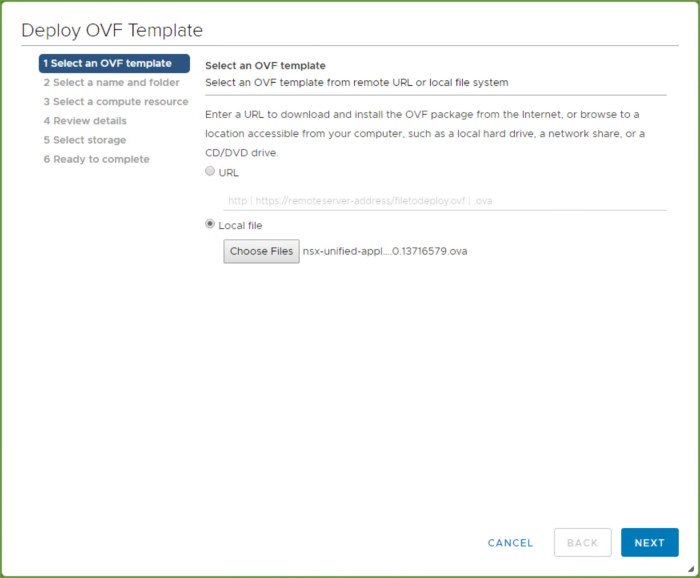
- Initiate the ‘Deploy OVF’ wizard from the vSphere Client. Select the downloaded NSX-T ‘unified appliance’ OVA file and click Next.
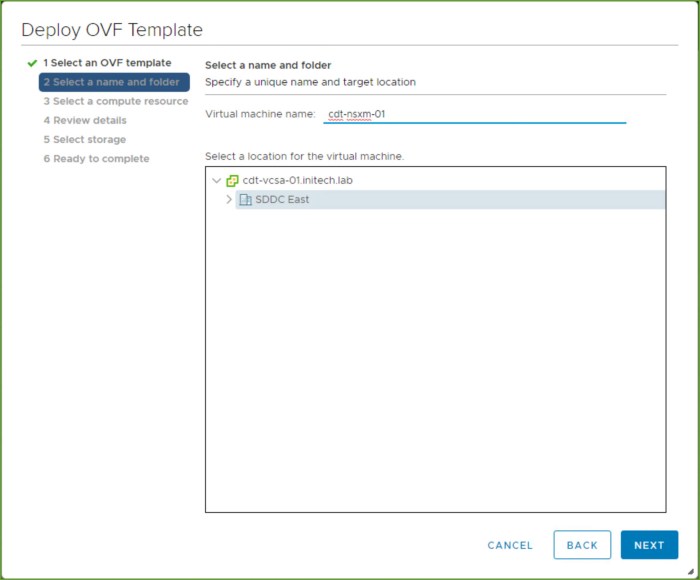
- Enter the name of the appliance as you want it to appear in the VM inventory and click Next.
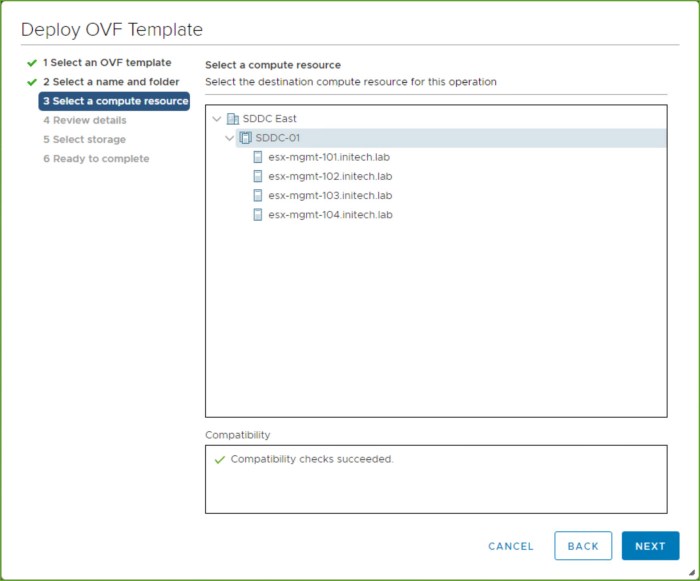
- Select the target compute resource, vSphere cluster if DRS is enabled or specific ESXi host, and click Next.
- Review the details of the appliance and click Next.

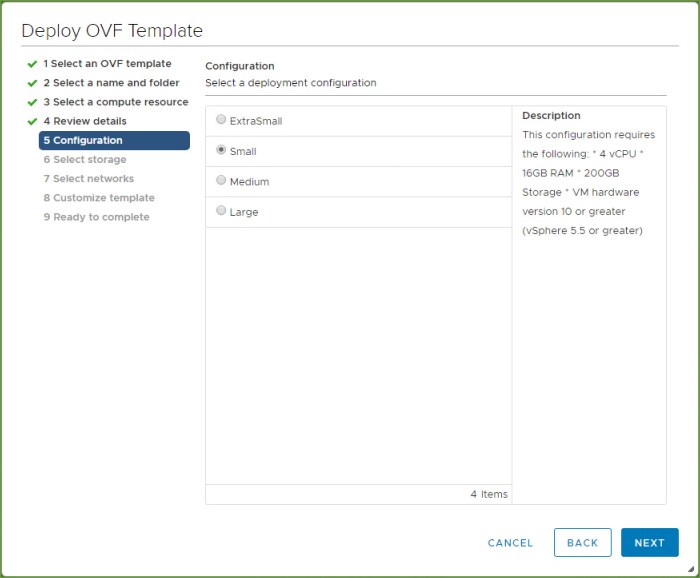
- Select the Configuration size and click Next (Notice if you select ‘ExtraSmall’ it states under Description that it is only supported for the ‘nsx-cloud-service-manger’ role).
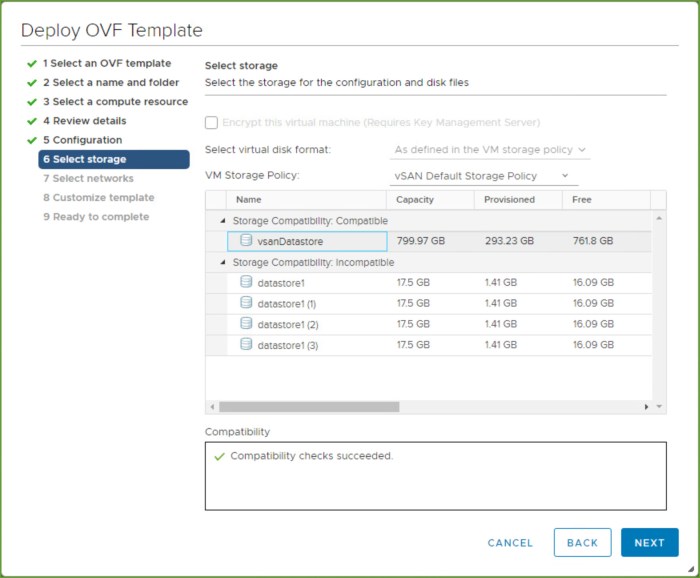
- Select the target datastore for the appliance and click Next.
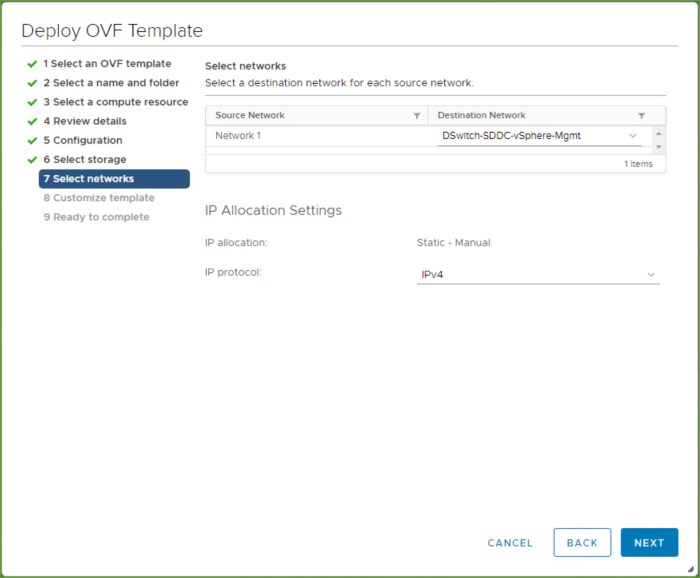
- Select the virtual network (port group) and then choose the protocol and click Next.
- Scroll through the various settings for customizing the template. This is where you will enter the complex passwords that meet the password requirements, hostname, role, static IP information, DNS, NTP, SSH and on. Do not enter anythin g in the ‘internal properties’ section. Click Next.
Review the settings in the ‘Ready to complete’ section and click Finish. Wait for the appliance to deploy into your vSphere VM inventory and power on.

- Once the NSX Manager appliance boots, you can either open the VMRC console or SSH (Putty) to the appliance to run a few commands. I like Putty because I can scroll through the extended output that is generated much easier than the console. Execute the command ‘get services’.

- After reviewing the output from the ‘get services’ command you will then start a few services and set the SNMP community. Start the following services as you see in the screenshot below. This part is also covered in Step 20 on page 34 of the Installation Guide.

- Next from a supported browser connect to the newly deployed NSX Manager and log in with the ‘admin’ account.

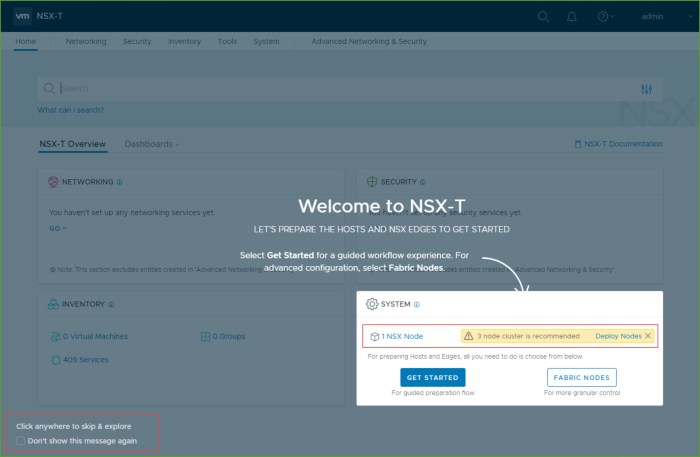
- Upon login accept the EULA and choose whether or not to join CEIP.The ‘Weclome to NSX-T’ screen appears and you immediately see the system warning you that one (1) NSX node is deployed and you should have at least three (3) for redundancy and high availability purposes. If you are in a lab with limited resources and just want to ‘kick the tires’ on NSX-T you can proceed with one node for now. Click anywhere to skip & explore.
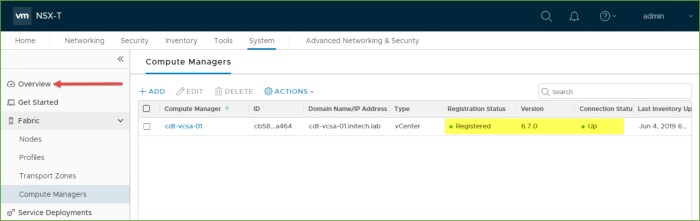
- Next I am going to add a ‘Compute Manager’, in this case my vCenter Server. Navigate by clicking ‘System -> expand Fabric -> Compute Managers’ and then click Add.

- Enter the information for your vCenter Server and click Add. The SHA-256 thumbprint will automatically be detected, click Add when the warning appears.Wait for the vCenter Server to be added and once it is complete you will see a Registration Status of ‘Registered’ along with the version and connection state. Next click on Overview.
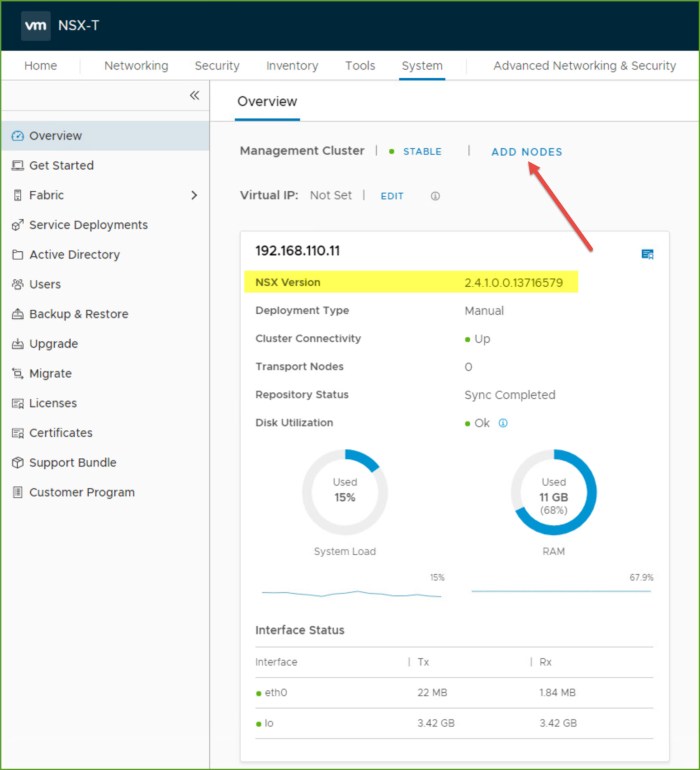
- Here is where we are going to expand our NSX Manager cluster to 3-nodes. Select Add Nodes. (Notice from here you can see the NSX version deployed.)
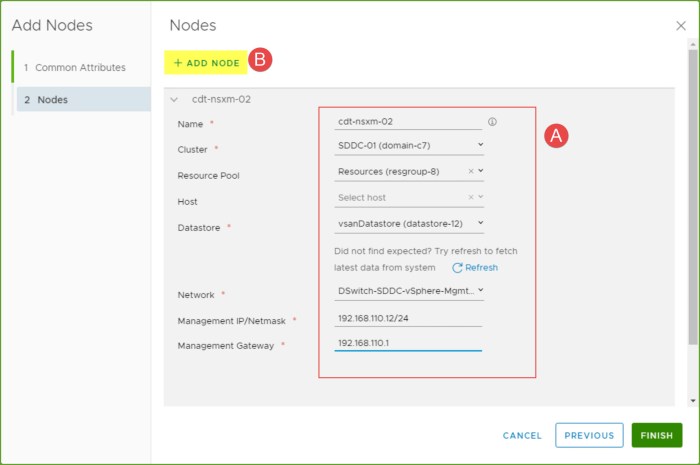
- In the ‘Add Nodes’ window select the compute manager, enable SSH (or root access), your node credentials, DNS and NTP info and the form factors. I select ‘Small’ and click Next.First I provide the following information for my 2nd NSX Manager node (A) including the name, the cluster, datastore, network and the static IP information. Everything with a red asterisk is required. Once I’m finished providing the info for Node #2 I select ‘Add Node’ again (B) because I want to simultaneously provision my other two nodes right from here versus having to go through the wizard another time.
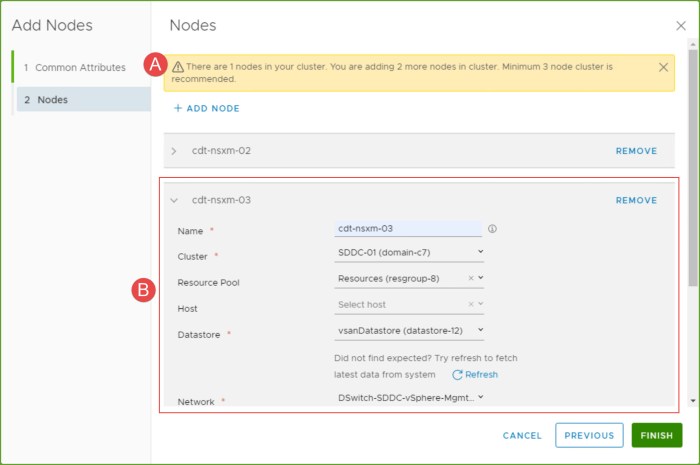
- Notice the warning at the top of the window regarding the number of recommended nodes (A). I then provide the information for my 3rd node (B) and click Finish.
- The two additional NSX Manager nodes will begin to deploy.
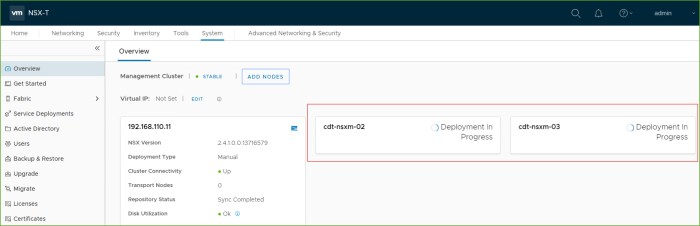
- Monitor the deployment of the nodes from the Management Cluster view. When a node is complete and online it will state that it is UP and the Repository Status as ‘Sync Completed’ or ‘Sync in Progress’ as you see with 2nd and 3rd nodes below.

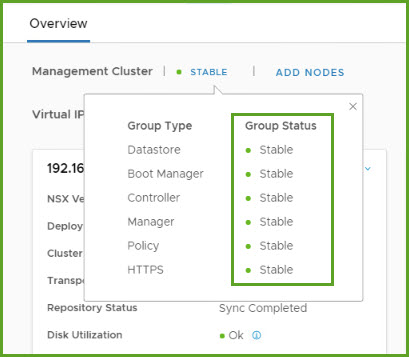
- You can see additional group status information by selecting ‘Degraded’ at the top and you will see which elements of the cluster are Up, Stable, Degraded or Down.

- Once everything is online and stable you should see the Management Cluster as STABLE. Repeat Steps 10 and 11 above on the two new nodes (connect via SSH and start services).
- Next I am going to set the Virtual IP (VIP) for my management cluster. Select EDIT and the ‘Change Virtual IP’ window will appear. Enter the VIP address and click Save. You can now connect to NSX Manager using the Cluster VIP address. I also have a DNS host record created for this VIP; you can connect to it from your browser using the IP or the FQDN, whichever you choose.
That’s all there is to it for deploying NSX Manager in Part 1 of my NSX-T 2.4 Installation blog series. In Part 2 we will cover the NSX Edge installation requirements, the NSX Edge installation procedure, creation of the NSX Edg Cluster, Transport Zones and lastly creation of the host transport nodes. Just as everything is outlined for the NSX-T Data Center Workflow for vSphere on page 11 of the installation guide.
I wanted to separate the NSX Edge and other components from the NSX Manager because it is much different than what you may have done in the past when deploying NSX-V. The logic is similar but there are a lot of differences. The NSX Edge in NSX-T is much different than the NSX Edge Services Gateway (ESG) that you may have worked with previously in NSX-V. We will get into more details on this later.
Aside from the NSX-T 2.4 Installation Guide (PDF) link at the beginning of this blog you should also review the following information.
- VMware NSX-T Reference Design Guide 2.0 (Released January 2018) – 117 page PDF document that you should read in its entirety multiple times.
- VMware NSX-T Data Center 2.4 Release Notes – rule of thumb for any admin regardless of what you are working on would be to read the release notes to not only understand what is new in the release but to understand compatibility, look at revision history, understand the Resolved and Known Issues and so on. Always very important!
- NSX-T Data Center Installation Guide (online version) – everything in the PDF can also be found online here.
- If you are looking to deploy NSX-T across multiple sites (2 or more) then you should start with the NSX Manager Cluster Requirements for Single, Dual and Multiple Sites web page. Quick Spoiler Alert…
- Dual Site deployment would require a stretched vSphere cluster (management cluster) and properly configured anti-affinity rules. You design this so the three (3) NSX Manager nodes all reside in Site-A and failover to Site-B upon site failure only; recovered by vSphere HA.
- In a 3 or more site deployment there would be one vSphere Management cluster per site with one NSX Manager per site. With a single site failure the two remaining NSX Manager continue operating in a degraded state. The recommendation here would be to manually deploy a 3rd node to replace the lost cluster member.
- A two-site failure would be a loss of quorum and have an impact to all NSX-T operations.

4 thoughts on “Installing NSX-T 2.4 (Part 1) – NSX Manager”